Small Playroom Ideas That Maximize Space
This post contains affiliate links. As an Amazon Associate I earn from qualifying purchases.
You don’t need a spare bedroom to give your kids a place to play. A hallway nook, a living-room corner or even a doorless closet will do the job. Here are three setups, drawn to scale, that you can copy piece by piece.
In this article (8 sections)
How These Small Playroom Setups Go Up (3 Steps)
Every setup goes up in the same order: big floor pieces, then hooks, then the pretty stuff.
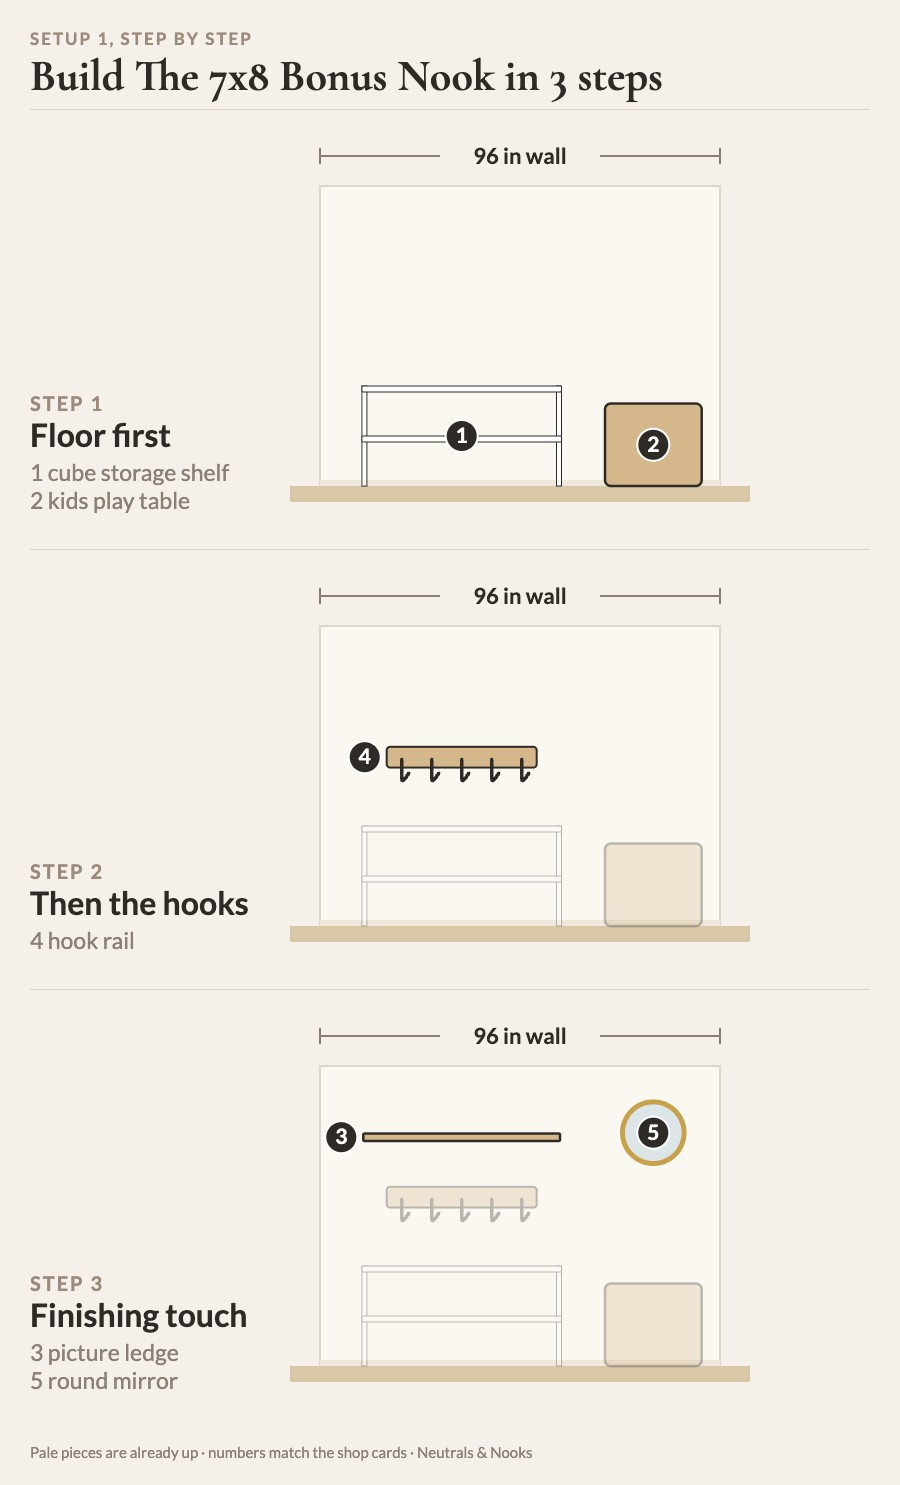
- Floor first: the cube shelf (1) and the play table (2).
- Then the hooks: the hook rail (4).
- Finishing touch: the picture ledge (3) and the round mirror (5).
Setup 1: The 7×8 Bonus Nook
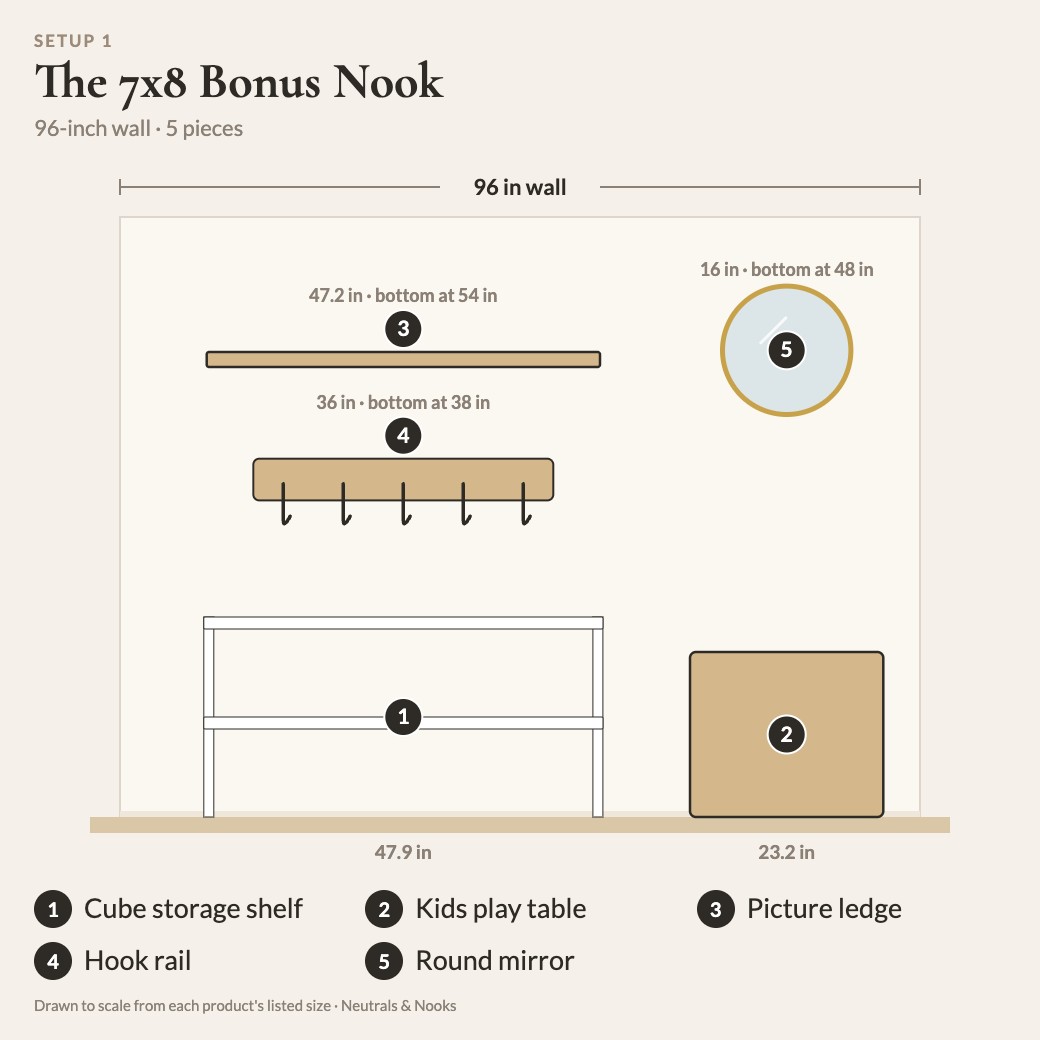
Best for: a spare 7×8 foot nook off a hallway or bedroom, with one full 8-foot (96-inch) wall and one or two kids (about ages 3-8) who need both storage and a table.
Shop this setup

1. Cube storage shelf
Best Choice Products 8-cube organizer
47.9" W x 11.5" D x 24" H · White
View on Amazon
2. Kids play table
Delta Children MySize kids table
23.5" W x 23.5" D x 19.6" H · Bianca White/Natural
View on Amazon

5. Round mirror
Oruii round gold mirror
16" W x 16" H · Gold
Sold out right now. Any piece in the size above works.
First: Set the 48-inch-wide cube shelf (1) on the floor and anchor it to the wall. Then place the 23-inch-wide play table (2) beside it. That leaves a 10-inch gap between them for a stool or a toy bin.
Then: Mount the 36-inch hook rail (4) with its bottom edge 38 inches up, so backpacks and dress-up capes hang at kid height.
Finally: Hang the 47-inch picture ledge (3) with its bottom edge at 54 inches, over the cube shelf and hook rail.
Then hang the 16-inch round mirror (5) with its bottom edge at 48 inches, above the table. The mirror starts well past the ledge’s end, so the two never overlap.
Discover how to transform small spaces like a hallway nook or living-room corner into functional playrooms. You'll find three detailed, scale-drawn setups with specific product recommendations and step-by-step assembly guides to maximize your space.
- Transform small areas like nooks or closets into functional playrooms.
- Choose from three detailed, scale-drawn playroom setups for different spaces.
- Follow step-by-step instructions to assemble each setup efficiently.
- Utilize specific product recommendations to easily replicate designs.
- Maximize storage and play potential with smart furniture arrangements.
Setup 2: The Living-Room Corner
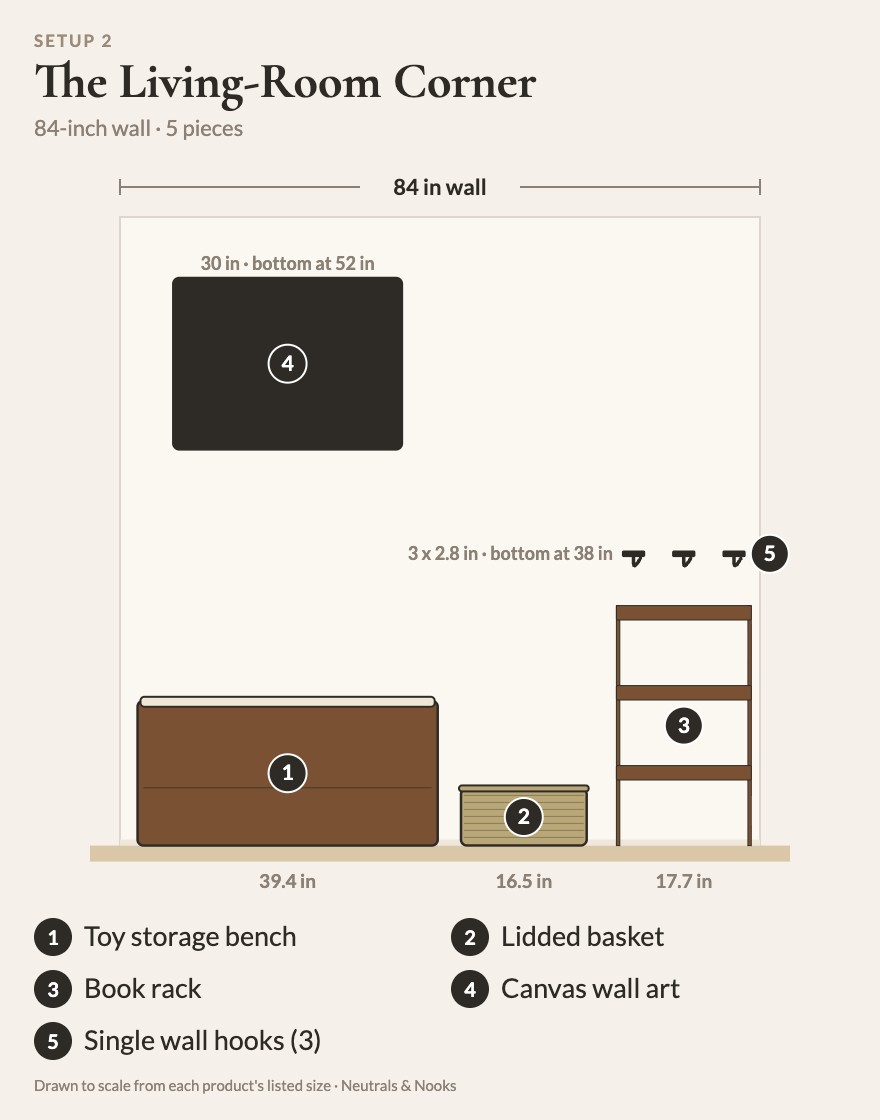
Best for: a family with kids about ages 3-8 whose play space lives along an 84-inch stretch of living-room wall and has to tidy away fast, with a seat plus storage for toys and books.
Shop this setup


2. Lidded basket
StorageWorks seagrass lidded basket
16.5" W x 13" D x 7.5" H · Brown(Seagrass)
View on Amazon

4. Canvas wall art
Cuspin framed abstract canvas set
30" W x 20" D x 0.2" H · Stone-Inspired Abstract
View on Amazon
5. Single wall hooks · use 3
Vanloory black round wall hooks
2.8" W x 0.6" D x 0.6" H · Black
View on AmazonFirst: Line up the 39-inch-wide toy storage bench (1), the lidded basket (2) beside it, and the 31-inch-tall book rack (3) next to the basket.
Then anchor the rack with its anti-tip kit.
Then: Add the three single wall hooks (5) with their bottom edge at 38 inches, above the book rack. Choose rounded tips, and teach kids that the anchored rack is for books, not climbing.
Finally: Hang the 30-inch canvas wall art (4) with its bottom edge 52 inches up, so the corner reads as decor first and play zone second.
Setup 3: The Closet Playroom
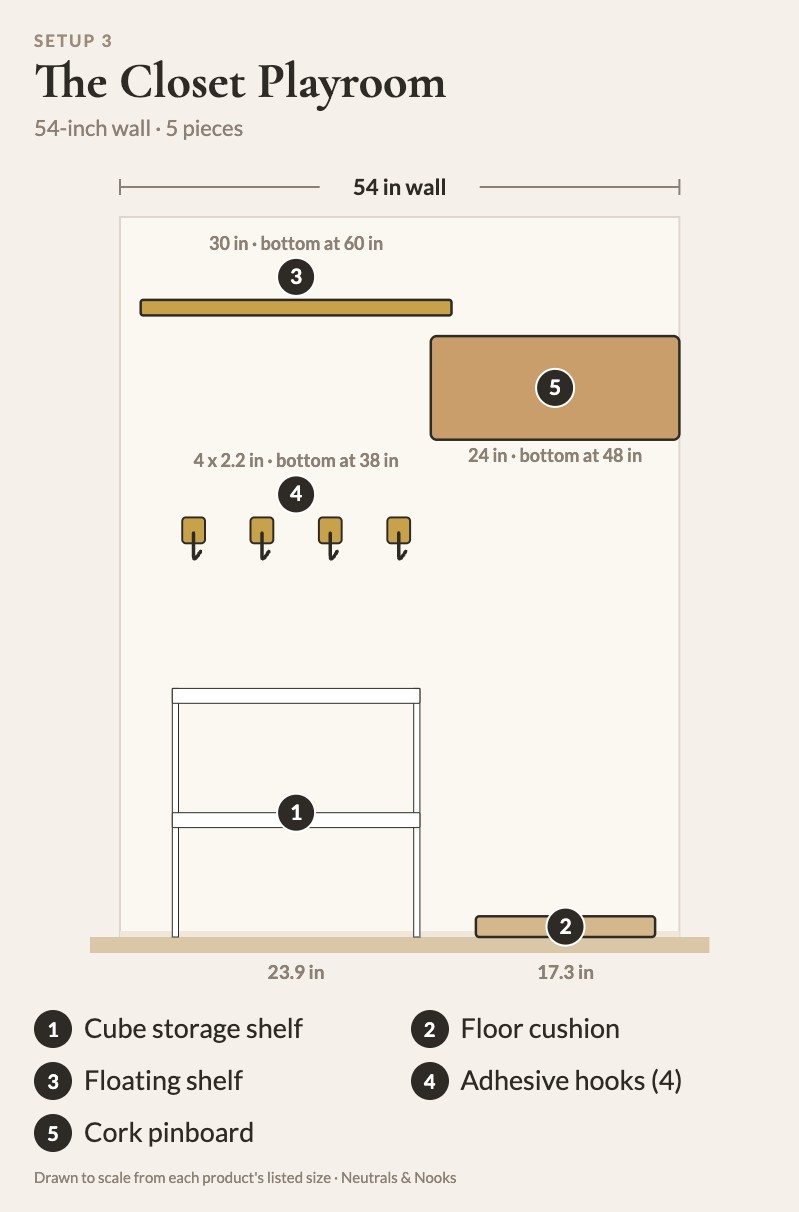
Best for: a renting family turning a doorless 4.5-foot (54-inch) closet into a tidy nook for one or two kids (about ages 3-8), with no big furniture.
Shop this setup


4. Adhesive hooks · use 4
DELITON brushed gold adhesive hooks
2.2" W x 1.4" D x 2.5" H · Brushed Gold-4
View on Amazon
First: Place the 24-inch cube shelf (1) on the floor and anchor it with its anti-tip kit. Drop the 17-inch floor cushion (2) beside it for a reading spot.
Then: Stick the four adhesive hooks (4) on with their bottom edge at 38 inches. Check the hook’s weight rating, clean the wall first, hang only light items, and replace any hook that starts to peel.
Finally: Mount the 30-inch floating shelf (3) with its bottom edge at 60 inches, flush with the left end of the closet. It ends at 30 inches.
Then hang the 24-inch cork pinboard (5) at 48 inches, above the cushion. It starts exactly where the shelf ends, so they sit side by side rather than stacked.
If you’re also deciding what actually earns a spot on those shelves, How Many Toys Should Be Out at Once? A Rotation Guide covers it. And if one corner needs to do double duty as a quiet spot, How to Create a Calm-Down Corner at Home pairs well with the closet setup.
Before You Buy: Measure in 5 Minutes
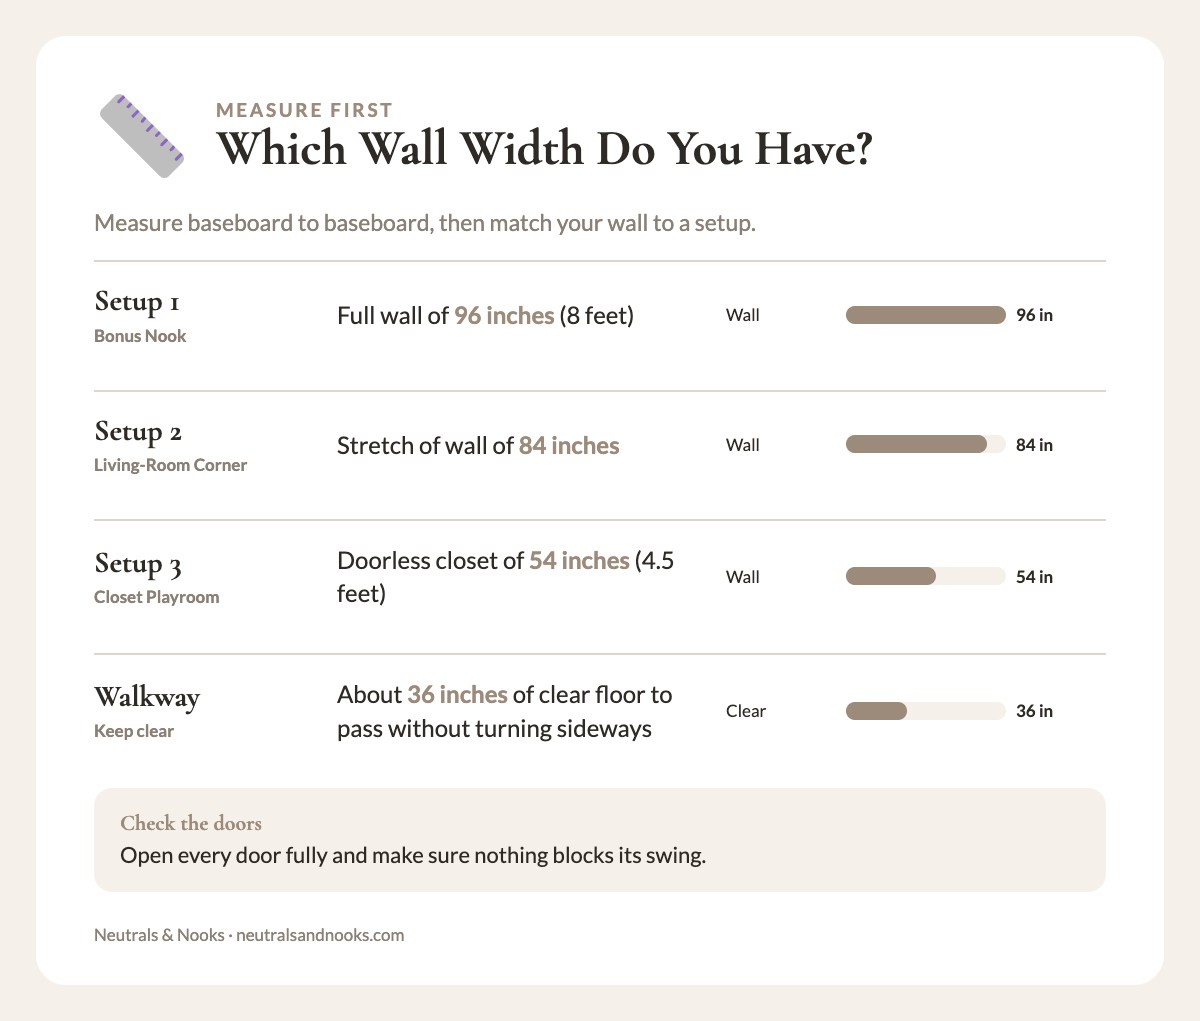
- Wall width: measure the full wall, baseboard to baseboard, and compare it to 96, 84 or 54 inches.
- Door swing: open every door fully and make sure nothing blocks it.
- Walkway: keep about 36 inches of clear floor so you can pass without turning sideways.
- Outlets and switches: note where they are so no shelf, rail or board covers one.
- Wall type: check what you’re drilling into, and whether drilling is allowed at all (renters, look at the adhesive options).
Install Heights at a Glance
All floor pieces sit on the floor. Heights below are to the bottom edge of each wall piece.
| Setup | Piece | Height |
|---|---|---|
| 1: Bonus Nook | Hook rail (4) | 38 in |
| 1: Bonus Nook | Round mirror (5) | 48 in |
| 1: Bonus Nook | Picture ledge (3) | 54 in |
| 2: Living-Room Corner | Wall hooks (5) | 38 in |
| 2: Living-Room Corner | Canvas wall art (4) | 52 in |
| 3: Closet Playroom | Adhesive hooks (4) | 38 in |
| 3: Closet Playroom | Cork pinboard (5) | 48 in |
| 3: Closet Playroom | Floating shelf (3) | 60 in |
Safety With Little Kids
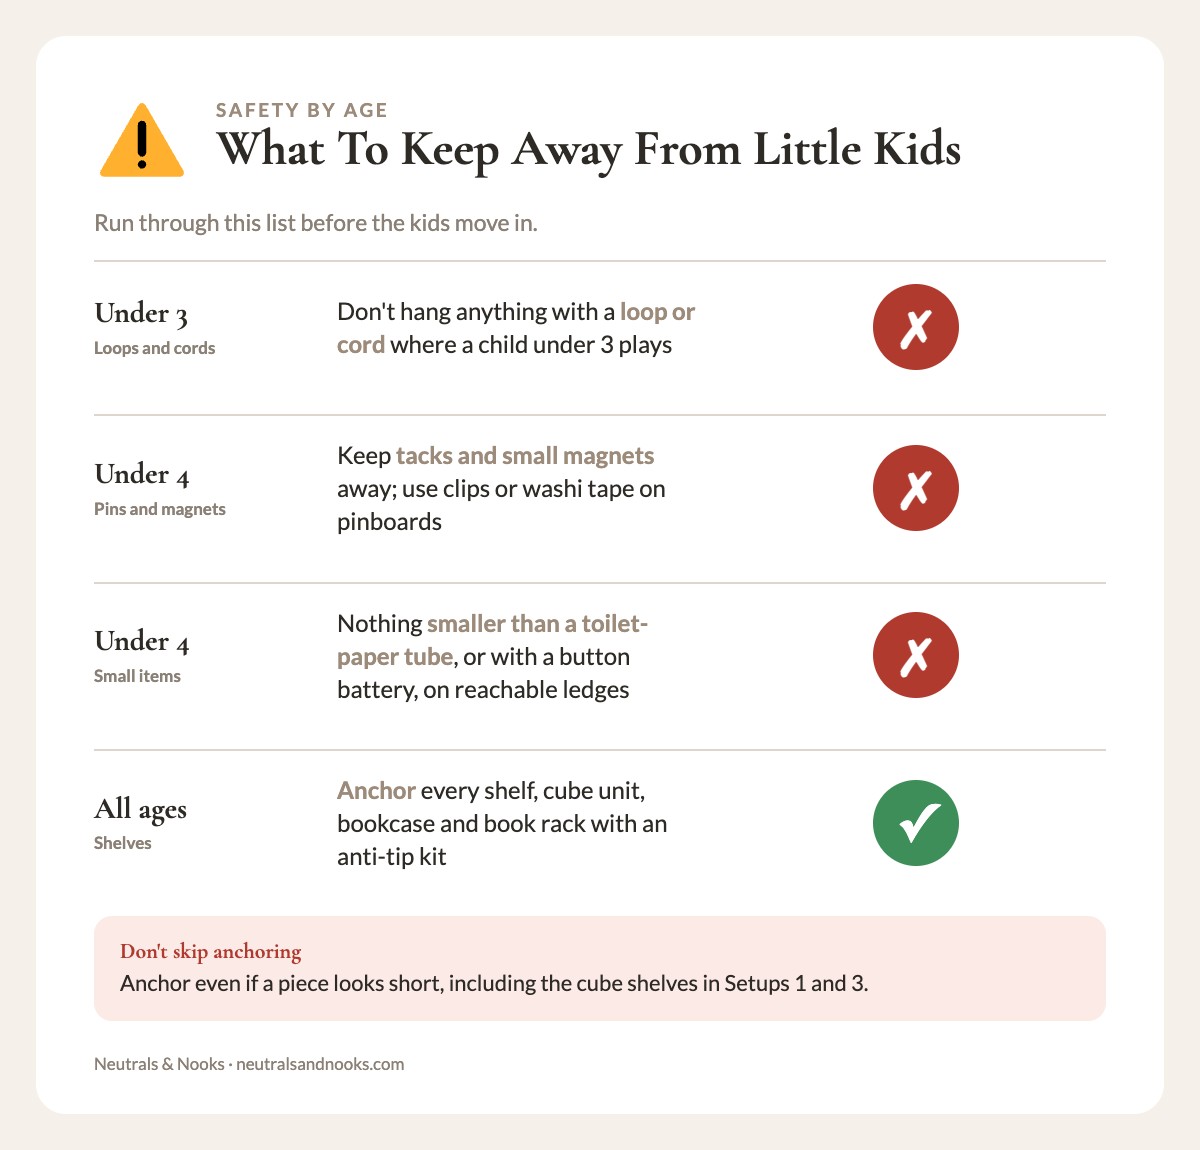
Safety firstRun through this list before the kids move in.
- Anchor everything. Anchor every shelf, cube unit, bookcase and the book rack to the wall with an anti-tip kit, including the cube shelves in Setups 1 and 3. Don’t skip it because a piece looks short.
- Lids. Pick a bench with a slow-close or lid-support hinge and no latch, or go lidless. Keep basket lids light, and never let a child climb inside.
- Pinboard. Use clips or washi tape instead of pushpins, or swap in a felt or magnetic board. Keep tacks and small magnets away from children under 4.
- Hooks. Choose rounded hook tips at kid height, and keep them beside a seat rather than over it. Use breakaway or Velcro closures on capes, and don’t hang anything with a loop or cord where a child under 3 plays.
- Adhesive hooks. Check the weight rating, clean the wall first, hang only light items, and replace any hook that starts to peel.
- Heavy things. Keep anything heavy off the wall above a seat. The canvas (4) and pinboard (5) should be lightweight.
- Mirror. Use a shatter-resistant mirror (5) in Setup 1, since a taller child can reach it.
- Shelf and ledge items. Keep them light, soft and unbreakable. With children under 4, keep anything smaller than a toilet-paper tube, and anything with a button battery, off ledges and shelves they can reach.
Frequently Asked Questions
How do I fit a playroom in a really small space?
Go vertical and keep the floor open. Use one low storage piece, one place to sit or play, and hooks or a ledge on the wall. That’s all three of these setups.
How much floor space does a play area need?
Aim for a clear patch of about 3×3 feet (9 sq ft) per child beside the storage, plus about 36 inches of walkway. The 10-inch gap in Setup 1 holds a stool, and the closet only needs room for a cushion.
What furniture works best for small playrooms?
Pieces that do two jobs: a bench with toy storage, a cube shelf under a ledge, or a small table with bins beside it. Low pieces also keep the room feeling bigger.
Can I do this in a rental?
Mostly. In the closet setup, the adhesive hooks need no drilling. The floating shelf and pinboard do, unless you swap in a freestanding shelf or a lightweight board on adhesive strips. Check your lease first. Anchoring the cube shelf means a small screw hole in most cases, so ask your landlord; the patch is usually a dab of spackle.
Pick the setup that fits your wall and give every toy a home. The kids will do the rest.
Want more budget-friendly ways to build out storage? See these IKEA playroom hacks.