Family Pantry Organization: A Complete System That Actually Works
This guide reveals why your family pantry organization fails and offers a complete, zone-based system. You'll learn to create a sustainable pantry with kid-accessible sections and realistic maintenance routines.
- Recognize your pantry's multi-user nature, with different needs for adults and kids.
- Implement a zone-based organization system tailored for family use.
- Create kid-accessible sections to manage their independent snack access.
- Plan for constant inventory turnover with a flexible, routine-based system.
- Embrace a realistic maintenance schedule to sustain organization.
Your pantry is going to fall apart again. Not because you’re disorganized, not because you lack the “right” containers, and not because your family doesn’t try. It’s going to fall apart because the system you’re using — if you even have one — wasn’t designed for the way a family actually uses a pantry. It was designed for a photoshoot. Or a single adult. Or a person who doesn’t have a seven-year-old rummaging through the crackers at 4:15 PM while you’re trying to figure out what you’re making for dinner with whatever random ingredients survived the week.
Here’s what I know to be true after organizing and reorganizing my own family pantry more times than I’d like to admit: the pantry is the single hardest space in a family home to keep organized. Harder than closets. Harder than the playroom. Harder than the laundry room. Because unlike those spaces, the pantry gets opened 15 to 25 times a day by multiple people of different heights, with different needs, operating on different levels of patience. Your toddler needs a snack right now. Your partner is looking for the pasta sauce but won’t move anything to find it. You’re trying to take inventory before a grocery run while someone is tugging on your shirt asking for goldfish crackers. The pantry is a high-traffic, multi-user system under constant stress — and most of us are treating it like a closet that happens to hold food.
This guide is the system I wish someone had handed me three years ago. Not a list of pretty containers to buy. Not a vague instruction to “group like items.” A complete, zone-based organization system designed for families — with kid-accessible sections, a realistic maintenance schedule, and an approach that respects the 2026 reality that most of us are done with aggressive decluttering and ready for something more sustainable. Routine-based organization. Systems that flex instead of break. A pantry that looks calm and works hard, even on a Thursday when the groceries haven’t been put away yet.
Why the Family Pantry Is the Hardest Space to Organize
Before we tear everything out and start fresh, it’s worth understanding why pantry organization fails so consistently in family homes. If you’ve reorganized your pantry twice in the last year and it reverted to chaos within weeks both times, you’re not failing. The space is working against you in ways that most organization advice doesn’t acknowledge.
The Multi-User Problem
Your pantry serves a minimum of two adults and one or more children, each with different access patterns. Adults open the pantry with intent — they’re looking for a specific ingredient for a specific meal. Children open the pantry with appetite — they want something, and they’ll dig until they find it, leaving a trail of displaced items in their wake. These two usage patterns are fundamentally incompatible in a single undifferentiated space. When everything lives together with no clear zones, every user disrupts every other user’s experience.
The Constant Turnover
A closet gets reorganized seasonally. A playroom gets reset weekly. But a pantry turns over inventory constantly — groceries come in, meals go out, and the contents shift daily. This means any organization system that relies on items staying exactly where you put them is doomed. A family pantry system needs to accommodate constant flux, not resist it.
The Variety Problem
A family of four with young children might have 80 to 150 distinct items in their pantry at any given time. That’s an enormous range of shapes, sizes, and packaging types: boxes, bags, cans, jars, pouches, produce, bulk items, baking supplies, snack packs, spice bottles, oils, and that random specialty ingredient you bought for one recipe six months ago. No other storage space in your home contains this much variety in this little square footage.
The Bulk Buying Trap
Families buy in bulk because it makes financial sense. But bulk buying creates a storage problem that most pantries weren’t designed for. A 48-count box of granola bars doesn’t fit neatly on any shelf. A Costco-sized bag of rice is awkward. Three boxes of cereal take up the space where one used to live. Bulk purchasing and pantry organization are in constant tension, and most families sacrifice organization to accommodate volume.
The Height Differential
Your pantry needs to serve people whose heights range from about 30 inches to over 70 inches. The top shelf is invisible to your kids. The bottom shelf is invisible to your back. The middle shelves — the prime real estate — can only hold so much, and everyone wants their stuff there.
The Complete Clean-Out Process: Starting from Zero
Every effective pantry system begins with a full clean-out. Not a rearrange. Not a tidy-up. A total extraction. I know that sounds dramatic for a Tuesday, but there is no shortcut here. You cannot organize a space you can’t see, and you can’t see a space that’s full.
Step 1: Clear the Schedule (45-90 Minutes)
Block an hour and a half. You will not finish this in 20 minutes. If your kids are home, set them up with an activity or enlist older kids to help — sorting food can actually be a surprisingly engaging task for school-age children. You need counter space or a table near the pantry to spread everything out.
Step 2: Remove Everything
Every single item comes out. Every can from the back corner. Every bag of chips wedged behind the cereal. Every mystery spice you’ve had since your first apartment. Put it all on the counter or table, grouped loosely as you go:
- Cans and jars
- Boxes and dry goods
- Snacks and treats
- Baking supplies
- Breakfast items
- Spices and seasonings
- Oils, vinegars, condiments
- “What even is this?”
Step 3: Clean the Empty Pantry
Wipe every shelf, vacuum or sweep the floor, check for expired shelf liner, and examine the space with fresh eyes. Note the number of shelves, adjustable heights, any dead corners, door-back space, and lighting. This is also the moment to assess whether your shelves are at the right heights. Most pantries come with evenly spaced shelves, but even spacing is almost never optimal for how families actually use the space. We’ll adjust these in the zone setup phase.
Step 4: Sort and Purge (Gently)
Now look at what you extracted. You’re going to sort into four categories:
| Category | What Goes Here | Action |
|---|---|---|
| Keep — use regularly | Items you use at least once a month | These get prime pantry real estate |
| Keep — use occasionally | Specialty items, holiday baking supplies, backup stock | These go on high or low shelves |
| Donate or give away | Unexpired items you won’t use, duplicates, things the kids outgrew | Bag them up today |
| Toss | Expired items, stale goods, anything opened and forgotten | Trash or compost |
A note on the “less aggressive decluttering” approach: You don’t need to get rid of everything you haven’t used in 30 days. That advice never made sense for pantries. Baking supplies might sit for weeks between uses and still be essential. Holiday ingredients have a season. The 2026 approach to pantry organization isn’t about minimalism — it’s about intentional placement. Everything you keep needs a home. If it has a home, it’s not clutter. If it doesn’t, it becomes clutter regardless of how useful it is.
Step 5: Take Inventory and Measure
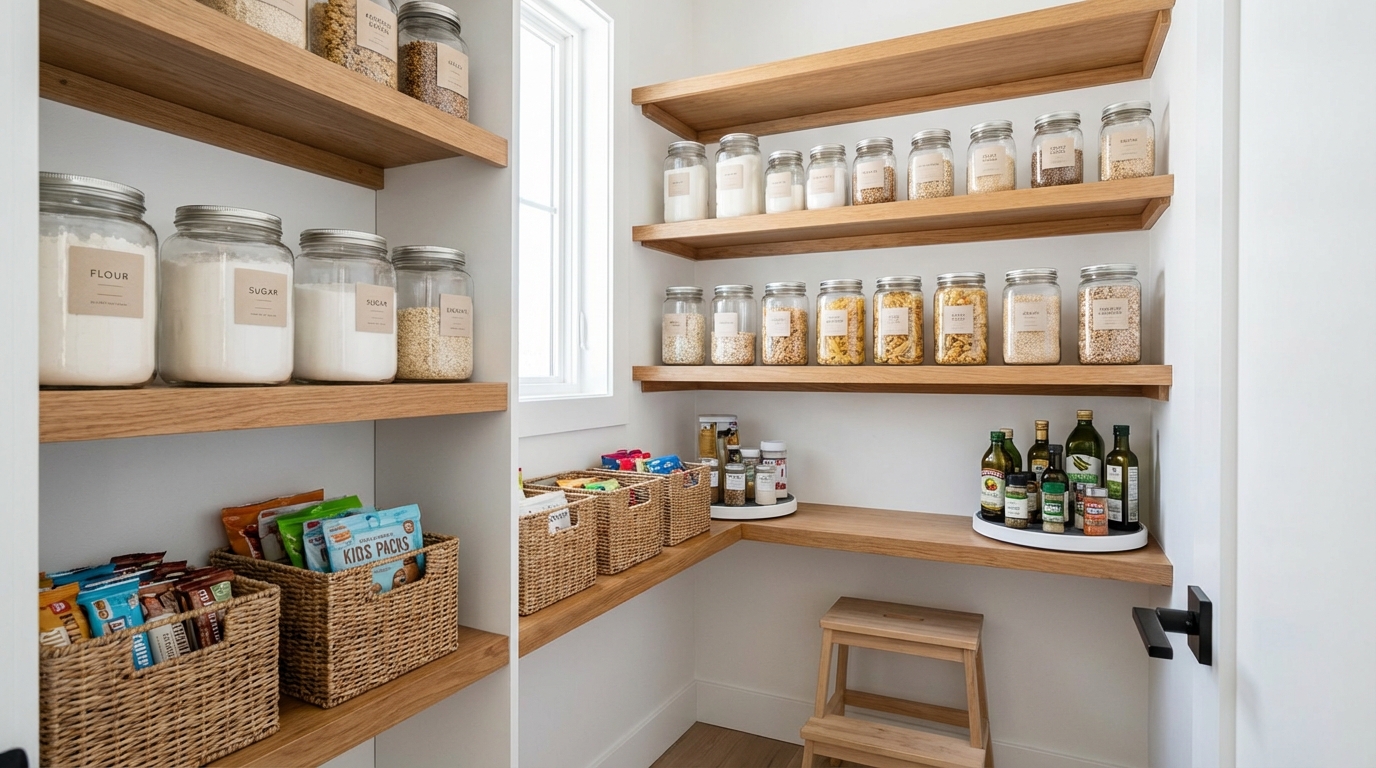
Before putting anything back, grab a tape measure. Measure your shelf widths, depths, and the height between shelves. Write these down. You’ll need them when selecting containers. Also take a rough inventory of what you’re keeping — a phone photo of each group spread out on the counter is the easiest method. This inventory becomes your shopping list for containers and your blueprint for zone planning.
The Zone-Based Organization System
This is the core of the system — the part that makes everything else work. Instead of organizing by arbitrary categories or alphabetically (who has time for that with kids?), you’re going to organize your pantry into activity-based zones. Each zone corresponds to how your family actually uses the pantry, not how a store shelves its inventory.
Why Zones Work Better Than Categories
Traditional pantry organization says: put all cans together, all boxes together, all bags together. The problem? When you’re making spaghetti, you need the pasta (box shelf), the sauce (can shelf), and the garlic bread mix (bag shelf). You’re visiting three different areas for one meal.
Zone-based organization says: put everything you need for dinner prep in one zone. Pasta, sauce, canned tomatoes, rice, dried beans, broths — they live together because they’re used together. Zones reduce the number of decisions and movements per pantry visit, which is critical when you’re cooking with a toddler wrapped around your leg.
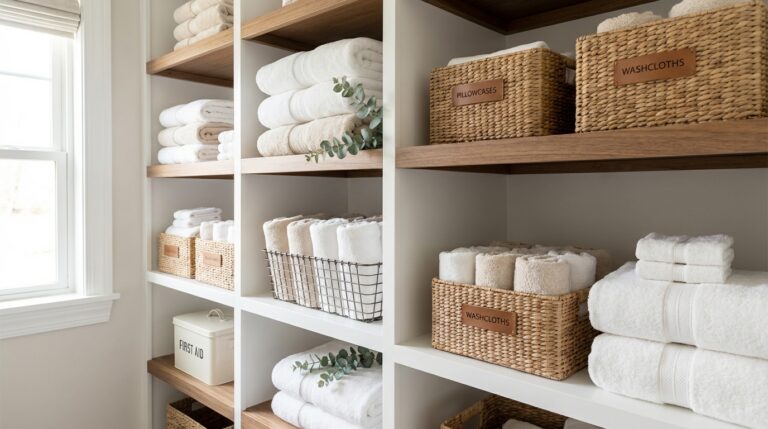
The Six Family Pantry Zones
Here’s the zone system that works for most families. Adjust based on your family’s eating patterns, but this is a strong starting framework.
Zone 1: Dinner Staples (Middle Shelves, Eye Level)
This is your prime real estate — the shelves between hip and shoulder height. It gets the most-used category because you access it daily, usually under time pressure.
What lives here:
- Pasta, rice, grains, and noodles
- Canned tomatoes, beans, broth, and soups
- Sauces (pasta sauce, soy sauce, curry paste, salsa)
- Cooking oils and vinegars
- Dried herbs frequently used in cooking
- Bread, tortillas, and wraps (if shelf-stable)
Container strategy: Tall, clear containers for pasta and grains. A turntable (lazy Susan) for oils and sauces — one spin and you see everything. Cans stacked or in a can organizer rack.
Zone 2: Breakfast and Morning Essentials (Upper-Middle Shelf)
Breakfast is rushed. Everyone is half-awake. The pantry items for breakfast need to be visible, accessible, and grouped so that making breakfast doesn’t require a scavenger hunt.
What lives here:
- Cereal and oatmeal
- Pancake and waffle mix
- Syrup, honey, and nut butters (if not refrigerated)
- Coffee, tea, and hot chocolate
- Granola and trail mix
- Bread and bagels (if not on the counter)
- Dried fruit for topping
Container strategy: Cereal in large clear canisters or the original box inside a labeled bin. A designated “breakfast basket” that holds pancake mix, syrup, and toppings together works beautifully — pull the whole basket out on Saturday morning.
Zone 3: Snacks (Lower Shelves — Kid-Accessible)
This zone is one of the most important in a family pantry, and it gets its own detailed section below. For now, know that snacks live low — within reach of your shortest family member.
What lives here:
- Crackers, pretzels, and chips
- Granola bars and fruit snacks
- Dried fruit and trail mix portions
- Applesauce pouches and fruit cups
- Popcorn
- After-school snack rotation
Zone 4: Baking Supplies (Upper Shelves or a Dedicated Section)
Baking supplies are used intensely but intermittently — a weekend baking session, holiday cookies, a birthday cake. They don’t need prime real estate, but they do need to be grouped so you can assess at a glance whether you have what you need.
What lives here:
- Flour (all-purpose, whole wheat, specialty)
- Sugars (white, brown, powdered)
- Baking soda and baking powder
- Vanilla extract and other extracts
- Chocolate chips, sprinkles, and decorating supplies
- Muffin and cake mixes
- Cocoa powder
- Cornstarch
Container strategy: Matching canisters for flour and sugar (label them clearly — nobody wants to mix up salt and sugar). A single “baking bin” or basket for smaller items like extracts, baking soda, and sprinkles keeps them from scattering across the shelf.
Zone 5: Canned Goods and Backup Stock (Lower Shelves or Deep Shelves)
This is your pantry’s warehouse zone. Items here are heavier, used less frequently per unit, and benefit from being at a height where you’re not lifting cans to eye level.
What lives here:
- Backup cans and jars beyond what’s in Zone 1
- Canned vegetables and fruits
- Canned tuna, chicken, and other proteins
- Extra broth and stock
- Bulk backup items (extra pasta, rice, or sauce bought on sale)
Container strategy: Can organizer racks that auto-rotate (first in, first out) are genuinely useful here. Or simply stack by type — all black beans together, all diced tomatoes together. A label on the shelf edge identifying what goes where prevents the “shove it wherever it fits” decay.
Zone 6: Special Items and Overflow (Top Shelf, Door Back, or Floor)
Every pantry needs a miscellaneous zone — a designated place for items that don’t fit neatly into the other zones. Without this zone, miscellaneous items invade every other zone and cause entropy.
What lives here:
- Specialty ingredients (coconut milk, tahini, specialty flours)
- Party and entertaining supplies (napkins, candles, paper plates)
- Pet food and treats
- Reusable bags and lunch supplies
- Seasonal items (holiday baking, summer drink mixes)
- Overflow from a recent bulk buy that hasn’t been decanted yet
Container strategy: Large labeled bins, one per sub-category. “Party supplies,” “Specialty baking,” “Pet.” Items you rarely access go highest; items accessed weekly go lowest within this zone.
Zone Layout by Pantry Type
Where each zone physically lives depends on your pantry’s configuration:
| Pantry Type | Prime Real Estate | Best for Zones 1-2 | Best for Zones 3/5 | Best for Zone 4/6 |
|---|---|---|---|---|
| Walk-in pantry | Shelves at eye level on entry wall | Eye-level shelves, both sides | Lower shelves, deeper shelves | Upper shelves, back wall |
| Reach-in pantry (single door) | Middle shelves | Middle 2 shelves | Bottom shelf, door back | Top shelf |
| Cabinet pantry (multiple cabinets) | Most-used cabinet | Primary cabinet, mid-shelves | Secondary cabinet or lower shelves | Least-used cabinet |
| Open shelving | Eye-level shelf | Center shelves | Lowest shelf | Highest shelf, or a basket on any shelf |
The Container and Labeling Guide
Containers are where most people start their pantry organization journey, which is backwards. Zones come first, containers come second. But now that your zones are mapped, let’s talk containers — because the right ones make a zone system visual and maintainable, while the wrong ones waste money and space.
The Container Philosophy
You do not need to decant everything. This is the single most over-prescribed piece of pantry advice in existence. Transferring every item from its original packaging into a matching container is time-consuming, removes cooking instructions and nutrition info, and creates an ongoing maintenance burden that most families abandon within weeks.
Here’s what actually deserves a container:
- Items you buy in bulk and need to portion: A 10-pound bag of rice goes into a container. A single box of pasta does not.
- Items in flimsy packaging that doesn’t reseal: Bags of flour, sugar, chips that come in bags without zippers, loose tea.
- Items you want to see at a glance: When flour, sugar, oats, and rice are in clear containers, you know your inventory without opening anything.
- Items in the snack zone: Kid-accessible snacks benefit from containers because they’re easier for small hands to open and close than crinkly bags and boxes.
Everything else? Leave it in the original packaging and organize with bins and baskets instead. A labeled basket that says “pasta” holding three boxes of different pasta shapes is more practical than three separate pasta containers that you have to wash, refill, and label.
Budget-Tiered Container Recommendations
Budget Tier: Under $50
You can build a highly functional pantry system for under fifty dollars. This tier uses bins, baskets, and a few strategic containers — not a complete container set.
| Item | Approx. Cost | Where to Get It | Use |
|---|---|---|---|
| Clear stackable bins, set of 6 | $10-15 | Dollar Tree, Target | Zone grouping for snacks, breakfast items, baking |
| Large clear canisters, set of 4 | $12-18 | Walmart, Amazon | Flour, sugar, rice, oats |
| Turntable/lazy Susan, 2-pack | $8-12 | Amazon, HomeGoods | Oils, sauces, spices |
| Shelf labels (chalkboard or adhesive) | $5-8 | Amazon, craft store | Zone and bin labeling |
| Can organizer rack | $8-12 | Amazon, Target | Canned goods zone |
| Basket or bin for snack zone | $3-5 | Dollar Tree | Kid-accessible snack station |
Total: approximately $46-70. This gives you the bones of a functional zone system. Everything is grouped, labeled, and accessible. It won’t win a magazine photoshoot, but it will work — and working beats beautiful every single time.
For more ideas on making budget organization look polished, check out how to make cheap organization look expensive.
Mid-Range Tier: $75-150
This tier adds aesthetic consistency and a few quality-of-life upgrades.
| Item | Approx. Cost | Where to Get It | Use |
|---|---|---|---|
| Matching canister set, 8-10 pieces | $30-50 | Amazon, The Container Store, IKEA | All bulk dry goods |
| Woven or fabric-lined baskets, set of 4-6 | $20-30 | Target (Brightroom), HomeGoods | Zone grouping with visual warmth |
| Shelf risers, set of 2-3 | $10-15 | Amazon | Doubling visible surface area |
| Label maker (rechargeable) | $15-25 | Amazon (DYMO, Brother P-Touch) | Clean, consistent labeling |
| Door-back organizer rack | $15-25 | Amazon, Target | Spices, small items, foil/wrap |
| Clear drawer-style bins for deep shelves | $10-15 | The Container Store, Amazon | Pull-out access for deep pantries |
Total: approximately $100-160. This tier creates a pantry that looks intentional and cohesive. The matching containers and coordinated baskets give it that “Neutrals and Nooks” feel — calm, clean, not trying too hard.
Investment Tier: $200+
For the family that wants a pantry transformation — the kind where you open the doors and exhale.
| Item | Approx. Cost | Where to Get It | Use |
|---|---|---|---|
| Premium canister system (OXO POP, mDesign) | $50-100 | Amazon, The Container Store | Complete dry goods storage with airtight seals |
| Custom-fit shelf inserts or adjustable shelving | $30-50 | The Container Store, hardware store | Maximized vertical space |
| Coordinated basket set (seagrass, rattan, or linen) | $30-50 | Target, West Elm, Pottery Barn | Beautiful zone containers |
| Spice drawer insert or mounted rack system | $20-40 | Amazon, IKEA | Complete spice visibility |
| LED puck lights (battery or USB) | $10-20 | Amazon | Illuminating dark shelves |
| Professional-style labels (clear with white text, or embossed) | $15-25 | Etsy, Amazon | The finishing touch |
Total: approximately $155-285. This is the full transformation. But I want to be clear: a $50 pantry with good zones will outperform a $300 pantry with no system. Containers are the finish line, not the starting line.
And if you want to stretch your dollar even further, there are excellent dollar store organization finds that hold up remarkably well for pantry use — especially bins, baskets, and turntables.
Labeling That Lasts
Labels serve two critical functions in a family pantry: they tell everyone where things go (reducing the “shove it wherever” impulse), and they tell everyone what things are (because white powder in a clear jar could be flour, sugar, powdered sugar, baking soda, or cornstarch).
Labeling best practices:
- Label the shelf or bin, not just the container. When a container is empty and removed for refilling, the shelf should still communicate what belongs there. This is the difference between a system that maintains itself and one that decays.
- Use words, not just icons. Unless your entire household is pre-literate, written labels are clearer than pictures. For households with pre-readers, use both.
- Be specific enough to be useful, vague enough to be flexible. “Pasta” is better than “Penne Rigate” because the label still works when you switch pasta shapes. “Snacks — Sweet” is better than “Fruit Snacks” because the label still works when the rotation changes.
- Choose a labeling method you’ll maintain. A label maker produces clean, consistent labels you can reprint in seconds. Handwritten labels on chalkboard tags are beautiful but require you to have nice handwriting and a chalk pen that works. Clear labels with white text look modern. Choose what you’ll actually redo when the label peels off or the zone changes.
Building a Kid-Friendly Pantry Zone
If you’ve read our guide to creating a toddler-friendly kitchen, you already know the principle: children engage more, behave better, and develop independence faster when their environment is designed for their access level. The pantry is no different. A kid-friendly pantry zone isn’t about giving children unlimited snack access — it’s about creating a defined area of independence within a structured system.
The Low-Shelf Snack Station
Dedicate the lowest one or two shelves of your pantry to kid-accessible items. This is their territory. Everything here is pre-approved, portioned appropriately, and easy to open.
What the kid zone includes:
- Snack bins (2-3): One for salty/savory, one for sweet, one for “anytime” (fruit pouches, string cheese if shelf-stable, crackers). Use open-top bins that small hands can reach into without pulling the whole bin off the shelf.
- Lunchbox supplies: If your kids pack lunch, a bin with sandwich bags, reusable containers, and napkins at their height means they can participate in packing their own lunch.
- Water bottles and snack containers: Their own water bottles, stored where they can grab them independently.
What the kid zone does NOT include:
- Treats and dessert items (those stay in a separate, parent-controlled location)
- Items that require preparation (raw oats, cooking pasta)
- Anything in packaging that’s a choking hazard for young children in the household
Setting Snack Boundaries Without Being the Snack Police
The kid-friendly zone works best when combined with clear, simple rules:
- You can have one snack from your zone between meals. This prevents all-day grazing while honoring their autonomy.
- When a bin is empty, tell a grown-up. This teaches inventory awareness and prevents the “there’s nothing to eat” meltdown.
- Close the bin, close the door. The maintenance habit starts early.
- If you want something NOT in your zone, ask. This preserves your ability to manage treats and special items without locking the whole pantry.
Age-Based Access Levels
| Age | Access Level | Zone Setup |
|---|---|---|
| 1-2 years | Adult retrieves, child chooses from 2-3 options | Lowest shelf, 2 small bins with pre-portioned snacks in sealed containers |
| 3-4 years | Independent access to snack zone with one-snack rule | Lowest shelf, 3 bins (savory, sweet, anytime), easy-open containers |
| 5-7 years | Independent snack zone + can help with breakfast zone | Bottom 2 shelves, snack bins plus a breakfast basket (cereal, oatmeal packets) |
| 8+ years | Full pantry access for meals and snacks with agreed limits | All shelves reachable, participates in meal prep retrieval, helps restock |
Pro tip: Involve your kids in the weekly snack restock. Let them choose which items fill their bins from a parent-approved list. Ownership of the selection process dramatically reduces complaints about “there’s nothing good.”
The Maintenance System That Prevents Backslide
This is where every pantry organization guide either succeeds or fails. The clean-out is satisfying. The zones are logical. The containers are pretty. But without a maintenance routine, your pantry will revert to chaos within four to six weeks. I’ve watched it happen in my own home enough times to know that the organization is not the system — the maintenance IS the system.
The 2026 approach to organization is rooted in routine, not in periodic overhauls. You don’t need a quarterly pantry purge if you build these habits into your weekly and monthly rhythms.
The 5-Minute Weekly Reset (Pick a Day, Any Day)
Choose one day a week — grocery day works perfectly, ideally the day before you shop. This reset takes five minutes. Set a timer. You’re not reorganizing; you’re maintaining.
Weekly reset checklist:
- [ ] Return any displaced items to their zones (things that got put back wrong)
- [ ] Pull expired items (check one zone per week on rotation — don’t check everything every week)
- [ ] Wipe any spills or crumbs on shelves
- [ ] Restock the kid snack zone from backup supplies
- [ ] Take a quick inventory photo for your grocery list
- [ ] Flatten and recycle empty boxes and packaging
That’s it. Five minutes. The goal is preventing accumulation, not performing a deep clean. When you do this weekly, the pantry never gets bad enough to need a full reorganization. This is the same philosophy behind the 10-minute tidy approach to decluttering — small, consistent effort beats occasional marathon sessions every time.
The 20-Minute Monthly Check (First of the Month)
Once a month, go a level deeper. This takes about 20 minutes and addresses the slow drift that weekly resets can’t catch.
Monthly check tasks:
- [ ] Check all zones — are items still in the right zones, or has migration happened?
- [ ] Assess container condition — any cracked lids, stained bins, peeling labels?
- [ ] Review the kid zone — are the snack options still age-appropriate? Has your child outgrown any current setup?
- [ ] Check backup stock levels — do you need to restock bulk items?
- [ ] Wipe all shelf surfaces (pull bins forward, wipe behind)
- [ ] Adjust any shelf heights that aren’t working
- [ ] Update your inventory list or grocery app if you use one
The Seasonal Deep-Clean (4 Times a Year)
Quarterly, align a pantry deep-clean with the seasons. It pairs naturally with a broader spring cleaning routine or a seasonal reset.
Seasonal deep-clean tasks:
- Full shelf wipe-down (remove all items, clean shelves, replace)
- Check all expiration dates across the entire pantry
- Rotate seasonal items (summer drink mixes forward in May, baking supplies forward in November)
- Reassess zones — has your family’s eating pattern shifted? New dietary needs? A child who aged into a new access level?
- Replace any worn containers, bins, or labels
- Donate unexpired items you know you won’t use
Time investment: 30 to 45 minutes, four times a year. That’s under three hours annually to maintain a pantry that works every single day.
Getting the Family on Board
A pantry system only works if everyone in the household uses it. Here’s the reality: you will be the primary maintainer. That’s not fair, but it’s true in most households. However, you can reduce your maintenance burden significantly by making the system intuitive enough that other family members naturally comply with it.
- Labels do the training for you. A clearly labeled shelf doesn’t require you to explain where the crackers go. The label says it. Done.
- Make the right thing the easy thing. If pasta goes on a specific shelf and that shelf is the most natural place to put pasta (near sauces, at a convenient height), people will put it there without thinking. Bad systems fight human nature. Good systems work with it.
- Give your partner ownership of a zone. If one person manages the dinner staples zone and the other manages snacks and breakfast, each person has investment in their area.
- Kids maintain the kid zone. Part of having snack independence is having snack responsibility. A three-year-old can close a bin and push it back on the shelf. Expect it.
Common Pantry Organization Mistakes Families Make
After helping dozens of families (and making every one of these mistakes myself), these are the patterns I see most often.
Mistake 1: Buying Containers Before Planning Zones
The container aisle at Target is seductive. Those matching sets, those clean lines, that promise of order. But containers bought without measurements and a zone plan end up being the wrong size, the wrong shape, or the wrong quantity. Measure first. Plan second. Buy third.
Mistake 2: Over-Decanting
You do not need to transfer Cheerios from a perfectly good box into a clear container. The box has a resealable top, nutritional information, and a recognizable design that every family member can identify. Decant items that benefit from it (bulk goods, flimsy packaging, portion control). Leave everything else in its packaging, organized in bins.
Mistake 3: Ignoring the Door
The back of your pantry door is prime real estate that most families waste entirely. A door-mounted organizer can hold spices, foil and wrap, small snack packets, or frequently used condiments. It’s essentially a free extra shelf.
Mistake 4: Putting Kids’ Stuff on High Shelves
If your child’s snacks are on a shelf they can’t reach, you’ve guaranteed two things: they’ll ask you for snacks constantly, and they’ll eventually try to climb the shelves to reach them. Neither outcome is good. Kid items go low. Always.
Mistake 5: No Maintenance Routine
The most beautifully organized pantry in the world has a shelf life of about five weeks without maintenance. If you skip the weekly reset, you’ll need a monthly reorganization. If you skip the monthly check, you’ll need a quarterly overhaul. If you skip the quarterly deep-clean, you’ll need to start from scratch. Build the maintenance into your weekly routine the same week you organize, not “eventually.”
Mistake 6: Organizing for the Pantry You Wish You Had
If you have a reach-in pantry with four shelves, you cannot organize it like a walk-in with twenty feet of shelf space. Work with the space you have. If that means your baking supplies live in a bin on the top shelf instead of beautifully displayed in matching canisters, that’s fine. Function over aesthetic, always. The aesthetic comes from consistency and cleanliness, not from having a specific amount of space.
Mistake 7: Making It Too Precious
If your family is afraid to use the pantry because everything is so perfectly arranged that opening a bin feels like disturbing a museum exhibit, your system is too rigid. The pantry should invite use. Kids should feel comfortable grabbing from their zone. Adults should feel comfortable tossing groceries into the right general area without precision placement. The system’s job is to make “close enough” good enough between resets.
Pantry Organization for Different Pantry Types
Not every family has the same pantry, and a one-size-fits-all layout doesn’t work. Here’s how to adapt the zone system to the three most common family pantry configurations.
The Walk-In Pantry
You have space. The challenge isn’t fitting everything — it’s preventing the space from becoming a walk-in junk room. Walk-in pantries need zones even more than small pantries, because without them, the abundant space invites chaos.
Walk-in strategy:
- Assign each wall or section a zone purpose
- Use the entry-side shelves for daily-use zones (dinner, breakfast, snacks)
- Use deeper or back-wall shelves for storage zones (backup stock, baking, specialty)
- Consider a small step stool stored inside for reaching upper shelves
- Add lighting if the pantry doesn’t have its own — a motion-activated LED strip makes a massive difference
- Use floor space strategically: bulk items, pet food, or a recycling bin can live on the floor of a walk-in
The Reach-In Pantry (Single or Double Door)
This is the most common family pantry — a closet-style space with shelves, accessible through one or two doors. Space is limited, so every inch matters.
Reach-in strategy:
- Use the door back for a mounted organizer (spices, wraps, small packets)
- Prioritize the middle two shelves for daily zones
- Use shelf risers to double your visible surface area on deep shelves
- Pull-out bins or drawers for deep shelves prevent the “items lost in the back” problem
- Group small items in bins rather than placing them individually — a bin of tea boxes takes less visual space than six boxes scattered across a shelf
- Accept that your reach-in pantry may not hold everything; overflow items can live in a designated kitchen cabinet
The Cabinet Pantry (No Dedicated Pantry Space)
Some kitchens don’t have a pantry at all — just cabinets. If that’s your situation, you can still implement a zone system across multiple cabinets.
Cabinet pantry strategy:
- Designate one cabinet as the “primary pantry” (daily items) and another as “secondary” (baking, backup stock, specialty)
- Use one low cabinet or drawer as the kid zone — this might be a cabinet near the dining area rather than in the main cooking zone
- Turntables are your best friend in cabinets — they maximize corner and deep-shelf access
- Door-mounted organizers work on cabinet doors too, just ensure the door can still close fully
- Consider adding a slim freestanding pantry unit (a narrow bookshelf or an IKEA KALLAX) in a hallway or dining area to supplement cabinet storage
If you’re working with a small kitchen overall, you may find our guide to small kitchen organization with kids helpful for thinking about the entire kitchen ecosystem, not just the pantry.
Tying Your Pantry into Your Family’s Larger Organization System
A pantry doesn’t exist in isolation. It connects to your grocery shopping, your meal planning, your kitchen workflow, and your family’s daily routines. The most effective pantry systems are integrated into the household’s broader organization infrastructure.
Connect Pantry to Meal Planning
If your family uses a meal plan (even a loose one), your pantry zones should mirror your planning categories. When you decide on Monday’s dinner and check the Dinner Staples zone, you see immediately what you have and what you need. No more buying a third bottle of soy sauce because you couldn’t find the one you already had.
Connect Pantry to Grocery Shopping
Take a photo of each zone during your weekly reset. These photos become your grocery list — you can see what’s low, what’s empty, and what’s well-stocked. Some families keep a running list on the pantry door or wall; others use a shared notes app. The best method is the one you’ll actually use.
A family command center is the perfect home for a running grocery list, meal plan, and pantry inventory — it keeps the information visible and accessible to everyone in the household.
Connect Pantry to Kids’ Routines
When kids know where their snacks are and what the rules are, the pantry becomes part of their daily routine rather than a source of conflict. After school, they go to their zone, choose a snack, close the bin. Before packing lunch, they grab from their lunch supply bin. These micro-routines add up to significant independence — and significant sanity for you.
Neutral Nina
Neutral Nina is an interior design enthusiast and mom of three who proves that beautiful, organized spaces and family life can coexist. She shares practical strategies for creating calm, functional homes that work for kids and grown-ups alike.
Frequently Asked Questions
How often should I completely reorganize my pantry?
If you’re maintaining the weekly reset and monthly check routine described above, you should almost never need a complete reorganization after the initial setup. A seasonal deep-clean four times a year handles the drift. The only reasons for a full redo are: a major change in family size or dietary needs, a physical change to the pantry (new shelving, renovation), or moving to a new home. If you’re doing full reorganizations more than once a year, your maintenance routine needs attention — the system is decaying faster than you’re maintaining it.
What’s the best way to handle a Costco or bulk-buy haul?
Bulk buying and pantry organization coexist peacefully when you separate “active stock” from “backup stock.” When you bring home a Costco haul, immediately portion the active amount into your zones (refill the snack bins, restock the dinner staples shelf, top off the baking canisters). The remainder — the backup stock — goes into Zone 6 (overflow/special items) or a designated backup area. This might be a high shelf, a bin on the pantry floor, or even a separate location like a basement shelf or garage storage rack. The key is: your active zones stay organized, and backup stock lives elsewhere until it’s needed.
Should I use airtight containers for everything?
No. Airtight containers are important for items vulnerable to staleness or pests: flour, sugar, rice, oats, cereal, crackers, and any opened dry goods. They’re unnecessary for canned goods, sealed packaged items, oils, vinegars, and anything you’ll use within a week of opening. Over-investing in airtight containers wastes money and creates maintenance burden (more containers to wash, more decanting to do). Prioritize airtight for your bulk staples and leave everything else in its packaging, organized in bins.
How do I deal with a partner who won’t follow the system?
Make the system easier to follow than to ignore. If the cereal zone is clearly labeled and at a natural height, putting cereal there requires zero extra effort. If the system requires precision placement or memorization, it will lose to “just put it on whatever shelf has space.” Reduce the number of decisions the system requires. Label everything. Make bins large enough that items don’t have to be placed perfectly to fit. And pick your battles — if your partner puts the granola bars in the breakfast zone instead of the snack zone, it’s not worth a conversation. The system is working well enough.
What about pantry organization with food allergies in the family?
Food allergies add a critical dimension to pantry zoning. Allergen-containing items should be physically separated from safe items — ideally on a different shelf or in a clearly marked, distinct-colored bin. For families with children who have serious allergies, the allergen zone should be above the child’s reach level, not in the kid-accessible zone. Label allergen-containing bins with bright, unmistakable markers (red labels, bold text, or allergen-specific icons). This isn’t about aesthetics — it’s about safety, and it overrides any design consideration.
My pantry is dark and deep. How do I organize the back of shelves?
Deep shelves are where food goes to die. Two solutions: pull-out bins or drawers that slide forward to reveal back-shelf items (clear bins work best so you can see contents from the side), and turntables that spin to bring back items forward. For lighting, battery-operated LED puck lights or a motion-activated strip light mounted under the shelf above makes a dramatic difference. If your pantry has no built-in light, this is a ten-dollar fix that transforms usability. Also consider the “nothing behind nothing” rule — avoid placing items behind other items. Instead, use shelf risers to create tiers, so back items are elevated above front items and visible.
How do I get my kids to actually maintain their pantry zone?
Tie it to something they care about. “After you finish your snack, close your bin and push it back before you go play” is a reasonable expectation for any child over three. For older kids, make restocking their zone a weekly responsibility — they help choose what goes in it, and they help put it away after grocery shopping. Ownership breeds maintenance. If they chose the granola bars, they care where the granola bars live. And keep your expectations age-appropriate: a four-year-old closing a bin is a win. A four-year-old alphabetizing the snack shelf is not a realistic goal.
A Pantry That Works for Real Life
Here’s what I want you to take away from all of this: the goal is not a perfect pantry. The goal is a functional pantry with a system that’s easy to maintain and hard to break. A pantry where anyone in the family can find what they need without emptying a shelf. A pantry where grocery unloading takes five minutes instead of fifteen because everything has a home. A pantry where your kids can get their own snack and you can prep dinner without a scavenger hunt.
The zone system works because it mirrors how families actually cook and eat — by meal occasion, not by food category. The maintenance routine works because it prevents the slow decay that leads to full reorganization. The kid-friendly section works because it turns snack time from a constant interruption into an independent routine.
Will it look like a Pinterest board every day? No. Will there be weeks when the bins aren’t perfectly aligned and someone put the peanut butter in the wrong zone? Absolutely. That’s fine. A good system doesn’t require perfection — it requires a five-minute weekly reset to bring it back to baseline. And baseline, in this system, is pretty great.
Start with the clean-out this weekend. Map your zones on a piece of paper before you buy a single container. Set up the kid zone first, because the immediate reduction in “can I have a snack” requests will fuel your motivation to finish the rest. And build the weekly reset into your routine from day one — not next month, not when things start slipping, but now.
Your pantry can be the calmest, most functional space in your kitchen. It just needs a system designed for the family that actually uses it.