Mudroom Cubbies for Multiple Kids: Sizing, Labels, and Layout
A few Septembers ago, at 7:52 on a school morning, my four-year-old was wearing a coat pulled off the doorknob, the only thing in our house at their height. I had bought a lovely six-cubby unit, but each cubby was eleven inches wide and my hooks sat at my own shoulder height. That afternoon I marked my youngest’s shoulder on the doorframe: 32 inches. My hooks were 22 inches too high. The cubbies were fine. The sizes were wrong for the kids using them.
This post covers cubby sizing by age (3 to 8), hook and bench heights, labels kids can actually read, and layouts for two to four children, with safety notes along the way.
It zooms in on the cubby unit, the piece that decides whether your children can manage their own arrivals and departures. For the wider view of floor, lighting, and traffic flow, see our full guide to organizing a family mudroom and the spring mudroom and entryway reset.
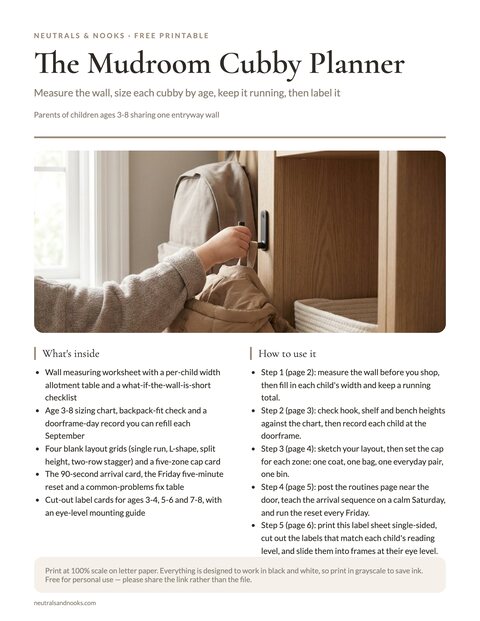
Free printable · 6 pages
The Mudroom Cubby Planner
A fill-in wall worksheet and per-child allotment table, an age 3-8 sizing chart with a doorframe-day record, blank layout grids with a five-zone cap card, cut-out labels for three reading levels, and arrival, Friday reset and troubleshooting cards.
Free. Your download link appears right here. You'll also join the Monthly Home Reset. Unsubscribe anytime. Privacy
In this article (13 sections)
- Mudroom Cubby Sizing Chart by Age (3 to 8)
- Choosing a Cubby Style for Ages 3-8
- Measure Before You Buy: Wall Width, Clearance, and the Per-Child Allotment
- Sizing the Details: Backpacks, Hooks, and Benches
- What Goes in Each Cubby: Five Zones and a Hard Limit
- Layouts for Two, Three, or Four Kids
- Labels That Kids Can Actually Use
- Materials, Finish, and the Neutral Look
- Teaching Kids the Arrival Routine
- Troubleshooting Kids’ Mudroom Cubbies: Common Problems and Fixes
- Seasonal Swaps and Room to Grow
- Frequently Asked Questions
- How to Size Mudroom Cubbies for Kids: The Short Version
Mudroom Cubby Sizing Chart by Age (3 to 8)
Here’s the reference I wish I’d had that September. Store-bought cubbies are designed for one imaginary average child, and real households have a three-year-old and an eight-year-old sharing a wall. These numbers assume average growth for each age. Treat them as a starting point, and confirm them against your own child with a pencil and a doorframe.
Good to knowThe Mudroom Cubby Planner printable has a card for each child: height, shoulder height, hook height, cubby width, and label type. Fill in one card per child as you measure, then compare it with this chart.
| Age | Average height | Cubby width | Cubby depth | Hook height | Highest usable shelf | Bench height |
|---|---|---|---|---|---|---|
| 3 | 37″ | 12–13″ | 12–13″ | 30–32″ | 34″ | 10–11″ |
| 4 | 40″ | 13–14″ | 13″ | 32–35″ | 37″ | 11–12″ |
| 5 | 43″ | 14–15″ | 14″ | 35–36″ | 40″ | 12″ |
| 6 | 45–46″ | 15–16″ | 14–15″ | 37–40″ | 42″ | 13″ |
| 7 | 48″ | 16–17″ | 15–16″ | 39–43″ | 45″ | 14″ |
| 8 | 50–51″ | 17–18″ | 16″ | 41–42″ | 47″ | 14–15″ |
How to read the chart:
- Hook height is roughly the child’s shoulder height, just below eye level. That’s where they can lift a coat loop on and off without tiptoeing or a stool.
- Highest usable shelf is the top surface a child can reach comfortably without a stool and without straining. The space just above it suits harmless gear the child doesn’t handle daily, like spare mittens or the swim bag. That space isn’t out of reach, though: a preschooler stretching or standing on the bench gets well past it. Height alone isn’t a barrier anywhere on this wall, including a parent shelf at 60 inches. Sunscreen, keys, and other hazards always go in a closed, latched or locked bin, or out of the entry altogether.
- Bench height is close to the back-of-knee height of a seated child, so their feet rest flat while they put on shoes.
- Kids grow about two to three inches a year across this age range. For cubby width and depth, size to the age your child will be in eighteen months. Keep hooks and shelves at their current height, on adjustable rails, and move them up as they grow.
Choosing a Cubby Style for Ages 3-8
The chart works with any kind of unit, so the next decision is style. Here are five common styles and what each is good at.
| Style | Best for | Trade-off |
|---|---|---|
| Open individual stalls with shared bench | Ages 3–8, two to four kids, a wall of 30–90 inches | Needs enough wall width; each stall must be sized per child |
| Hook rail + bench + baskets underneath | Narrow entries, renters, tight budgets | Less defined territory; bins can drift and mix between siblings |
| Tall locker-style units | Older kids (7+), lots of gear, sports families | Too tall for preschoolers; can feel heavy in a small room; must be anchored to the wall, since tall units can tip |
| Freestanding shelving cubes | Flexible, no-drill situations | Cubes are usually 11–13″ square, which often won’t fit backpacks. Must always be anchored to the wall, into a stud or with rated anti-tip hardware, even as a single low row. |
| Built-in with adjustable rails | Long-term homes, mixed ages | Highest effort; worth it if you can plan for growth |
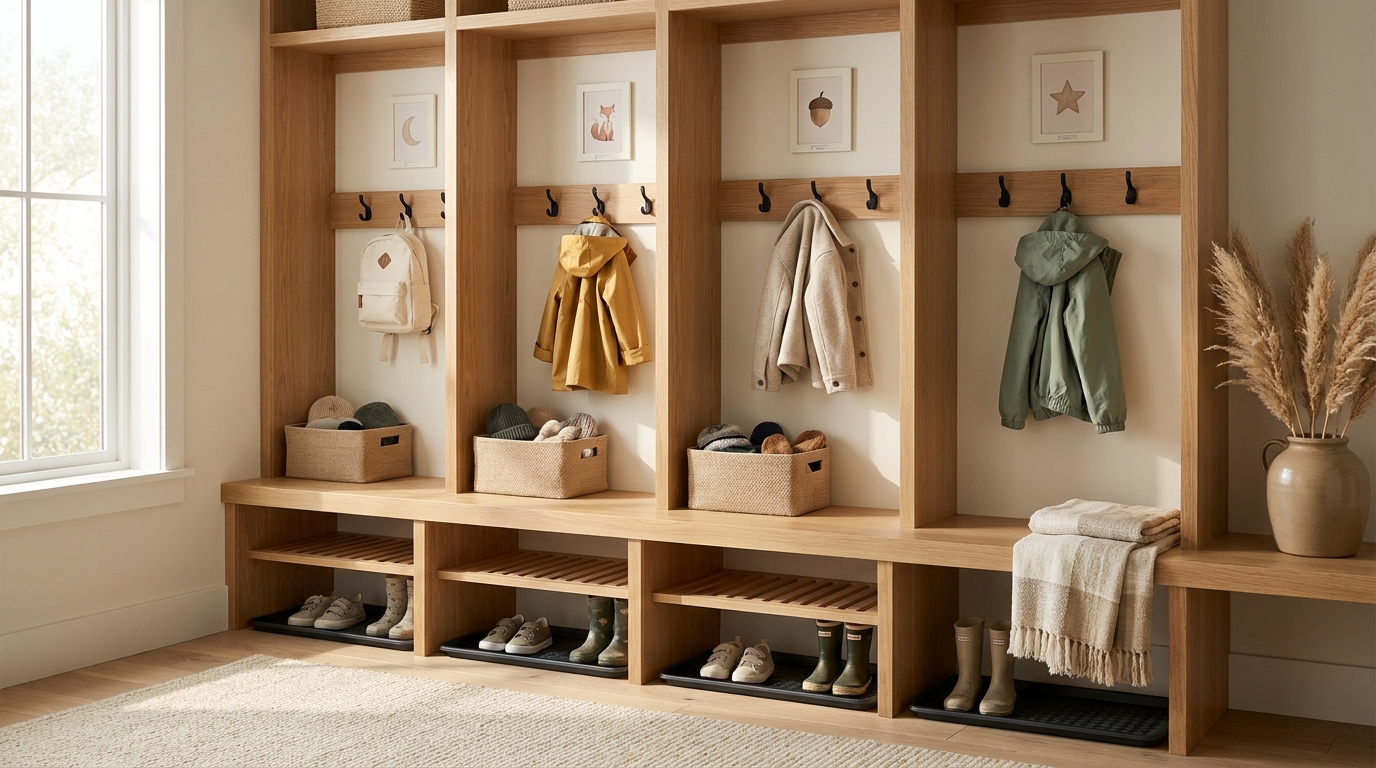
For ages three to eight, I lean toward open individual stalls with a shared bench across the front. Each child gets a visible space of their own, and everyone has a seat for putting on shoes. There are no doors, since a door is one more step for a young child to finish. The rest of this post assumes that style, though the sizing numbers apply to any of them.
Safety firstFreestanding cubes and tall units can tip when a child climbs them. Always anchor them to the wall, into a stud or with rated anti-tip hardware. That includes a single low, unstacked row.
Measure Before You Buy: Wall Width, Clearance, and the Per-Child Allotment
Sizing starts with the wall, not the product page. Grab a tape measure and write down these numbers before you shop:
- Usable wall width, measured between obstacles (door casing, corners, light switches, heating vents).
- Ceiling height, especially if you want an adult hook row above the kids’ hooks.
- Baseboard depth. Trim usually sticks out about three-quarters of an inch, which means a unit will sit that far off the wall unless you notch it or remove the trim behind it.
- Door swing. Confirm the door opens fully without hitting the bench end.
- Clear floor in front. Plan for at least 36 inches from the front of the bench to the opposite wall or furniture. A child sitting to put on shoes extends their legs 14 to 18 inches, and someone still has to walk past.
The per-child allotment
Once you have the wall width, divide it by the number of children, then check the result against the age chart above. For ages three to eight, a comfortable allotment lands between 12 and 18 inches of width per child. Under 12 inches, a school backpack won’t sit properly. Over 18 inches, you’re paying for space that becomes a dumping ground.
Here’s a rough wall-width guide, using a mixed-age set of siblings and about three-quarters of an inch for each divider or side panel:
| Household | Cubby widths | Approx. wall width needed |
|---|---|---|
| 2 kids (ages 3 and 6) | 13″ + 15″ | About 30″ |
| 3 kids (ages 3, 5, and 8) | 13″ + 15″ + 17″ | About 48″ |
| 4 kids (ages 3, 5, 6, and 8) | 13″ + 15″ + 16″ + 17″ | About 65″ |
| Add one adult or “everyone” cubby | 18–20″ | Add 20″ to any row above |
Good to knowA worked example: a 52-inch wall with three kids, ages 3, 5, and 8. The cubbies are 13 + 15 + 17 inches, and four panels add about 3 inches, for 48 inches total. That leaves 4 inches of breathing room. Write the wall width, each child’s cubby width, and the total on your Mudroom Cubby Planner before you shop.
The adult or “everyone” cubby matters more than you’d think. Somewhere on this wall, the dog leash, the sunscreen, the reusable grocery bags, and your own keys need a home. If they don’t get a designated cubby, with a latched bin for the leash, keys, and sunscreen, they’ll colonize the children’s spaces.
Safety firstKeys and key fobs (often coin-cell batteries), plastic bags, leashes, and sunscreen always go in a closed, latched or locked container, or out of the entry altogether. Height alone isn’t a barrier, because children climb the bench. A preschooler standing on it can reach a shelf at the adult hook row. Keep the open shelves and hooks of the adult cubby for non-hazardous items only, like coats and reusable shopping bags.
What if the wall is too short?
Most of us don’t have a full 90 inches of wall to work with. If you’re short on width, try these in order:
- Give the youngest children the full cubbies. Ages three to five need the most defined, most reachable space. An eight-year-old can do well with a hook and a bin under the bench.
- Use the adjacent wall. An L-shape (covered below) often adds 30 to 40 inches without needing a bigger room.
- Move shoes to a shared tray by the door, and shrink each personal cubby down to a hook, a shelf, and a bin.
- Skip the stall dividers on the oldest child’s section and use a hook rail with a bin. It reads as a promotion, which older kids tend to like.
Sizing the Details: Backpacks, Hooks, and Benches
The chart gives you the numbers. These three details explain where they come from and how to adjust them for your own kids.
Width and depth: fit the backpack first
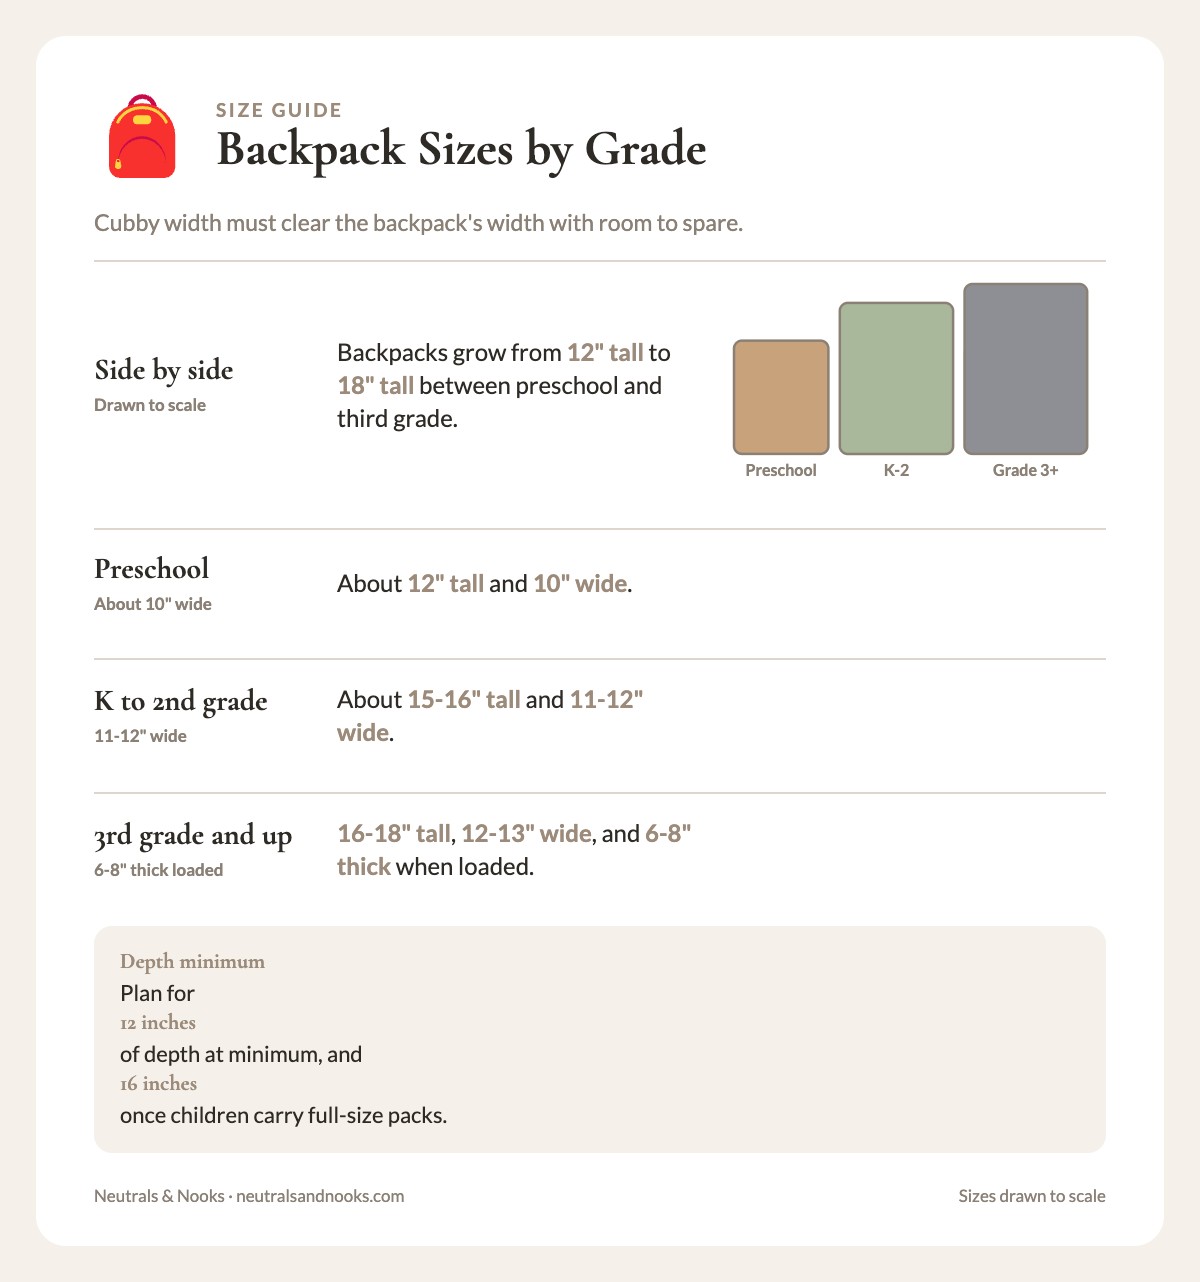
Backpacks are the largest, floppiest, most stubborn thing that goes into a child’s cubby, so they set the minimum dimensions. As a rule of thumb:
- A preschool backpack is about 12 inches tall and 10 inches wide.
- A kindergarten to second-grade backpack is about 15 to 16 inches tall and 11 to 12 inches wide.
- A third-grade-and-up backpack is 16 to 18 inches tall, 12 to 13 inches wide, and 6 to 8 inches thick when loaded.
The cubby width needs to clear the backpack’s width with room to spare. It also needs enough depth for a puffy winter coat to hang without spilling into the neighbor’s space.
In practice, that means 12 inches of depth at minimum and 16 inches once children carry full-size packs. If your unit is shallower, mount the hooks on the outside face of the divider, not the back wall. The coat then hangs alongside the cubby rather than into it.
Hook and shelf height: shoulder level, not adult level
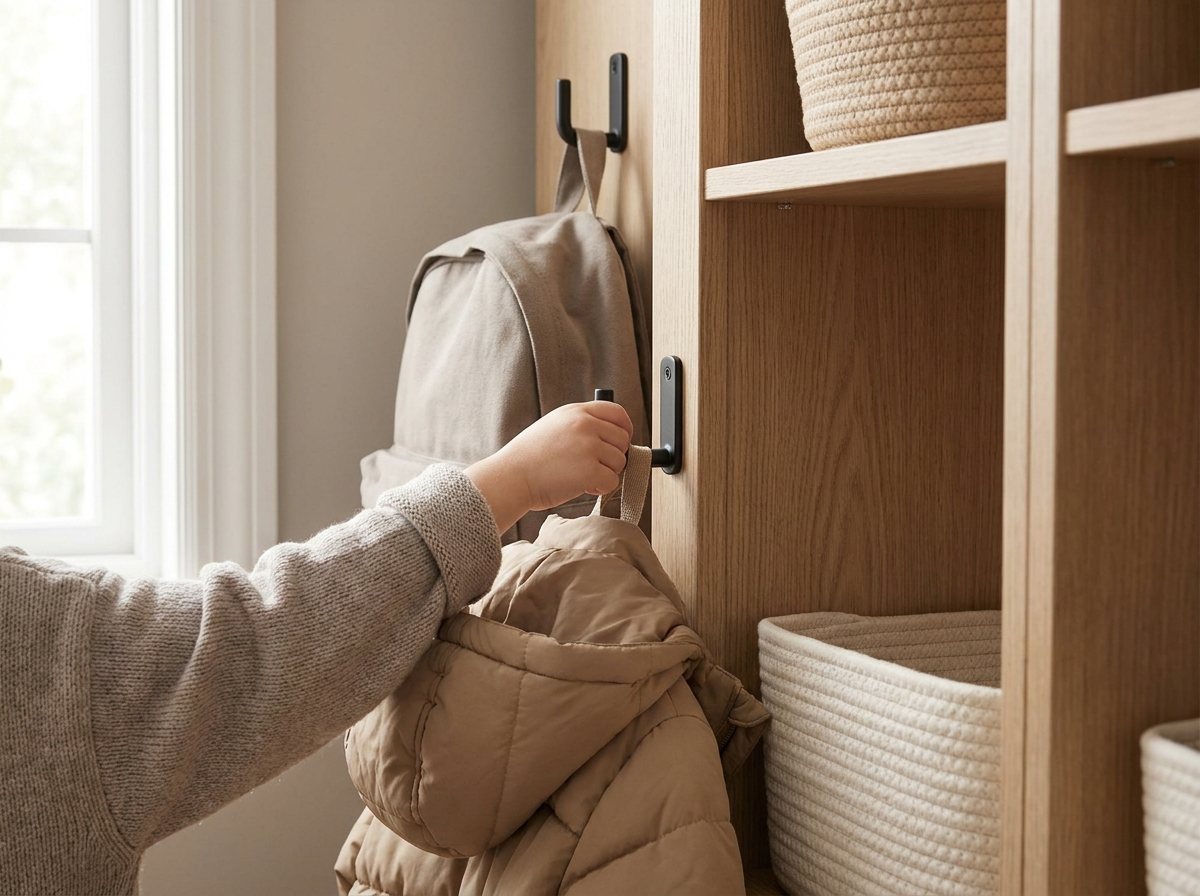
Hooks belong at shoulder height, just below the child’s eye level. The most common mistake with mudroom cubbies for kids is mounting them at adult height, or high enough that the child has to reach overhead. A child hanging a coat lifts the loop up and over the hook, which is hard with short arms and a heavy backpack. Shoulder height turns it into an easy upward motion, and it still keeps the coat’s hem off the floor.
Two practical tricks help when children of several ages share a rail:
- Mark the next hook position, but don’t install it yet. Pencil a small dot two to four inches higher and move the hook up when they grow.
- Use an adjustable rail. A slotted track or a French cleat rail lets you slide hooks up as children grow, with no new holes in the wall.
If you need to add an adult hook row for your own coats, place it at 60 to 66 inches, above the highest child’s cubby. It keeps adult coats visibly separate from the kids’ hooks. It isn’t out of reach, though, since children climb the bench, so the dog’s leash and your keys still go in a latched bin.
Safety firstChoose coats without neck drawstrings, keep bag straps short, and use rounded or breakaway hooks. Don’t leave spare hooks at head height. Children hang on loaded hooks, so screw rails, tracks, and cleats into studs or rated wall anchors.
Bench and shoe space: the low-down details
Bench height is the detail people skip, and it decides whether a three-year-old can sit down alone. A standard bench is 17 to 18 inches high, made for adults. For children under six, that’s a climb.
A 13-inch bench is a workable compromise for the full three-to-eight range, but it leaves a three-year-old’s feet dangling. If your youngest is 3 or 4, go with an 11- to 12-inch bench, or add a wide, stable footrest.
Beneath the bench or at the base of each stall, plan shoe space by shoe type:
| Item | Height needed | Width per pair |
|---|---|---|
| Sneakers, sandals | 6–7″ | 6–8″ |
| Rain boots | 11–13″ | 5–6″ each (stand upright) |
| Winter boots | 10–12″ | 6–8″ |
| Cleats or sports shoes | 6–8″ | 7–8″ |
If you have bench storage beneath, a two-tier arrangement works well: a low shelf for sneakers and a taller open area at one end for boots.
What Goes in Each Cubby: Five Zones and a Hard Limit
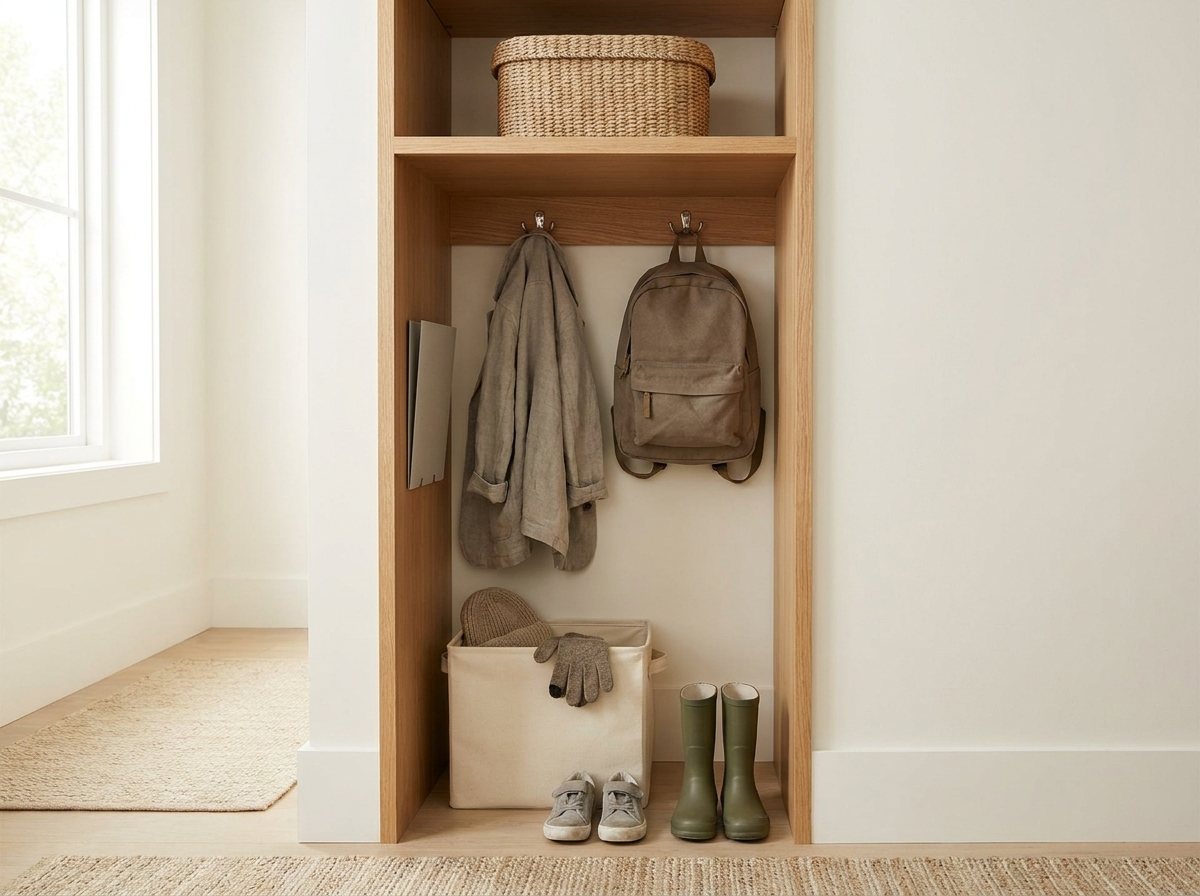
A cubby that fits is only half the equation. The other half is deciding what it’s for. “A place for everything” shouldn’t mean a place for everything the child owns. I divide every child’s stall into five zones, from top to bottom.
| Zone | Where | What lives here | Cap |
|---|---|---|---|
| 1. Parent shelf | Top of the stall, above the child’s usable shelf | Spare hats, mittens, swim bag, next season’s bin | One bin of harmless spares; sunscreen and other hazards go in a latched bin, never here |
| 2. Hook | Shoulder height | Coat and backpack | One coat and one bag per hook |
| 3. Accessory bin | Just below the hook, or on a shelf at hand height | Hat, gloves, water bottle | One open bin per child |
| 4. Paper drop | On the stall wall or in a shallow pocket | Folder for notes, library card, permission slips | One folder |
| 5. Shoe zone | Floor of the stall or bench shelf | Everyday shoes for the current season | One pair, plus one seasonal pair |
The most important word in that table is cap. Every cubby needs a hard limit, or it stops working the day the first extra item arrives.
TipMy cap: one coat, one bag, one pair of everyday shoes (plus one seasonal pair), one bin, and one folder. Anything beyond that goes to the closet, the garage, or the donation bag.
That limit is the entire trick behind a functional mudroom. Kids can maintain a cubby with a handful of items in it. They can’t maintain a cubby with fourteen. If you’ve been fighting piles at the bench, count what’s in a cubby before you buy anything new. You’re rarely short of space and nearly always over the limit.
Where the overflow goes
The natural question is what to do with the rest: the three extra jackets, the snow pants, the soccer bag, the second pair of rain boots. Two places work well:
- A seasonal rotation. Off-season gear moves out of the mudroom entirely and into a labeled bin in the garage or hall closet. I follow our seasonal gear rotation guide for the family garage, so the switch from summer to winter happens on a schedule instead of in a panic.
- A shared overflow bench. One large basket or bench-end bin for “everyone’s spare stuff” (extra mittens, the muddy-day boots) that doesn’t earn a slot in anyone’s personal cubby.
Layouts for Two, Three, or Four Kids
Once the cubbies are sized, decide how they sit together. This table shows which layout fits each household.
| Kids | Wall available | Best layout | Cubby order |
|---|---|---|---|
| 2 | About 30″ (plus 20″ for an adult cubby) | Single wall run | Youngest nearest the door, older child next |
| 3 | About 48″ on one wall, or a shorter wall plus a return | Single wall run or L-shape | Youngest two on the long wall, oldest on the return |
| 4 | About 65″ | Single wall run, L-shape, or split heights | Younger two at one end, older two at the other |
| Any number, ages 5+ years apart | Any | Split heights | Lower open stalls for the young, taller stalls for the old |
Layout 1: The single wall run
This is one long row of stalls with a continuous bench in front. It’s the most efficient use of space and the easiest to read at a glance.
Here’s how I order the cubbies:
- Youngest closest to the door. The smallest child needs the most help, and parents are usually standing near the door.
- Oldest farthest from the door, or nearest the garage entry if you have one. They can manage the longer walk and they tend to be the first out.
- Adult or “everyone” cubby at the far end, so the family’s shared gear doesn’t interrupt the kids’ sequence.
TipIf two children get along, sit them side by side. If they don’t, put a neutral cubby (or the adult one) between them. Nobody has to explain why.
Layout 2: The L-shape
If your wall runs out at 40 inches but an adjacent wall is free, an L-shape gives you two runs that meet at a corner. Put the youngest two on the longer wall and the oldest (or the older two, in a family of four) on the short return.
The corner is the L’s one real design problem. Two children sitting at the inside corner will knock knees and elbows. Leave about 12 inches of bench clear at the corner, or use a rounded corner bench. The corner itself can hold a shared basket or a tall umbrella stand.
Layout 3: Split heights for mixed ages
When ages span five or more years, a row of identical stalls fails one end or the other. A split-height layout groups the kids by age instead. The younger children get lower, open stalls with hooks at their shoulder height, around 30 to 35 inches for ages 3 and 4. The older children get taller stalls with a small upper shelf and hooks around 39 to 43 inches for ages 7 and 8.
If you’re building or buying a unit, look for adjustable shelves and a removable center divider. Off-the-shelf pieces work too. Mount hook rails at different heights on a plain backboard, then add cubbies or bins below.
With four kids on a tight wall, apply the same idea to one continuous bench. Put the younger two at one end and the older two at the other, with a bin on a shelf at bench height below the older pair’s hooks.
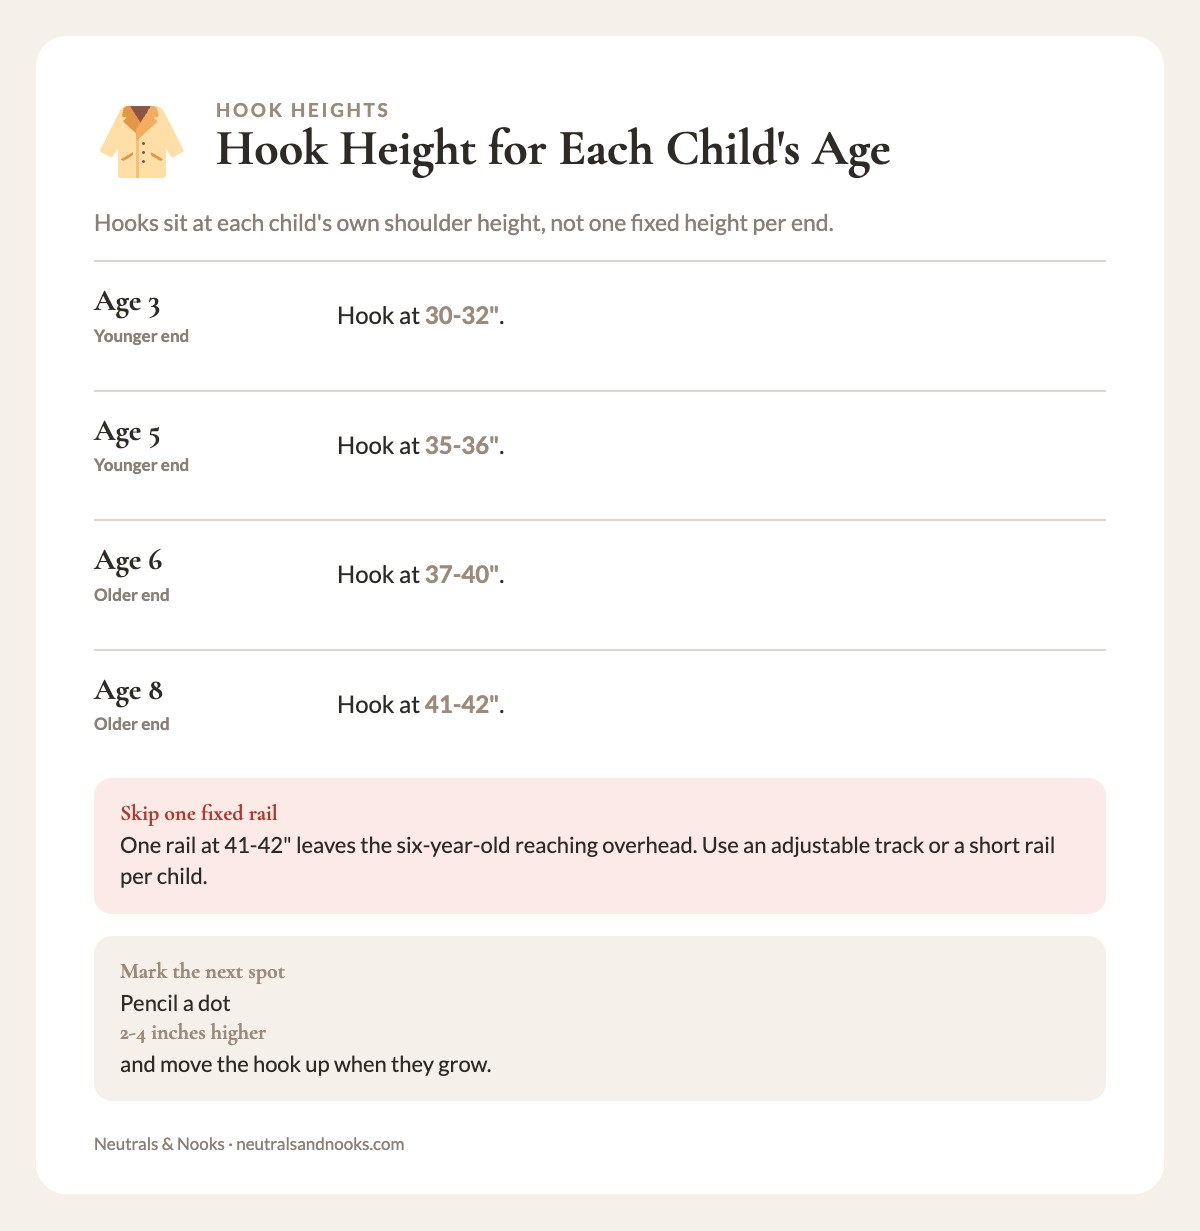
Set each hook from the chart rather than giving each end one fixed height. For the four-kid example above (ages 3, 5, 6, and 8), it looks like this:
| Child | End of the bench | Hook height |
|---|---|---|
| Age 3 | Younger end | 30–32″ |
| Age 5 | Younger end | 35–36″ |
| Age 6 | Older end | 37–40″ |
| Age 8 | Older end | 41–42″ |
An adjustable track at each end lets every hook sit at its own child’s shoulder and move up as they grow. A short rail per child works too. One fixed rail at 41 to 42 inches would leave the six-year-old reaching overhead.
Leave at least a hand-width of bare wall between the two sections so coats don’t overlap. It looks intentional when the materials match.
Just don’t put the oldest child’s hooks so high that the younger ones can’t manage in their absence. Kids get sick, sleep late, or go to a friend’s house. The system should work with any subset of children.
One cubby per child, for the whole childhood
A small piece of advice from experience: assign each child a stall and keep it. Don’t rotate them as they grow. The youngest inherits nothing, the oldest gets no upgrade, and no one loses the space that felt like theirs. If you set up the hooks to be adjustable, the cubby itself grows with the child, and the label goes with it.
Labels That Kids Can Actually Use
A label’s job isn’t to look nice, though it can. Its job is to answer a question a child can’t yet ask aloud: where does this go? Which means the right label depends on who’s reading it.
The principle I follow: label for the reader you have today, and make it easy to swap as they grow.
By age: what each child can read
| Age | What they can read | Label approach | Where it goes |
|---|---|---|---|
| 3–4 | Colors, pictures, their own photo | A color-and-symbol ID plus a simple icon per zone | Stall face at eye level (about 30–34″) |
| 5–6 | First name, simple words with picture support | Name in first-letter-capital, plus symbol; zone words with an icon | Stall face and shelf edges |
| 7–8 | Full name, short phrases | Name only; optional zone labels; let them customize | Stall face |
For pre-readers (ages 3–4): color and symbol
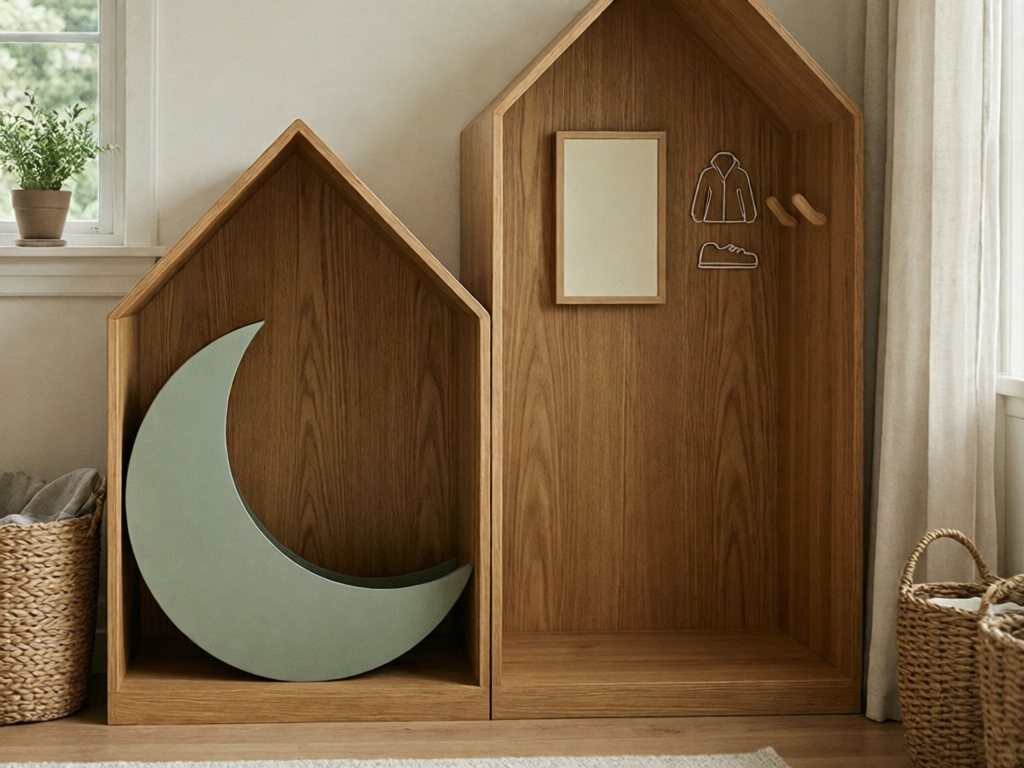
Give every child their own color and symbol, and use it everywhere. In a neutral palette, that might be sage and a moon, clay and a fox, oat and an acorn, ink and a star. The color appears on their stall; the symbol appears on their hook, their bin, and, if you’re feeling thorough, their water bottle and lunch bag.
For zones, use one picture per zone: a coat for the hook, a shoe for the floor, a mitten for the bin. Fix each one firmly in place, since a three-year-old will test any loose edge. A photo of the child’s own sneakers on the shoe zone works surprisingly well. A three-year-old can match the picture to the real thing without decoding a single symbol.
For early readers (ages 5–6): names and words with pictures
Kindergarten and first grade are when children start recognizing their names on sight. Write names with the first letter capitalized and the rest lowercase, which matches how schools teach it. Keep the symbol on the label as a fallback for the days when reading is too much effort at 7:50 a.m. Zone labels can add a simple word beneath the icon: “shoes,” “coat,” “hat.”
Use a plain, rounded sans-serif in a dark color on a light background. A letter height of about an inch is easy to read from standing height for this age.
For confident readers (ages 7–8): hand over the label maker
By second and third grade, the label is really just a name, and the best thing you can do is let the child own it. Hand them a label frame and a pen and let them decide how to write it. They’ll be more likely to respect a system they helped build. Ideally, this is also when you retire the symbols from their stall, if they ask you to. Eight-year-olds tend to feel that picture labels are for little kids, and they’re right.
Label height: eye level of the child
Mount labels where the child’s eyes naturally rest, not where yours do. Rough eye levels are about 32 inches for a three-year-old, 38 inches for a five-year-old, and 45 inches for an eight-year-old. If you have several ages on one wall, mount each label at that child’s eye level. The wall will look slightly stepped, which I find charming. If you’d rather have a clean horizontal line, choose a middle height around 36 inches and let the youngest look slightly up.
Label materials: what holds up
| Material | Pros | Cons |
|---|---|---|
| Slide-in label frames | Swap as reading develops, no residue | Slightly bulky; kids may pull them out |
| Matte removable vinyl | Clean, minimal, wipeable | Can peel at corners after a few months |
| Chalkboard or paint-marker strips | Fully rewritable | Smudges; chalk dust on clothes |
| Wooden tags, screwed on | Warm and sturdy | Not easily changed; needs drilling |
| Fabric tags on bins | Soft, quiet look | Not visible from a distance; washing needed |
Safety firstFor ages 3–4, fix labels securely with no loose or peelable pieces. Save slide-in frames and swappable tags for ages 5 and up, or mount them above toddler reach. Use water-based markers and chalk labeled non-toxic (AP or ASTM D-4236).
For ages 3–4, I use firmly adhered matte vinyl labels with no loose parts. From age 5 on, I switch to slide-in frames for stall labels, because the label changes as the child does. Zone icons stay matte vinyl, since they rarely need updating.
If you’ve already set up a label system in your kitchen, borrow its font and icon style so the house reads as one visual language. Our pantry label system is a good starting point for the style, and the same principles carry over to a mudroom.
Materials, Finish, and the Neutral Look
A mudroom takes more abuse than any other room in the house, so the finish matters as much as the form. It should look calm when it’s empty, and it should survive the moment a wet boot meets a wooden shelf.
Choose finishes that forgive
- Wood. Oak, ash, and birch hold up well and hide scuffs. If you choose painted wood, look for a scrubbable finish like satin or semi-gloss rather than matte, which marks easily.
- Melamine or laminate. Practical, cheap, and easy to wipe, but check the edges. Cheap edge banding peels quickly in a damp room.
- Metal hooks. Powder-coated or matte black hooks with rounded ends are the safest choice for small children. Skip anything with a sharp point at eye level.
- Baskets and bins. Woven baskets add warmth but soak up moisture and dirt. Solid bins with open tops wipe clean and are easier for small hands to use. If you love the woven look, line the basket or reserve it for dry items like hats and mittens.
Ventilation and drying
Wet gear needs air. If your children come home with damp coats or muddy boots, use a wire or slatted shelf rather than a solid one. Put a boot tray under the shoe zone, too. A rubber tray with a raised lip catches puddles and can be carried outside to rinse. A slatted back panel keeps the cubby from developing a mildew smell over a long winter.
A quiet palette
I like a restrained palette for family mudroom cubbies. Warm oak or soft white for the unit, matte black or brushed brass for hooks, and a few baskets in natural fiber and cream. Let the children’s items provide the color, which they will do without help. A unit in neutral tones frames the daily chaos of a bright yellow raincoat and mismatched mittens as something charming, rather than something the room is fighting against.
A few small details that make a difference:
- Round the corners. Any exposed edge at child height should be rounded or softened.
- Keep the top of the unit clear. A flat surface becomes a landing zone for mail, keys, and half-finished crafts. If you need a catch-all, give it a tray and a limit.
Teaching Kids the Arrival Routine
The best-sized cubby in the world still needs a routine. The good news is that the routine is short, and children in this age range are remarkably good at short, predictable sequences.
Ours is four steps, always in the same order. Once practiced, they take about a minute or two.
- Shoes off, onto the shoe zone. Sit on the bench, take them off, and put them in the cubby.
- Coat on the hook. Loop over the hook, no folding required.
- Backpack on its hook or shelf. Lunchbox goes to the kitchen counter on the way in.
- Paper folder. Anything that came home from school goes in the folder for the parent to review.
There’s no sweeping or sorting in it. I taught it as a chant for the youngest (“shoes, coat, bag, paper”), and the older children picked it up by listening.
How to teach it
- Rehearse it on a calm Saturday. Walk out the front door and come back in three times, doing the sequence each time. It feels silly and it works, because children learn from doing it with no pressure.
- Stand beside them the first week. For ages three and four, physically help with the hook. For ages five and up, point, don’t do.
- Praise the outcome, not the tidiness. “Your coat is on the hook” beats “good job cleaning up.”
- Let mistakes ride. If a coat lands on the floor, hand it back and say “hook.” No lecture.
Once the arrival sequence is solid, the same hooks and cubbies serve the morning departure in reverse. For the rest of the school-day flow, pair the mudroom with the family command center and the homework station.
The Friday five-minute reset
Even the best system drifts. I run a five-minute reset on Friday afternoons:
- Empty backpacks and lunchboxes.
- Pull any extra items out of the cubbies (the lone glove, the water bottle from last Tuesday).
- Wipe the shoe zone if it’s muddy.
- Send laundry to the hamper and papers to the family folder.
It keeps the cubbies at their intended limits, and it means that Monday morning starts with everyone’s things where they belong.
Troubleshooting Kids’ Mudroom Cubbies: Common Problems and Fixes
When the cubbies stop working, the cause is usually one of these.
| Problem | Likely cause | Fix |
|---|---|---|
| Backpacks keep falling out | Cubby too narrow or shallow | Add a hook on the stall side; upsize the width to the next age row |
| Coats end up on the floor | Hook too high, or too many items on it | Lower the hook to shoulder height; one coat and one bag per hook |
| Shoes pile in front of the cubby | Too many pairs, or shoe space too small | Cap at one everyday pair and one seasonal pair; add a boot tray |
| The youngest can’t reach anything | Everything is set for the older kids | Lower the hooks and use an 11–12″ bench; add a wide, low footrest if needed |
| Older kids ignore the labels | Labels feel babyish | Swap symbols for names; let them design their own |
| Damp, musty smell | Wet gear in a closed space | Use a slatted shelf and a boot tray; air out on weekends |
| Siblings raid each other’s cubbies | No visual boundary | Add divider panels; use distinct colors and symbols |
Seasonal Swaps and Room to Grow
A cubby unit isn’t a one-time project. It shifts with the seasons and the children.
The fall switch
In late September and October, the cubbies change over. Sandals and sun hats move out; light jackets, rain boots, and hats move in. A few weeks later, heavier coats and gloves. I keep a “next season” bin on the parent shelf at the top of each stall, packed a few weeks ahead. The swap then takes a minute per child instead of an evening.
Anything that doesn’t fit the cubby limit goes to the off-season storage bin. Snow pants and boots that live in the garage until the first frost are much easier to find when they’re labeled and in a consistent spot.
The annual doorframe day
Every September, I pick a Saturday and re-measure. I stand each child against the same doorframe, mark their height and shoulder with a pencil, and check the hook against the chart above. It takes about five minutes per child, and it doubles as a keepsake, since the pencil marks stay on the frame for years.
Things I check on doorframe day:
- Hook height. Move it up if it’s now below the child’s shoulder.
- Cubby width. Does the backpack still fit with room to spare? A growing child usually gets a bigger bag.
- Labels. Is the current label still the right one for their reading level?
- Shoes. Do the shoe zone and boot space still match the sizes they’re wearing?
Handing down
Each child keeps their stall for good. When an older child moves out or stops using the mudroom, turn that stall into shared space for sports gear or guests instead of handing it down.
Frequently Asked Questions
How wide should a kid’s mudroom cubby be?
Plan on 12 to 18 inches per child for ages three to eight. A three-year-old needs 12 to 13 inches, and an eight-year-old with a full-size pack needs 17 to 18. If you’re buying one size for several kids, 15 to 16 inches is a workable compromise.
How high should I hang hooks for a 3-year-old and an 8-year-old on the same wall?
Hang each hook at roughly the child’s shoulder height: about 30 to 32 inches for a three-year-old and 41 to 42 inches for an eight-year-old. With a gap that wide, skip the single shared rail. Separate rails or an adjustable track let each hook move up as that child grows.
Should each child have their own cubby, or can siblings share?
Give each child their own when the wall allows. Separate cubbies cut down on arguments and give kids a sense of ownership. Siblings under five can share a wider stall with two hooks and two labeled bins until they start school.
What’s the best way to label cubbies for a child who can’t read yet?
Give that child their own color and symbol, such as sage and a moon, and repeat it on their hook, bin, and belongings. Use simple icons or a photo of the real item for each zone, like their own sneakers for the shoe area. Mount labels at their eye level, with their written name alongside so they start to recognize it.
How many pairs of shoes should live in each cubby?
One everyday pair plus one seasonal pair, such as rain boots in spring or snow boots in winter. Sports shoes, dressy shoes, and last season’s sandals belong in a closet or a labeled bin elsewhere. Capping the count stops the pile-up in front of the cubby.
What if I don’t have a mudroom at all?
Everything in this post works in a hallway, a garage entry, or a stretch of wall by the front door. You need a wall about 30 to 65 inches wide with 36 inches of clear floor in front. Start with a hook rail at the right height, a narrow bench, and a bin per child, then upgrade to full stalls later.
How to Size Mudroom Cubbies for Kids: The Short Version
You don’t need a new mudroom to fix your mornings. You need a wall that fits the people who actually use it.
- Measure the kids. Mark each child’s height and shoulder on a doorframe.
- Size the cubbies. Use the chart for cubby width, hook height, and bench height.
- Label for today’s reader. Use color and symbol for pre-readers, and names once they read.
- Cap the contents. One coat, one bag, one or two pairs of shoes, one bin, and one folder.
That’s the whole system, and every part of it can be adjusted as they grow.
If you do one thing this weekend, stand your youngest against a doorframe and mark their shoulder. Then check your hooks. That small pencil line is where a calmer morning starts.