How to Organize a Garage for Family Storage
Learn how to organize your family garage in one weekend by clearing it out, setting zones, adding storage, and securing hazards. You'll get actionable steps for sorting and proper disposal.
- Empty your garage onto the driveway and sort items into Keep, Donate/Sell, Trash, and Relocate piles.
- Immediately move and lock up hazardous items like chemicals, fuel, and sharp tools out of children's reach.
- Properly dispose of items like expired car seats, hazardous waste, and old paint; don't just trash them.
- If an item hasn't been used in 12 months and isn't seasonal, it's time to let it go.
- After clearing, define four zones and plan for wall and ceiling storage to keep your center clear.
This post contains affiliate links. As an Amazon Associate I earn from qualifying purchases.
Here’s how to organize a garage for a family in one weekend: clear it, set four zones, add wall and ceiling storage, and lock up anything dangerous.
The order matters. Clear first, then install a locking cabinet and lock up the hazards. After that, tape the zones, choose your wall and kid-gear storage, and only then buy the rest. I’ve laid the steps out in that order below.
In this article (10 sections)
- How to Organize a Garage: Clear Everything Out First
- Garage Safety for Kids: Locking Up Chemicals, Tools and Batteries
- Zone Planning: Mapping Your Garage Layout
- Garage Wall Storage: Slatwall, French Cleat and Shelving
- Kid-Safe Garage Storage: Bikes, Scooters and Sports Gear
- What to Buy First: A Garage Storage Budget
- How to Label Garage Bins and Do a Twice-Yearly Reset
- Finishing Touches: Two Upgrades Worth Adding
- Final Check: The Garage Parking Test
- Garage Organization FAQ
How to Organize a Garage: Clear Everything Out First
Shifting piles around won’t fix a full garage. Pick a dry weekend morning, ask for help, and empty everything onto the driveway.
Safety firstHave kids and pets stay inside or with another adult during the clear-out. Move chemicals, fuel, batteries and sharp tools first, to one spot children can’t reach. Never leave them unattended on the driveway. At the end of the day, lock them up out of children’s reach, and keep fuel out of the house itself.
- Pick a dry day. Plan for a full morning and ask a spouse, teen or friend to help.
- Move the hazards first. Carry chemicals, fuel, batteries, propane and sharp tools to one out-of-reach spot, and keep an adult near them.
- Empty everything else. Move the rest onto the driveway.
- Sort into four piles. Keep, Donate/Sell, Trash and Relocate.
- Sweep and clean. Wipe down shelves and sweep the bare floor.
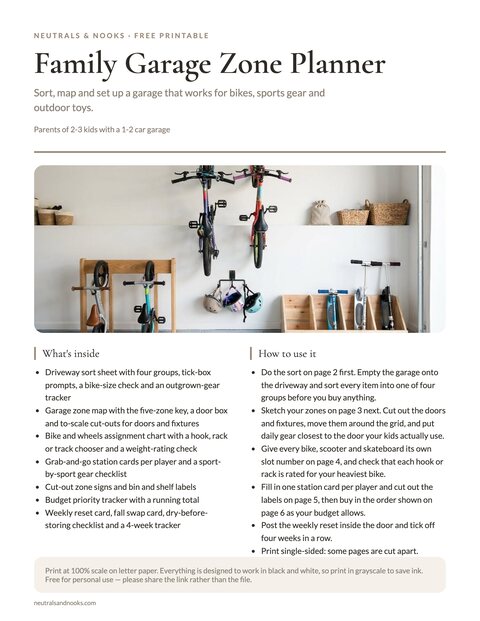
Free printable · 6 pages
Family Garage Zone Planner
A driveway sort sheet, a garage zone map with cut-out doors and fixtures, a bike and wheels chart, grab-and-go station cards, cut-out bin and zone labels, a budget tracker, and a weekly reset with a fall swap and dry-before-storing checklist.
Free. Your download link appears right here. You'll also join the Monthly Home Reset. Unsubscribe anytime. Privacy
Seeing everything in daylight shows how much you’ve been storing. Use one simple rule: if it hasn’t been used in 12 months and isn’t seasonal, it goes. Relocate means anything that belongs inside the house.
Be kind but honest about the broken camping chair and the skis nobody has touched in five years. The high chair your youngest outgrew, dried-up paint cans and gear from abandoned hobbies qualify too.
If a “maybe” pile starts forming, give it one box and write the date on it. Whatever is still in the box at the next reset goes.
TipGarages swing in temperature and humidity. Put paper, photos, fabrics and anything that spoils in the Relocate pile and store them indoors.
Some items need a specific exit. Here is where each one goes.
| Item | Where it goes | Note |
|---|---|---|
| Expired car seats | Trash, or a retailer trade-in event. These run periodically, not year-round. | Check the expiration date stamped on the seat or its label. It is usually 6-10 years from manufacture and varies by manufacturer. Cut the straps and write EXPIRED on the shell so no one reuses it. |
| Car seats from a crash | Replace after a moderate or severe crash | Don’t reuse or donate it. NHTSA counts a crash as minor only if all five of these are true. The car could be driven away, and the door nearest the seat was undamaged. No one was injured, no airbags deployed, and the seat shows no visible damage. Check your seat’s manual too, since some manufacturers are stricter. |
| Paint, pesticides, fuel, old batteries | Household hazardous waste program | Never the trash or a drain; many programs are free or low-cost, so check yours |
| Propane cylinders | Ask your local hazardous waste program or supplier | Don’t put partly used cylinders in the trash |
| Working sports gear | Facebook Marketplace or a local resale shop | Sells quickly when it is clean and priced fairly |
| Baby gear in good condition | Local shelter or consignment shop | Check cribs, high chairs and other gear on CPSC.gov first and call ahead. Never donate walkers (the AAP recommends against them) or car seats with an unknown history. Don’t sell, donate or hand down recalled items or drop-side cribs, which have been banned from sale since 2011. Take them apart and dispose of them instead. |
Garage Safety for Kids: Locking Up Chemicals, Tools and Batteries
A garage holds poisons, heavy loads and moving vehicles, so set up safe storage first. The locking cabinet and a locked battery bin are the first things to buy and install, ahead of shelving, wall systems and bins.
Gasoline needs its own home. Give it a lockable flammable-liquids safety cabinet or a locked, ventilated outdoor shed, separate from the general chemicals and tools cabinet.
Until the cabinet, the battery bin and any fuel storage are in place, don’t move chemicals, fuel or spare batteries back into the garage. Keep them somewhere children can’t reach, and keep fuel out of the house itself.
Safety first: chemicals, tools and fuelInstall the locking cabinet first, then lock these up before anything else goes back:
- Labels: keep chemicals, pesticides and antifreeze in their original labeled containers.
- A real lock: store them, and all power tools, in a cabinet with a key or combination lock.
- Latches: a child-resistant latch on its own is not enough for chemicals or power tools.
- Height: mounting the cabinet high is a useful extra, not a substitute for the lock. Re-check the height as kids grow.
- Fuel cans: keep gasoline only in approved, labeled cans. It is a poison as well as a fire risk.
- Fuel storage: lock the cans in a flammable-liquids safety cabinet or a locked, ventilated outdoor shed, out of children’s reach.
- Never with other chemicals: don’t put gasoline in the general cabinet. It gives no fire protection, and fuel vapors can build up inside.
- Ignition: keep fuel cans away from water heaters and other ignition sources.
Safety first: batteries and chargingSpare and e-bike batteries are a fire and poison risk:
- Locked bin: store spare lithium and button batteries in a locked bin, kept cool and dry. The bin is for storage, never for charging.
- Terminals: keep each battery in its original packaging or tape over the terminals so they can’t touch.
- No metal: keep batteries away from keys, coins, tools and other metal objects.
- Chargers: use only UL-certified e-bike and scooter batteries and chargers, and only the charger that came with the battery.
- Surface: charge e-bike and scooter batteries on a hard surface, away from the car, fuel, stored gear and your exit door.
- Outdoors if you can: charge outdoors or in a detached space if you have one.
- Supervise: stay nearby while a battery charges. Never charge a battery unattended or overnight.
- Damage: stop using any battery that is swollen, warm or smells odd.
- Disposal: move a damaged battery outdoors only if it is safe to do so, then call your local hazardous waste program.
- Emergency: if a battery is smoking, hissing or very hot, leave the area and call 911.
Safety first: propane and alarmsKeep propane out of the garage and the alarms working:
- Propane outdoors: store cylinders upright outdoors, in a shaded, ventilated spot children cannot reach.
- Distance: keep cylinders away from doors, windows, vents and ignition sources.
- Not in the garage: manufacturers and fire codes advise against storing propane cylinders in a garage or any enclosed space.
- Alarms beside the garage: install working smoke and carbon monoxide alarms in the rooms and hallway next to an attached garage. Test them monthly.
- Alarm in the garage: if you want one, use a heat alarm, not a smoke alarm.
- Why heat: temperature swings, humidity and exhaust can make smoke alarms fail or sound falsely in a garage.
Safety first: shelves, door and racksCheck these before kids use the space:
- Shelves: anchor tall shelving to wall studs with anti-tip brackets.
- Loads: store heavy items low and never exceed rated loads. Teach kids that shelves are not for climbing.
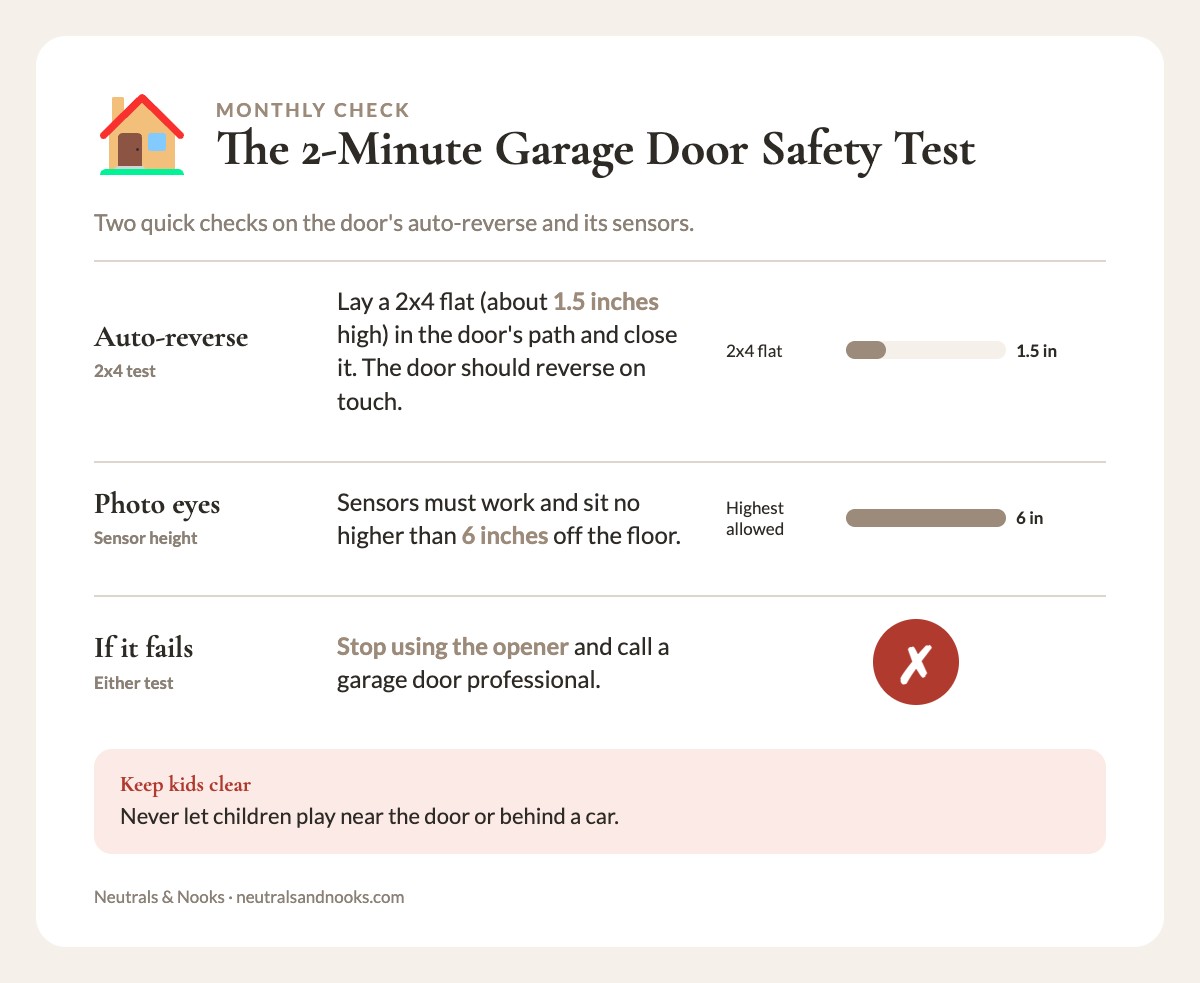
- Door auto-reverse: test it monthly. Lay a 2×4 flat on the floor in the door’s path (about 1.5 inches high) and close the door.
- What should happen: the door should reverse when it touches the board.
- Photo-eyes: check that the sensors work and sit no higher than 6 inches off the floor.
- If either test fails: stop using the opener and call a garage door professional.
- Kids and the door: keep remote openers away from kids, and never let children play near the door or behind a car.
- Racks and hoists: only adults operate them. Mount them into joists, and never let kids stand under a loaded rack.
Good to knowKeep Poison Control (1-800-222-1222) handy. If a child may have swallowed a button battery, go to the ER immediately and call the National Battery Ingestion Hotline (800-498-8666). Don’t wait for symptoms.
Run through this list on set-up day and again at each reset. For the rooms inside the house, see our baby proofing guide.
| Lock-up check | How often |
|---|---|
| Chemicals and power tools are in the locking cabinet. | Set-up day and every reset. |
| Fuel cans are locked in the fuel cabinet or outdoor shed, away from ignition sources. | Set-up day and every reset. |
| Spare batteries are in the locked bin. | Set-up day and every reset. |
| No propane cylinders are stored in the garage. | Every reset. |
| Tall shelves are anchored to studs. | Set-up day, then each fall. |
| The garage door auto-reverse and photo-eye sensors work. | Monthly. |
| The smoke and carbon monoxide alarms next to the garage work, plus the garage heat alarm if you have one. | Monthly, with the door test. |
Zone Planning: Mapping Your Garage Layout
Before anything goes back into the garage, plan four zones. Think of your garage as a room with dedicated areas. The four steps after the zone table show how to measure and tape them.
Zone 1: Frequently Used
Bikes, scooters, the stroller and current-season gear. Put this zone closest to your most-used door, with everything visible and grab-and-go. Our kid gear storage guide covers this zone in detail.
Daily shoes and backpacks belong in a mudroom setup instead.
Zone 2: Seasonal and Occasional
Holiday decorations, camping gear, off-season sports equipment and luggage. Store it high or deep, since you only reach it a few times a year.
Zone 3: Tools and Home Maintenance
Hardware, paint, gardening supplies and lawn care equipment live here, near the workbench or along one wall. Keep this zone away from the kid grab-and-go zone.
Chemicals, solvents, antifreeze, pesticides and power tools go in the locking cabinet, and mower fuel goes in its own fuel storage, both covered in the safety section above. None of these sit out on the open workbench wall.
Keep everyday hand tools organized so you can find the right screwdriver without dumping a toolbox.
Zone 4: Overflow and Bulk Storage
Bulk supplies, the folding table, extra chairs and anything you rarely touch. Use the hardest-to-reach spots: high shelves, ceiling racks or back corners.
| Zone | What goes there | Where | Kid access |
|---|---|---|---|
| 1. Frequent | Bikes, scooters, stroller, current-season gear | Near the main door | Grab-and-go |
| 2. Seasonal | Holiday bins, camping gear, luggage | High shelves, ceiling racks | Adults only |
| 3. Tools and chemicals | Hardware, paint, lawn care | Workbench wall, locked cabinet | Locked cabinet only |
| 4. Overflow | Bulk supplies, folding table | Back corners, high shelves | Adults only |
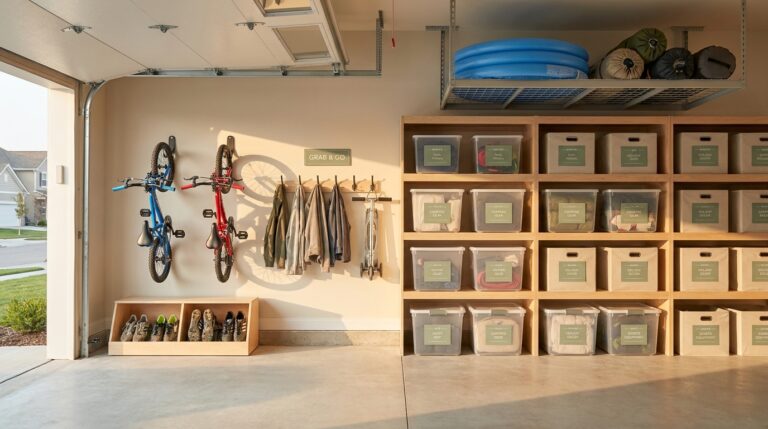
The most critical rule: leave the center of the garage clear for the car. Everything lives on the walls, ceiling or in the back. If your zones creep into the parking area, it’s time to purge more.
Our Family Garage Zone Planner walks you through this step with a zone map, an inventory sheet and a reset checklist.
- Measure. A typical one-car garage is about 12 x 20 feet. Measure yours and sketch it.
- Mark the car footprint. Tape the parking area first, with 2-3 feet beside the doors.
- Tape four zones. Use the walls and back of the garage for everything else.
- Place bins and shelves. Set them inside the tape before you mount anything.
Garage Wall Storage: Slatwall, French Cleat and Shelving
Walls hold bikes, tools and gear without using any floor.
Slatwall Panels
These horizontal-groove panels mount to your garage walls and accept hooks, shelves, bins and holders. PVC slatwall panels are durable and moisture-resistant. Add hooks for bikes, tool holders and shelf brackets, and follow each hook’s weight rating. The advantage over pegboard is that slatwall handles heavy items and the accessories lock securely in place.
French Cleat Systems
A French cleat wall is the DIY-friendly alternative. Angled strips of plywood let you hang custom tool holders, shelf brackets and bins that slide on and off.
It costs less than slatwall but takes a weekend and a saw. Slatwall costs more and goes up faster. Either way, matching neutral bins and hooks make the wall look calm instead of crowded.
Heavy-Duty Shelving
For bins and bulky items, freestanding metal shelving is essential. Choose a sturdy, adjustable steel unit. Manufacturers rate heavy-duty units for several thousand pounds total, evenly distributed, so check the label for per-shelf limits. Place these along the back wall or side walls, and use them to get everything off the floor.
Ceiling Storage
Overhead racks mounted into ceiling joists hold bins, luggage and camping gear, the things you reach for only a few times a year. Our holiday decor storage guide pairs well with this zone.
A ceiling-mount bike hoist lifts a bike overhead with a simple pulley system and frees up floor space. Ceiling joists are usually 16 or 24 inches on center, and the rack’s rated load is shown on the packaging.
| Option | Typical cost | Install | Best for |
|---|---|---|---|
| Slatwall | $5-$12 per sq ft | Faster, moderate skill | Hooks, bins and shelves; follow each hook’s weight rating |
| French cleat | Plywood and screws | A weekend and a saw | Custom tool holders and shelf brackets |
| Freestanding shelving | $80-$200 per unit | Assemble and anchor | Bins and bulky items; check per-shelf limits |
| Ceiling racks and hoists | Racks $100-$250; hoists $25-$60 | Mount into joists | Luggage, camping gear and bikes; adults only |
Kid-Safe Garage Storage: Bikes, Scooters and Sports Gear
Kid gear is the bulk of a family garage: bikes in several sizes, helmets, scooters, balls and outdoor toys. Here is the short version. The full setup is in our bikes, sports gear and outdoor toys guide.
Bike Storage
Bikes are the biggest space hogs. For families with multiple bikes, vertical wall hooks store them upright and take far less floor space. Anchor hooks into studs.
Adults hang the heavier bikes. Kids can use low-mounted hooks or floor stands for light bikes only, with supervision.
Scooter and Ride-On Storage
A purpose-built scooter rack keeps scooters upright. A row of large J-hooks mounted low on the wall also works for scooters and balance bikes. For ride-on toys like Power Wheels, designate a specific floor zone and use painter’s tape to mark the “parking spot”. Let your child pick the tape color.
Sports Equipment
A rolling wire ball caddy or a DIY bungee-cord ball corral keeps basketballs, soccer balls, and footballs from rolling around. For bats, sticks, and rackets, a vertical wall-mounted holder keeps them upright and organized by sport.
Outdoor Toy Bin
For the small stuff such as chalk, bubbles, jump ropes and water guns, a large water-resistant deck box by the garage door works well. Our outdoor toy storage guide has more ideas. Label it “Outdoor Fun” and make it the one-stop grab for backyard play.
Safety firstCheck that the lid can’t latch a child inside. Use the box for storing items, not for seating or toddler play.
| Item | Storage option | Mounting height | Who handles it |
|---|---|---|---|
| Bikes | Vertical wall hooks | Stud-anchored; low for light kid bikes | Adults for heavy bikes |
| Scooters | Rack or J-hooks | Low | Kids |
| Balls | Wire caddy or bungee corral | Floor | Kids |
| Bats and rackets | Wall-mounted holder | Mid-height | Kids with supervision |
| Outdoor toys | Deck box | Floor by the door | Kids |
What to Buy First: A Garage Storage Budget
The locking cabinet comes before everything else. Buy and install it, along with a locked bin for spare batteries, before any chemicals or batteries go back in.
If you keep gasoline, set up its separate fuel storage (see the safety section) at the same time. Gasoline storage is a separate cost on top of the budget tiers below.
Buy the rest once the garage is empty, the zones are taped and you’ve chosen your wall and kid-gear storage. Add each piece as budget allows.
Plan on two budget tiers. A safety-and-basics start, the locking cabinet plus shelving, costs about $180-$450. A full build that adds a wall system, bins and ceiling racks costs about $600-$1,500.
Prices below are typical US ranges and vary by store and size.
| Item | What it does | Typical cost | Buy order |
|---|---|---|---|
| Locking cabinet | Keeps chemicals and power tools away from kids | $100-$250 for a cabinet | Before anything else (safety) |
| Flammable-liquids safety cabinet (only if you store gasoline and have no locked outdoor shed) | Keeps fuel cans locked up and apart from other chemicals | Varies by size, and is a separate cost | Before any fuel goes back (safety) |
| Heavy-duty shelving | Gets bins and bulky gear off the floor | $80-$200 per unit | First |
| Wall system (slatwall or French cleat) | Hangs bikes, tools and gear | Slatwall $5-$12 per sq ft; French cleat is plywood and screws | Second |
| Matching clear bins | Makes seasonal storage visible and stackable | $10-$20 each | Third |
| Ceiling racks | Holds luggage, camping and holiday bins | $100-$250 per rack | Last, as budget allows |
How to Label Garage Bins and Do a Twice-Yearly Reset
A tidy garage only stays tidy if everyone can see where things go. Labels and a short twice-yearly reset do most of that work.
Labels
Label every bin, shelf and zone in large, clear type that reads from a few feet away. A label maker with laminated, water-resistant labels holds up in garage conditions.
Label both the front and the lid of each bin so you can identify it when stacked. Keep zone labels temporary until you’re sure the layout works, then switch to permanent ones.
TipBuy bins in the same brand, size and one neutral color, and keep one label style throughout. The garage will feel like part of the rest of your home.
Bins
Use clear or translucent bins for seasonal storage so you can see contents without opening them. Latching clear bins of around 60 quarts are the workhorse here: sturdy, stackable and see-through.
Skip cardboard boxes in the garage. They attract pests, absorb moisture and fall apart over time.
Twice-yearly reset
Schedule two resets per year. In spring, swap winter gear for summer and check for pest damage. In fall, swap summer gear for winter and donate outgrown bikes and sports equipment.
Each reset takes about an hour once the system is in place. It’s also the step most likely to slip, because nothing forces it, so put it in your phone calendar now.
For a fuller routine, see our seasonal gear rotation guide.
| Spring reset | Fall reset |
|---|---|
| Swap winter gear for summer gear | Swap summer gear for winter gear |
| Check for pest damage, moisture and mold | Donate outgrown bikes and sports equipment |
| Check that no propane or expired sunscreen has crept into the garage | Check that shelf anchors are tight |
| Take old batteries to your hazardous waste program | Test the garage door auto-reverse and the smoke, carbon monoxide and heat alarms |
End each reset with this quick check.
- Chemicals, fuel cans, tools and batteries are locked up.
- Tall shelves are anchored.
- The garage door auto-reverse is tested.
- The center is clear for the car.
- Every bin has a label on the front and the lid.
- The next reset is in your phone calendar.
Finishing Touches: Two Upgrades Worth Adding
A retractable extension cord reel mounted to the ceiling keeps cords untangled and accessible.
A rubber garage floor mat or epoxy floor coating in the parking area protects the concrete and makes sweeping easier.
Final Check: The Garage Parking Test
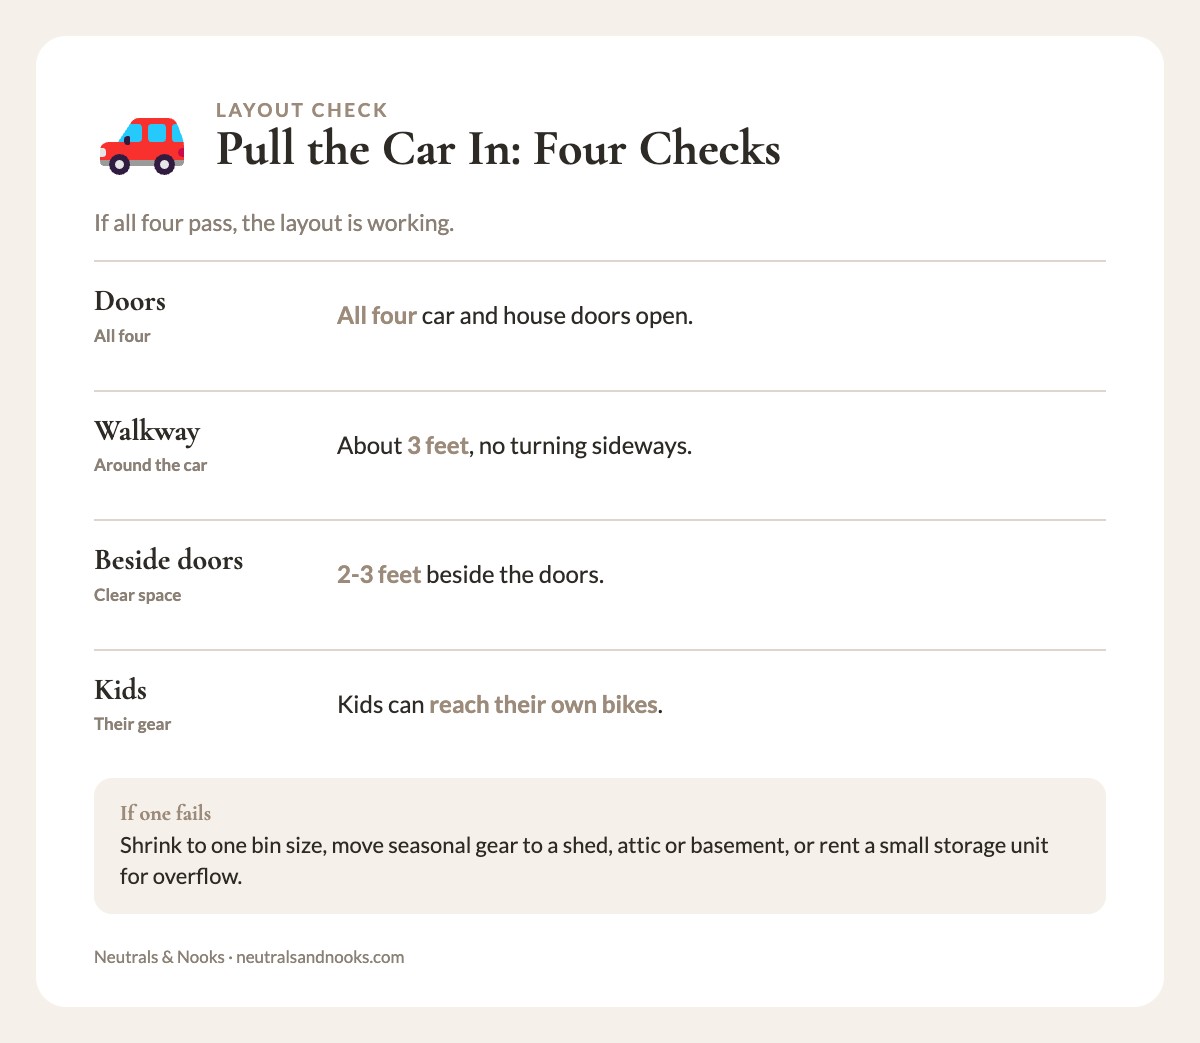
When everything is back in the garage, pull your car in and check four things.
If all four pass, the layout is working. If one fails, try one of these fixes.
- Shrink to one bin size.
- Move seasonal gear to a shed, attic or basement.
- Use ceiling racks for luggage and holiday bins.
- Rent a small storage unit for overflow.
Garage Organization FAQ
How much does it cost to organize a garage?
Plan on two tiers. A safety-and-basics start, a locking cabinet plus shelving, costs about $180-$450. A full build that adds a wall system, bins and ceiling racks costs about $600-$1,500. Install the locking cabinet before any chemicals go back in. If you keep gasoline, its fuel cabinet or locked outdoor shed is a separate cost.
What should go in the garage versus inside the house?
Garages swing in temperature and humidity, so keep paper, photos, fabrics and anything that spoils indoors. Bikes, tools, seasonal gear and sealed bins suit the garage. For daily shoes and backpacks, a mudroom cubby setup works better.
How do I store bikes with kids?
Use stud-anchored vertical hooks. Adults hang the heavy bikes, and kids use low hooks or floor stands for light bikes only, with supervision.
What is the best garage shelving for a family?
Choose sturdy, adjustable steel shelving and check the label for per-shelf load limits. Anchor it to wall studs and put heavy bins low.
How do I organize a small one-car garage?
A typical one-car garage is about 12 x 20 feet, so go vertical. Use wall hooks, a ceiling rack and one bin size, and move seasonal gear to a shed, attic or basement if the parking test fails.
How do I keep kids out of garage chemicals?
Keep chemicals in their original labeled containers inside a cabinet with a real lock, either a key or a combination. A child-resistant latch on its own is not enough. Gasoline goes in approved fuel cans, locked in its own fuel cabinet or a ventilated outdoor shed. Keep Poison Control (1-800-222-1222) handy.
Neutral Nina
Neutral Nina is an interior design enthusiast and mom of three who proves that beautiful, organized spaces and family life can coexist. She shares practical strategies for creating calm, functional homes that work for kids and grown-ups alike.