Setting Up Your Family Backyard for Summer: A Room-by-Room Outdoor Guide
Transform your backyard into a functional summer oasis by organizing it into intentional zones, just like rooms in your home. You'll learn how to create distinct areas for dining, play, relaxation, activities, and storage.
- Organize your backyard into distinct zones, just like rooms in your home.
- Create dedicated areas for dining, play, relaxation, activities, and storage.
- Ensure clear sight lines between zones for easy supervision of kids.
- Adapt the 'room' concept to your space, even if zones need to overlap.
The first genuinely warm Saturday arrived two weeks ago, and my kids reacted exactly the way kids react: they bolted for the back door, flung it open, ran outside, and then stopped.
The backyard was a wasteland.
Not in the dramatic, post-apocalyptic sense. In the quiet, nobody-has-been-out-here-since-October sense. The patio furniture was still stacked against the house under a tarp that had developed a small pond of rainwater on top. The sandbox was full of decomposed leaves and what I’m fairly certain was a family of earthworms. A deflated soccer ball sat in the corner of the yard next to a plastic shovel from last summer’s gardening phase. The outdoor toy bin had become a terrarium—moss growing on the inside, dead bugs on the bottom, and a jump rope tangled around everything. My daughter’s art easel was faded and wobbly from six months of weather exposure.
The kids stood on the patio for about fifteen seconds, then turned around and went back inside to ask for screen time.
This happens every spring in every family with a backyard. The outdoor space that was your best asset from June through September becomes a forgotten zone from October through March, and then when the warm weather returns, you’re standing in a space that needs a complete reset before anyone can enjoy it.
Here’s what I’ve learned after doing this reset multiple times: the key to a backyard that actually gets used all summer isn’t just cleaning it up—it’s setting it up with intentional zones, the same way you’d arrange the rooms inside your house. You wouldn’t dump all your furniture in a single room and call it a floor plan. Your backyard deserves the same thoughtful layout.
This guide walks through a room-by-room approach to outdoor family living: five distinct zones, each designed for a specific purpose, with product recommendations at every budget level, safety considerations for families with kids, and a maintenance plan that keeps the whole setup functional from Memorial Day through Labor Day and beyond.
The Room-by-Room Approach to Outdoor Living
Inside your home, rooms have defined purposes. The kitchen is for cooking. The living room is for gathering. The bedroom is for sleeping. You don’t eat dinner on your bed or sleep on the kitchen floor (college doesn’t count). Each room has furniture, storage, and boundaries suited to its function.
Most family backyards have no such organization. Everything happens everywhere. The kids play on the patio where you’re trying to eat. The sandbox toys migrate to the garden. The lounge chair is covered in sidewalk chalk. The hose is tangled around the play structure. It’s one big, undifferentiated outdoor space, and the result is that nothing works particularly well for anything.
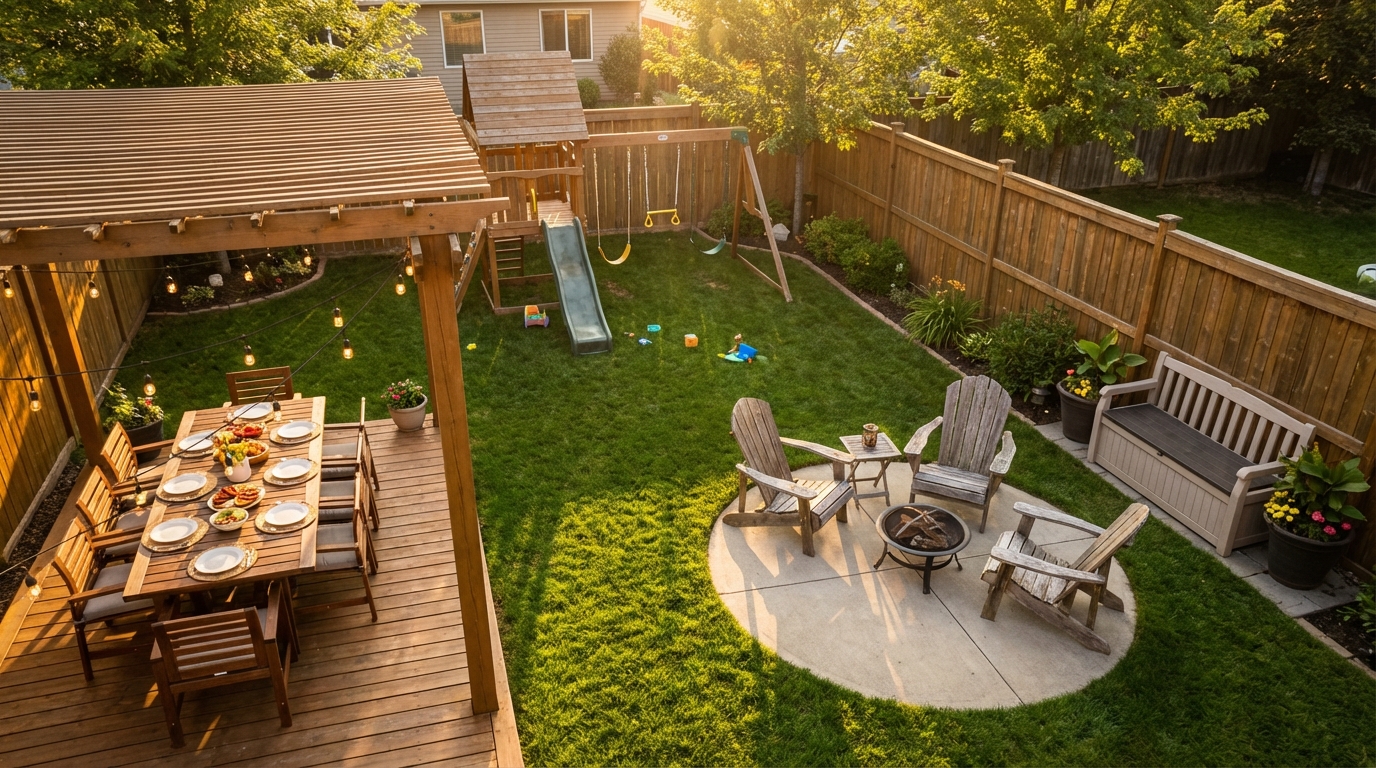
The room-by-room approach means dividing your outdoor space into distinct zones, each with its own purpose, its own boundaries, and its own setup. The zones don’t need walls—they just need defined areas, appropriate furniture or equipment, and clear sight lines between them so you can supervise kids while sitting in a different zone.
The five outdoor rooms I recommend for families:
- The Outdoor Dining Zone — where meals, snacks, and messy eating happen
- The Play Zone — where kids play independently with appropriate equipment
- The Relaxation Zone — where adults recharge (and kids are welcome on calm terms)
- The Activity Station — where messy, creative, and sensory activities happen
- The Storage Zone — where everything gets put away at the end of the day
Not every backyard can accommodate all five zones as separate physical spaces. A small backyard might combine the dining zone and relaxation zone, or the activity station and the play zone. But even a small patio benefits from designating areas by purpose, even if those areas overlap.
Let’s set up each room.
Room 1: The Outdoor Dining Zone
This is where your family eats outside, and it needs to handle everything from weeknight dinners to Saturday morning pancakes to the explosive mess of a toddler eating watermelon.
Choosing Your Table
The dining zone starts with a table that works for your family size and your reality. By “reality,” I mean: kids will spill on it, drop food under it, color on it with markers, and occasionally stand on the bench. Choose accordingly.
Table sizing: You need at least 30 inches of table width per person for comfortable eating. A family of four needs a table that’s at least 48 inches long. A family of five or six needs 60-72 inches. Round tables work well for families with small kids because there are no corners at eye level.
Product recommendations:
- Good ($80-150): The Lifetime 6-Foot Folding Table ($80-100). I know it sounds utilitarian, but hear me out. It’s weather-proof, seats six easily, wipes clean in seconds, and folds flat for storage in winter. Cover it with a fitted outdoor tablecloth (the Sorfey outdoor fitted tablecloth, about $20, has elastic edges and comes in neutral colors) and it looks perfectly acceptable. For a family with young kids who destroy surfaces, this is the practical champion.
- Better ($200-400): A resin or polywood outdoor dining table, like the POLYWOOD Nautical 37×72 dining table ($350-400). Polywood is made from recycled plastic, looks like painted wood, and is virtually indestructible. It doesn’t splinter, doesn’t rot, doesn’t need to be sealed or stained, and cleans with a hose. The 37×72 size seats six adults comfortably. Available in multiple colors; I’d go with sand, slate gray, or white for a neutral palette.
- Best ($500-1000): A teak or eucalyptus hardwood dining table. The amazonia teak collection and the Chris & Chris teak tables run $500-800 for a six-seater. Real wood is beautiful and weathers to a silver-gray patina over time. The tradeoff is maintenance—annual oiling if you want to preserve the original color, or letting it weather naturally if you prefer the patina. Teak is naturally weather-resistant but isn’t immune to staining from food and markers.
Seating That Survives Kids
Benches are better than individual chairs for families with small kids. Benches are harder to tip over, easier to slide in and out of, and fit more bodies in less space. Kids under 6 tend to squirm, slide, and shift—a bench accommodates that movement while a chair invites tipping.
If you prefer individual chairs, look for stackable or folding outdoor chairs with wide, stable bases. The Flash Furniture Brazos series ($30-40 per chair) is lightweight, stackable, and comes in neutral colors. For higher budgets, Adirondack-style dining chairs ($80-150 each) are extremely stable and comfortable.
High chair solution for outdoor dining: We used a portable clip-on high chair (the Inglesina Fast Table Chair, about $70) that clamps directly onto the table edge. It travels to restaurants and grandparents’ houses too, and it was the best feeding-related purchase we made. It works on any table with a surface at least 1.25 inches thick.
Shade Is Not Optional
Eating in direct sun is miserable for everyone, especially kids. You need shade over the dining zone from roughly 11 AM to 3 PM at minimum.
- Budget shade ($30-80): A 9-10 foot patio umbrella with a weighted base. The Simple Deluxe 9ft patio umbrella ($30-40) with a 50-lb weighted base ($25-35) provides adequate shade for a 4-6 person table. Crank-tilt models let you angle the shade as the sun moves. Choose a neutral color (tan, gray, natural) that won’t clash with anything.
- Better shade ($100-300): A cantilever (offset) umbrella, like the BestChoice Products 10ft offset patio umbrella ($100-150). The base sits to the side instead of in the center of the table, which gives you full, unobstructed shade coverage. Or a shade sail—a triangular or rectangular fabric canopy strung between posts, trees, or the house. Sun shade sails from ColourTree or Artpuch run $30-60 for a 12×12 foot triangle and create a modern, architectural look.
- Best shade ($300-1000+): A permanent pergola over the patio dining area. Aluminum pergola kits from Aluminum Pergola Co or similar manufacturers start around $500 for a 10×10 foot structure. Add climbing plants (jasmine, wisteria, grape vine) for natural dappled shade that improves every year. This is a one-time investment that fundamentally changes how your outdoor dining space feels.
The Cleanup Station
This is the detail that separates a dining zone that gets used nightly from one that’s too much hassle. You need a way to handle the mess—sticky hands, spilled drinks, watermelon juice, sand on everything—without trekking to the kitchen every five minutes.
My setup: A small outdoor utility cart (the IKEA KLASEN serving cart or any stainless steel outdoor cart, $50-80) stationed next to the dining table. On it: a roll of paper towels, a spray bottle of diluted all-purpose cleaner, a small trash bag hanging from the side, a stack of outdoor-safe plates and cups (we use the Wheat Straw plates from Amazon, $15 for a set of 8—lightweight, BPA-free, dishwasher safe, and don’t shatter when dropped by a four-year-old). A small tub of wet wipes for sticky hands is the finishing touch.
This station means you can serve, eat, clean up, and deal with spills without leaving the dining zone. It sounds like a small thing. It isn’t. It’s the difference between outdoor dining feeling effortless and feeling like a production.
Room 2: The Play Zone
The play zone is where kids do kid things—run, climb, swing, dig, imagine, and occasionally fall. It’s the heart of your family backyard, and it needs to be set up with both freedom and safety in mind.
Location and Sight Lines
The play zone should be visible from the dining zone and ideally from the relaxation zone and the house. This isn’t about hovering over your kids—it’s about being able to glance up from your book or your conversation and see that everyone is alive and generally upright.
Place the play zone where you can see it from the most locations. In most backyards, this means the center or the far end of the yard, with the patio/dining area providing the vantage point. Avoid placing play equipment behind the house, behind a garage, or behind dense landscaping that blocks sight lines.
Age-Appropriate Equipment
The play zone looks different at every age. Here’s what works well by developmental stage:
Ages 1-3:
- Low play structure with wide steps and a short slide (the Step2 Naturally Playful Woodland Climber, about $200, is well-sized for this age)
- Sandbox with a cover (more on this below)
- Push toys, bubble machines, and a water table
- Soft play balls
Ages 3-6:
- Swing set (2-3 swings, one bucket-style for the younger end)
- Climbing structure with multiple access points
- Balance beam or stepping stones
- A playhouse or fort (even a simple pop-up tent outdoors creates imaginative play space)
Ages 6-10:
- Full swing set with belt swings and possibly a disc swing or trapeze bar
- Climbing wall or rope ladder
- Sports area (enough flat space for soccer, catch, or badminton)
- Slack line (at low height, over soft ground)
Ages 10+:
- Basketball hoop (portable models are $100-300 and don’t require concrete mounting)
- Net sports (badminton, volleyball net—the Eastpoint Sports easy setup badminton set is about $30)
- Hammock or hanging chair (they’ll use it more than you think)
- Fire pit area for evening hangouts (with supervision)
Safety Surfacing
This is the most important safety decision in the play zone. The surface under and around play equipment determines whether a fall results in a bruise or a broken bone.
The fall zone: Every piece of play equipment needs a fall zone—a cushioned surface extending at least 6 feet in all directions from the equipment (for equipment under 7 feet tall). Swings need even more: 6 feet plus twice the height of the swing beam in front of and behind the swing path.
Surface options:
- Budget ($50-150): Rubber mulch or engineered wood fiber (EWF). A 4-6 inch layer of rubber mulch provides excellent fall protection and lasts for years. The Kidwise rubber mulch runs $15-25 per 75-lb bag, and you’ll need 4-8 bags depending on your zone size. EWF (basically finely shredded wood) is cheaper ($5-10 per bag) but breaks down faster and needs annual replenishing.
- Better ($200-500): Rubber paver tiles, like the RubberCal Eco-Sport interlocking tiles ($3-6 per square foot). They snap together, provide consistent cushioning, drain well, and look neat. A 100-square-foot play zone costs $300-600 in pavers.
- Best ($500-1500+): Poured-in-place rubber surfacing. This is what commercial playgrounds use—a seamless rubber surface that’s level, drains perfectly, and lasts 10+ years. Professional installation runs $8-15 per square foot. It’s a significant investment but essentially eliminates the maintenance aspect of safety surfacing.
What NOT to use: Concrete, packed dirt, grass alone (it compresses and wears away under equipment), and pea gravel (a choking hazard for toddlers and doesn’t provide adequate fall protection for heights over 4 feet).
The Sandbox Situation
Sandboxes are a polarizing topic among parents. Some love them. Some view them as outdoor litter boxes. I’m pro-sandbox with conditions.
The conditions: Your sandbox must have a cover. An uncovered sandbox is an invitation for neighborhood cats, rain accumulation, leaf debris, and the general entropy of nature. A covered sandbox that gets opened for play and closed afterward stays clean and usable.
My recommendation: The Badger Basket covered convertible cedar sandbox ($130-180). The bench seats fold up to become the cover. It’s large enough for two kids to dig without territorial disputes (46 x 46 inches), and the cedar is naturally rot-resistant. For a budget option, any sandbox with a fitted tarp cover works—just make sure the cover is secured (bungee cords around the frame) so wind doesn’t turn it into a leaf collector anyway.
Sand type matters. Use washed play sand, not builders’ sand or beach sand. Play sand is screened to remove debris and sharp particles. A 50-lb bag costs $5-8 at any hardware store, and a standard sandbox needs 200-400 lbs to fill to the right depth (4-6 inches).
Room 3: The Relaxation Zone
This is the adult retreat. It’s also the zone kids are welcome in when they want to slow down, read, cuddle, or just be near you without the intensity of the play zone.
The relaxation zone should feel noticeably different from the rest of the backyard—calmer, softer, more enclosed. If the play zone is your family room, the relaxation zone is your reading nook.
Location
Place the relaxation zone at the periphery of the backyard, ideally with a view of the play zone but physically separated from it. Near a fence line, under a tree, in a corner with some natural screening—anywhere that feels slightly apart. This is the outdoor equivalent of the calm-down corner concept I’ve written about for indoor spaces—a designated area that signals “slower pace.”
If your backyard is small and zoning by location isn’t realistic, you can create the relaxation zone on a different surface level (a raised deck section, a patio area while the play zone is on grass) or with a visual boundary (a row of potted plants, a low garden border, a different ground cover).
The Core Furniture
The relaxation zone needs comfortable seating, shade, and ideally a surface for a drink or a book.
Product recommendations:
- Good ($60-150): Two sturdy outdoor lounge chairs—the Mainstays Zero Gravity chairs ($35-50 each) are the budget classic. They recline, they fold for storage, and they’re surprisingly comfortable. Add a small side table (the Adams Manufacturing Quik-Fold side table, about $15) between them for drinks and phones. Total investment: about $100 for a functional two-person relaxation zone.
- Better ($200-500): A set of Adirondack chairs with a side table. Polywood Adirondack chairs ($200-280 each) are the gold standard—they look great, weather perfectly, and come in every color. Two chairs plus a side table from the same collection creates a cohesive, attractive zone for $450-600. For a hammock option, the Vivere double cotton hammock with steel stand ($100-150) is wide enough for a parent and child together and doesn’t require trees.
- Best ($500-1500+): An outdoor sectional sofa set or daybed. The Outer outdoor sofa collection (starting around $2000) is beautiful but aspirational for most families. The Patio Festival 4-piece conversation set ($400-600) offers a more accessible version—two chairs, a loveseat, and a coffee table with weather-resistant cushions. For a cocoon-like feel, the Modway Garner teardrop outdoor patio swing chair ($300-400) is an absolute kid favorite that adults love too.
The Shade Factor
The relaxation zone needs reliable shade, especially for afternoon use. If it’s under a mature tree, nature has handled this for you. If not, you have options.
A shade umbrella dedicated to the relaxation zone (separate from the dining zone umbrella) ensures you always have shade where you want it. A sail shade stretched between the fence and a post creates a permanent canopy with a modern look. For a natural approach, tall ornamental grasses (like Miscanthus) or a trellis with climbing plants on the sunny side of the relaxation zone provides filtered, dappled shade that feels more organic than fabric.
Making It Kid-Friendly Without Losing the Calm
The relaxation zone should welcome kids on different terms than the play zone. My rules for our relaxation zone:
- Books, puzzles, and quiet toys are welcome
- Running, climbing, and throwing are not (that’s what the play zone is for)
- Everyone uses an indoor voice
- Snacks are fine; full meals happen in the dining zone
I keep a small outdoor basket of books and a few fidget toys (a tactile sensory ring, a Koosh ball, a small container of kinetic sand) in the relaxation zone. My kids gravitate there when they’re winding down from active play, and it’s become a natural transition space between full-energy outdoor time and going inside.
Room 4: The Activity Station
This is the messy zone—water play, art projects, sensory bins, mud kitchens, science experiments. It’s where creativity and chaos live, and it needs to be set up to handle both without you losing your mind.
Location (Messy Adjacent)
The activity station should be:
- On a surface that can get wet and dirty (grass, dirt, or a patio section you don’t mind hosing down)
- Near a water source (a hose bib or spigot within reach)
- NOT on the deck or close to the house (water and paint and mud will splash, and you don’t want that on your siding or deck boards)
- Visible from the relaxation zone and dining zone
I put our activity station in the back corner of the yard, on grass, about 15 feet from the patio. It’s far enough that splashes don’t reach the house, close enough that I can supervise from the patio chair, and on a surface that doesn’t matter if it gets stained, muddy, or soaked.
The Water Play Setup
Water play is the single best way to keep kids occupied outdoors for extended periods. A good water play setup pays for itself in entertainment hours within the first week.
Product recommendations:
- Good ($25-60): A basic water table, like the Step2 Rain Showers Splash Pond ($40-55). It’s the standard for a reason—two tiers, scoops and funnels included, drains easily, and entertains kids from age 1 through about 5. For older kids, a sprinkler setup—the Melissa & Doug Splash Pad ($15-20) or a simple oscillating sprinkler on a timer.
- Better ($60-150): A larger water table with more interactive elements (the Step2 Summer Showers Splash Tower, about $80, adds a waterfall feature) combined with a water wall. A water wall is a vertical surface with funnels, channels, and buckets that kids pour water through. You can buy one (the HABA water play wall system, $100-200) or build one from a sheet of pegboard, plastic bottles, and zip ties for under $20. The DIY version is honestly more fun because kids can rearrange the channels.
- Best ($150-400+): A dedicated splash pad area. The H2OGO! inflatable water park ($60-150 depending on size) provides hours of splash entertainment. Or invest in a permanent splash pad—a flat, textured concrete or rubber pad (8×8 feet) with a recirculating water feature. DIY versions using PVC pipes and a garden hose run $50-100 in materials; professional installation is $2000+.
The Outdoor Art Table
Kids do art differently outside—bigger, messier, more experimental. An outdoor art station should embrace this.
The table: Any sturdy, washable surface works. A small plastic folding table ($25-35) dedicated to art is ideal because it can be hosed off, bleached, and doesn’t matter if paint permanently stains it. The Lifetime 4-foot adjustable height folding table ($50-60) is particularly good because the height adjusts—lower for small kids, higher as they grow.
The supplies station: Rather than hauling art supplies in and out of the house, I keep an outdoor art bin (a large plastic tote with a lid, $10-15) stocked with supplies that can handle weather and mess:
- Washable tempera paints in squeeze bottles
- Large brushes (house-painting brushes from the hardware store, $1-3 each, are better than craft brushes for outdoor art)
- Sidewalk chalk
- Large rolls of paper (butcher paper or easel roll paper, $10-15 for 100 feet)
- Spray bottles filled with water and a tiny drop of food coloring
- Cups and containers for water
- Smocks or old t-shirts
Tip from experience: Tape the paper to the table with painter’s tape so it doesn’t blow away. Keep the art bin closed with a bungee cord when not in use to prevent rain damage and critter exploration.
The Sensory Area and Mud Kitchen
For kids ages 2-7, a sensory area is almost guaranteed daily entertainment. This can be as simple or elaborate as you want.
Simple sensory station ($20-50): A large under-bed storage bin ($10-15) filled with a sensory material: dried rice, dried beans, water beads, kinetic sand, or actual sand. Add scoops, cups, funnels, small toy animals, and spoons. Rotate the material every week or two to keep it fresh. Store the bin with a lid when not in use.
Mud kitchen ($50-200): A mud kitchen is a child-sized pretend kitchen outdoors where the primary ingredients are dirt and water. You can build one from a repurposed bookshelf or old desk placed against a fence—add some old pots and pans from the thrift store, a few baking sheets, spoons, and muffin tins, and kids will “cook” for hours. The MUDDY BUDDY outdoor mud kitchen ($120-180) is a purpose-built option with a sink basin and shelf.
My daughter’s mud kitchen is a $30 thrift store end table against our back fence with two pots, a muffin tin, and a bucket of water. She uses it more than any other single item in our backyard. The toy rotation principle from indoor play applies here too—rotating the tools and containers (spoons one week, funnels the next, cookie cutters the week after) keeps the same basic setup feeling new. The toy rotation guide covers this philosophy in detail.
Room 5: The Storage Zone
Storage is what makes or breaks a family backyard. Without it, toys, tools, and supplies end up scattered across the yard, rained on, sun-bleached, and lost. With a good storage system, everything has a home, cleanup takes five minutes, and your backyard looks organized instead of abandoned.
Outdoor Toy Storage
The primary storage need is for the daily-use outdoor toys—balls, bats, jump ropes, chalk, bubbles, water toys, sand toys.
Product recommendations:
- Good ($30-60): A large deck box, like the Suncast 50-gallon deck box ($40-60). It’s waterproof, lockable, and holds a significant amount of toys. Park it at the edge of the play zone or near the back door. The lid doubles as a bench seat.
- Better ($60-150): A larger deck box (Keter Brightwood 120-gallon, about $120) combined with a mesh toy bag that hangs from a fence or hook for wet toys that need to dry before going in the box. The Mesh XXL Beach Bag ($15-25) or a large laundry mesh bag works well for this—sand and water drain out, toys dry, then they go in the box.
- Best ($150-400+): A dedicated outdoor storage shed or cabinet. The Suncast vertical utility shed ($200-300) is a slim, vertical cabinet that stores brooms, rakes, pool noodles, and tall items alongside bins of smaller toys. The Rubbermaid horizontal storage shed ($250-350) offers more floor space for larger items like ride-on toys and wagons.
The “Come Inside” Cleanup System
The end-of-day cleanup should be simple enough that kids can participate. Here’s the system that works for us:
- 5 minutes before going inside: Announce “cleanup in five minutes.” This prevents the whiplash of sudden transitions.
- Each kid handles their zone: My son is responsible for the play zone (balls back in the bin, equipment put away). My daughter handles the activity station (art supplies in the bin, sensory materials covered). This aligns with the ownership principle I use for indoor organization—when each person has a defined area, accountability is clear.
- Wet items go in the mesh bag. Anything that’s wet hangs in the mesh drying bag overnight.
- Dry items go in the deck box. Everything else goes in the main storage box.
- Quick scan. One adult does a final 30-second scan of the yard to catch anything the kids missed.
This takes 5-10 minutes and prevents the gradual accumulation of outdoor debris that leads to the wasteland I described at the start of this article.
Seasonal Storage Rotation
Just like indoor toys benefit from rotation, outdoor toys benefit from not all being available simultaneously. I keep about two-thirds of our outdoor toys in active use and one-third stored in the garage or basement. Every few weeks, I swap a batch: the jump ropes come out and the hula hoops go in storage. The chalk comes out and the bubble machines rotate. This keeps the outdoor play feeling fresh without buying new things.
The same principle applies to the activity station. Rotate the sensory bin material weekly. Swap the art supplies monthly. Introduce a new outdoor game every few weeks (lawn bowling one month, ring toss the next). The novelty keeps kids engaged and prevents the “there’s nothing to do outside” complaint that kicks in around mid-July.
Backyard Setup by Budget
Here’s what you can accomplish at three budget levels, covering all five zones:
| Zone | $100 Budget | $500 Budget | $1,000+ Budget |
|---|---|---|---|
| Dining Zone | Folding table + tablecloth + patio umbrella ($110-130) | Polywood or resin table + bench + cantilever umbrella ($350-500) | Teak dining set + pergola ($800-1500) |
| Play Zone | Sprinkler + balls + jump ropes + DIY obstacle course ($30-50) | Swing set or play structure + rubber mulch ($200-400) | Full play structure + safety surfacing + basketball hoop ($500-1200) |
| Relaxation Zone | Two zero gravity chairs + side table ($85-115) | Adirondack chairs + hammock ($350-500) | Outdoor sectional or daybed + shade structure ($500-1500) |
| Activity Station | Sensory bin + water table + sidewalk chalk ($40-70) | Water table + art table + mud kitchen + sensory station ($100-250) | Splash pad + full art station + mud kitchen + water wall ($300-600) |
| Storage Zone | Deck box + mesh bag ($45-75) | Large deck box + drying system + bins ($80-175) | Storage shed + organized interior ($250-400) |
| TOTAL | $310-440 | $1,080-1,825 | $2,350-5,200 |
Reality check on the $100 budget: You can absolutely create a functional family backyard for under $200 if you already have a table and chairs from inside that you can bring out temporarily. The non-negotiables are shade (even a $30 umbrella), a cleanup system (even a $10 tote bin), and a water play option (even a $5 sprinkler). Kids don’t need expensive equipment—they need defined spaces and permission to be outside.
Where to spend if you can only invest in one zone: The play zone gives you the highest return on investment for families with kids under 8. The dining zone gives the highest return for families with kids over 8 (because older kids want to hang out where the food is). If you cook and eat dinner outside three to four times a week all summer, a good dining setup pays for itself in family experience.
Safety Checklist for Family Backyards
Before summer kicks into full gear, walk your entire outdoor space with this safety checklist. I do this every April and again in mid-June.
Fencing and Boundaries
- [ ] Fence is intact with no gaps larger than 4 inches (a child’s head can fit through a 4-inch gap)
- [ ] All gate latches work and self-close properly
- [ ] Gate latches are at least 54 inches high or have a childproof lock if kids are under 5
- [ ] No climbable objects (chairs, bins, woodpiles) positioned near the fence
Plants and Landscaping
- [ ] No poisonous plants within reach of play areas (common culprits: foxglove, oleander, lily of the valley, castor bean, yew berries)
- [ ] Thorny plants (roses, barberry, holly) are not bordering play zones or foot-traffic areas
- [ ] Mushrooms removed—they pop up after rain and young kids put everything in their mouths
- [ ] Mulch in play areas is non-toxic (avoid cocoa mulch, which is toxic to dogs and smells enough like chocolate that kids may taste it)
Water Safety
- [ ] No standing water in containers, flower pots, or low areas (drowning risk for toddlers—it takes less than 2 inches)
- [ ] If you have a pool, fence meets local code requirements (typically 4-foot minimum, self-latching gate)
- [ ] Water table is drained after each use if toddlers are present
- [ ] Kiddie pools are emptied and flipped over after each use
Sun Protection
- [ ] Shade covers all zones where kids spend more than 15 minutes at a time
- [ ] Sunscreen is stocked and accessible (SPF 30+ broad-spectrum, reapply every 2 hours and after water play)
- [ ] Outdoor time is scheduled around peak UV hours (avoid prolonged exposure between 10 AM and 2 PM for kids under 2; provide shade and protective clothing for all kids during peak hours)
- [ ] Hats and UV-protective swimwear available for water play days
Equipment and Surfaces
- [ ] All play equipment is anchored and stable (check swing set anchors, climbing structure bolts, sandbox frame)
- [ ] No exposed bolts, sharp edges, or splintering wood on any equipment
- [ ] Safety surfacing under play equipment is adequate depth (4-6 inches of mulch or rubber, or proper rubber pavers)
- [ ] Hot surfaces checked—metal slides, rubber surfaces, and dark deck boards can cause burns in direct sun. Test with your hand before kids play on them.
- [ ] Trampolines (if you have one) have intact netting, padding over springs, and follow a one-jumper-at-a-time rule
General
- [ ] Garden chemicals, fertilizers, and pesticides are stored in a locked cabinet or high shelf
- [ ] Garden tools (rakes, shears, saws) are stored out of reach
- [ ] Extension cords and outdoor electrical outlets have weather covers and are away from water play zones
- [ ] Fire pit (if present) has a screen cover and a “no go” zone clearly defined for kids
- [ ] First aid kit accessible outdoors or just inside the back door (ours hangs on a hook by the back door: bandages, antiseptic wipes, sting relief, ice pack, tweezers)
Maintaining Your Outdoor Rooms All Summer
Setting up the backyard is a weekend project. Maintaining it through three or four months of heavy family use requires a lightweight system—just enough structure to prevent the gradual slide back into chaos.
The Daily 5-Minute Closedown
Every evening, as part of your daily routine, spend five minutes on the backyard closedown:
- All toys in the storage box or mesh drying bag (kids handle this)
- Dining table wiped down and chairs pushed in
- Umbrella closed (wind can shred an open umbrella overnight)
- Water play items drained
- Quick scan for anything that shouldn’t be outside overnight
This is the outdoor equivalent of the evening reset routine I use inside the house. Five minutes a day prevents the two-hour cleanup that becomes necessary when you skip it for a week.
The Weekly Outdoor Reset (15 minutes, weekend morning)
Once a week, go slightly deeper:
- Hose down the patio and dining area
- Check safety surfacing under play equipment—rake mulch back into place if it’s migrated
- Inspect equipment for loose bolts, wobbly joints, or wear
- Refill the sunscreen station and bug spray
- Rotate one set of outdoor toys (swap something from the garage for something that’s been out for two weeks)
- Check the sandbox for debris or animal evidence (if uncovered overnight by accident)
- Water any potted plants in the relaxation or dining zones
The Monthly Deep Check (30 minutes)
Once a month, walk the full safety checklist above. Check fencing, plants, water features, equipment stability. Tighten any bolts that have loosened from use. Replace any safety surfacing that’s thinned out. Clean the deck box or storage container (a quick hose-out prevents mildew).
The Mid-Summer Refresh (July)
Around mid-summer, energy for outdoor play can dip. The backyard has been the same for eight weeks and the novelty has worn off. This is when I do a mini-refresh:
- Rotate zones slightly. Move the activity station to a different corner. Rearrange the relaxation zone. Even small changes create the feeling of “new.”
- Introduce a new activity. A new water toy, a new outdoor game, a new sensory material. Doesn’t need to be expensive—a $5 sprinkler attachment or a bag of water balloons can reignite enthusiasm.
- Deep clean everything. Hose down all furniture, scrub the play equipment, wash cushion covers, clean out the storage box. A clean backyard feels more inviting, even if the layout hasn’t changed.
- Reassess what’s working. Is the dining zone getting used? Is the activity station neglected? If a zone isn’t working, reconfigure it. Maybe the activity station needs to move closer to the water source, or the relaxation zone needs better shade.
This applies the same thinking I bring to indoor organization. If you’ve set up a pantry system or an indoor toy rotation and found that tweaking beats overhauling, the same principle works outdoors. Small adjustments sustain the system better than periodic overhauls.
Preparing for Fall Transition
In September or October (depending on your climate), the reverse swap happens. Here’s the quick version:
- Clean all outdoor furniture before storing
- Drain and store water play equipment
- Cover or bring in cushions
- Store sandbox cover securely
- Move seasonal outdoor toys to long-term storage
- Bring in any items that can’t handle freeze-thaw cycles (ceramic pots, certain plastics)
- Final equipment inspection—note anything that needs repair or replacement for next year
Store items clean and dry, and next spring’s setup will be a half-day project instead of the multi-day excavation I described at the beginning.
Bringing the Eco-Friendly Mindset Outdoors
A quick note on sustainability, because it matters for outdoor spaces. When choosing products for your backyard:
- Buy durable over disposable. A $200 polywood table that lasts 20 years is more economical and more sustainable than replacing a $60 table every three years.
- Choose recycled materials when available. Polywood (recycled plastic lumber), rubber mulch (recycled tires), and recycled resin furniture all perform well and keep materials out of landfills.
- Avoid single-use outdoor items. Reusable outdoor plates instead of paper plates. Reusable water bottles instead of juice boxes. Cloth napkins instead of paper towels (outdoor cloth napkins from Target’s Threshold line come in packs of 4 for $8 and hold up well).
- Compost yard waste. Leaf litter, grass clippings, and natural debris from the yard can feed a compost bin that feeds your garden.
The eco-friendly cleaning guide covers more of this philosophy for indoor and outdoor family spaces.
Frequently Asked Questions
How do I set up a family backyard if we rent and can’t make permanent changes?
Focus on portable and removable elements. Freestanding furniture (folding tables, portable chairs, pop-up canopies) replaces built-in structures. A portable sandbox and a pop-up play tent replace permanent play structures. Use potted plants instead of landscaping to define zone boundaries. Deck boxes and freestanding storage cabinets provide storage without mounting anything. A freestanding hammock with a steel frame doesn’t need trees or posts. When you move, everything comes with you. The room-by-room approach works exactly the same way—you’re just using furniture and portable equipment instead of permanent installations.
What’s the best backyard surface for kids to play on?
Grass is the most versatile natural surface—it cushions falls, stays cool, and is comfortable for sitting and crawling. However, it wears out under heavy foot traffic and play equipment. For under equipment, use rubber mulch, wood fiber, or rubber pavers (see the safety surfacing section above). For high-traffic paths, stepping stones or decomposed granite hold up better than grass. For a patio play area, outdoor rubber tiles or foam play mats provide cushioning on hard surfaces. Avoid bare concrete in play areas—it’s unforgiving for falls and gets extremely hot in direct sun.
How do I keep mosquitoes away from our outdoor living spaces?
Layer your approach. First, eliminate standing water everywhere in the yard—this is where mosquitoes breed. Empty saucers under plant pots, drain the water table nightly, and fix any low spots that collect rainwater. Second, use citronella candles or torches around the dining and relaxation zones (keep them out of reach of kids). Third, plant natural mosquito-repelling plants around your zones: lavender, citronella grass, marigolds, basil, and rosemary. Fourth, apply kid-safe bug repellent before outdoor time (products with 10-30% DEET are approved for kids over 2 months, or use picaridin-based repellents). Fifth, consider a mosquito misting system or fan—mosquitoes are weak fliers and even a box fan pointed across a dining area reduces them significantly. The fan trick is free if you already have an outdoor-rated fan and an extension cord.
At what age can kids be unsupervised in the backyard?
This depends on your specific yard setup, your child’s maturity, and your local norms. Generally, kids under 5 should have direct adult supervision outdoors at all times. Ages 5-7 can play in a fully fenced yard with periodic check-ins (every 5-10 minutes) if there are no water features. Ages 8-10 can play independently in a fenced yard with check-ins every 15-20 minutes. Ages 10+ can typically play unsupervised in a safe, fenced backyard. These are guidelines, not rules—you know your child and your yard. The room-by-room setup helps with gradual independence because each zone has defined boundaries and expectations, which makes it easier for kids to self-manage their play.
How do I keep outdoor toys from getting ruined by weather?
Three strategies: store, cover, and choose wisely. Store anything that isn’t weather-rated in the deck box or shed every evening—the daily closedown habit prevents exposure damage. Cover items that are too large to store (play structures, dining tables) with fitted covers or tarps during heavy rain or when not in use for extended periods. Choose materials that handle weather: polywood and resin over raw wood, stainless steel hardware over regular steel, marine-grade fabric for cushions. For items that will be left out, UV exposure is the biggest damage factor—shade sails and strategic tree placement reduce fading and plastic degradation. Accept that some items are semi-disposable: a $5 pool noodle that lasts one summer is fine. A $300 play structure should last a decade if properly maintained.
What if our backyard is very small — like a townhouse patio?
Small spaces benefit even more from the room-by-room approach because intentional zoning prevents the “everything piled everywhere” problem. Combine zones: the dining table doubles as the art table (put a plastic tablecloth over it for messy activities). The storage bench doubles as relaxation seating. A vertical garden wall creates visual interest and a zone boundary without taking floor space. Prioritize vertically: wall-mounted planters, hanging storage, hooks for gear, a wall-mounted folding table. Skip the large play structure and focus on portable play options (balls, chalk, water table that folds flat). Even a 10×12-foot patio can comfortably hold a dining zone, a play/activity zone, and storage if you use the space intentionally.
How do I handle neighbors or HOA restrictions on backyard setups?
Read your HOA guidelines before buying anything permanent. Common restrictions include fence height, structure height (play sets, pergolas), shed placement, and visible storage containers. Most HOAs allow furniture, umbrellas, and portable play equipment without approval. For permanent structures (swing sets, pergolas, fencing), submit your plan to the architectural review board before purchasing. Choose neutral-toned equipment and storage that blends with your home’s exterior. If your HOA prohibits sheds, use deck boxes or under-deck storage. If play structures are restricted by height, low-profile options like a climbing dome or a ground-level playhouse often fall under the height limit. Document everything and get approvals in writing.
Your backyard is the largest room in your house, and for three or four months a year, it’s the best one. It’s where your kids will build their summer memories—the water fights, the chalk masterpieces, the dinners that lasted until the fireflies came out. Setting it up with intention doesn’t require a huge budget or a landscape architect. It requires the same room-by-room thinking you’d apply inside: define the purpose, choose the right tools, and build a maintenance habit that keeps it working. Start with the zone your family needs most—for most families with young kids, that’s the play zone—and expand from there. By the time school lets out, you’ll have an outdoor home that your family actually wants to spend time in.