Freezer Organization Ideas for Batch-Cooking Parents
Last October I opened my chest freezer after a big batch-cook and found a frosted, ghost-labeled lasagna from spring. I had been cooking in bulk for months and shopping my own freezer for none of it.
This guide fixes that, step by step: a freezer audit, zones, containers, labels, a copyable inventory tracker, a rotation routine, and safe thawing and reheating. Cooking in bulk is the easy part. The system that keeps food findable and eaten is the part that gets skipped.
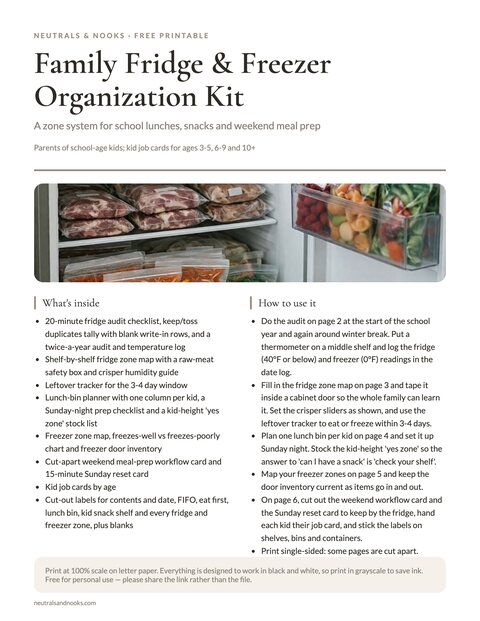
Free printable · 6 pages
Family Fridge & Freezer Organization Kit
A 20-minute fridge audit checklist with a twice-a-year log, fridge and freezer zone maps, a lunch-bin planner, a freezes-well chart, cut-out labels, a Sunday reset card, age-based kid job cards and a temperature log.
Free. Your download link appears right here. You'll also join the Monthly Home Reset. Unsubscribe anytime. Privacy
It is written for bulk-cooking parents with a garage chest freezer, a basement upright, or a crowded freezer drawer. For everyday shelves, start with our family fridge and freezer organization system. For dry goods, see our pantry organization system.
In this article (16 sections)
- Why Batch-Cooking Freezers Need Their Own System
- Start With a Full Freezer Audit
- Decide on Your Zones Before You Buy Anything
- Chest Freezer Organization for a Family
- Containers That Actually Work for Batch Cooking
- Labeling Systems That Survive the Cold
- The Freezer Inventory Tracker
- Batch-Cooking Day: Making Freezing Part of the Cook
- What Freezes Well (and What Does Not)
- A Rotation System That Keeps Food From Aging Out
- Safety Basics Every Batch Cooker Should Know
- Making the Freezer Work for the Whole Family
- Small-Space and Apartment Variations
- Troubleshooting Common Freezer Frustrations
- Frequently Asked Questions
- Start With the Audit This Week
Why Batch-Cooking Freezers Need Their Own System
An everyday family freezer holds a bag of peas, some waffles, an ice pack, and a pint of something you are not sharing. A batch-cooking freezer holds an entire month of dinners, and that changes the problem in three ways.
Volume. You are storing dozens of portions, not a handful. Without structure, volume turns into depth, and depth turns into a bottom layer nobody reaches until it is a science experiment.
Age. Batch food has a clock. Cooked meals kept continuously at 0°F (-18°C) stay safe, but quality fades. Soups and casseroles are at their best within about two to three months, and cooked poultry within two to four months. A freezer without dates is a freezer you cannot trust.
Variety. Raw ingredients, cooked meals, breakfast items, and kid snacks all behave differently. A single heap ignores that.
A good batch-cooking freezer system answers four questions in under thirty seconds:
- What do we have?
- Where is it?
- What should we eat first?
- What is running low?
Everything below serves one of those four questions.
Start With a Full Freezer Audit
Before you buy a single basket, empty the freezer. It is the least glamorous step and the one that makes every other step work. Pick a day when the weather is cool or the freezer is already low, and set up a staging area.
What you need for the audit
- Two or three insulated coolers or laundry baskets lined with towels
- Ice packs to tuck around the food, plus an appliance thermometer for the cooler
- A marker, painter’s tape, and a notebook or phone for the inventory
- A trash bag
- A sheet pan or two for sorting
The under-an-hour audit method
Work in batches so nothing sits out long. Pull out one shelf or one layer at a time, sort into the coolers, and keep going. Most home freezers take under an hour.
Safety firstKeep the coolers closed and at 40°F or below, checked with an appliance thermometer. Food that still contains ice crystals or measures 40°F or below can be refrozen or cooked. Discard anything above 40°F for more than 2 hours (1 hour above 90°F).
Sort everything into four piles:
| Pile | What goes here | What happens next |
|---|---|---|
| Keep and use soon | Anything within its best-by window | Goes on the top of the new system |
| Keep, but label | Good food with a missing or faded label | Re-label now with a date estimate |
| Question mark | Heavily frosted or very old, but you know what it is | Keep it only if the freezer held 0°F with no thaw or outage. Use it soon in a soup or casserole. If you do not know its history, toss it. |
| Toss | Unidentifiable or unlabeled mystery food, freezer-burned past saving, or unsafe | Trash |
Throwing away a lasagna from last spring is not a failure. It clears the way for the system you are about to build.
Freezer burn affects quality, not safety, as long as the freezer never thawed. A dried-out chicken thigh may still not be worth a family dinner. If you cannot identify something, or you do not know its history, let it go.
While the freezer is empty, wipe it down with warm soapy water, rinse, and dry. If it is a chest freezer with heavy frost on the walls, this is the moment to defrost it properly. Frost buildup of more than a quarter inch or so steals space and makes the compressor work harder.
- Move the food. Keep it in closed coolers with ice packs, and check that they stay at 40°F or below.
- Unplug and open. Prop the lid open and lay towels along the edges.
- Speed it up gently. Set shallow pans of warm water inside, and never chip at ice with a knife.
- Wipe and dry. Allow several hours, then dry the interior fully before plugging back in.
Decide on Your Zones Before You Buy Anything
Containers are the fun part, and most people jump straight to them. Resist. Zones come first, because zones are what make a freezer navigable. Think of your freezer as a small grocery store with aisles.
A zone map for a typical family
Here is a starting layout. Rename and resize to match what your family actually eats.
| Zone | Contents | Why it lives here |
|---|---|---|
| Dinners, ready to heat | Casseroles, lasagna, enchiladas, pot pies | The most used category, so it gets the best real estate |
| Soups, stews, sauces | Chili, broth, pasta sauce, curry bases | Flat-frozen bags that stack like files |
| Proteins, raw | Marinated chicken, ground beef portions, fish | Cold, bottom-most area, away from cooked food |
| Components | Cooked rice, shredded chicken, meatballs, taco meat | The building blocks of fast dinners |
| Breakfast and lunchbox | Waffles, muffins, burritos, pancake stacks | Grab-and-go for school mornings |
| Produce and baking | Frozen fruit, spinach, cookie dough balls, pie crust | Lower use, so it can sit toward the back |
| Treats and extras | Ice cream, popsicles, bread, butter | Whatever does not fit above |
Not every family needs seven zones. A smaller freezer might fold components into dinners and treats into produce. The point is that every item has a home, and a home means you always know where to put things back.
Chest Freezer Organization for a Family
The two freezer shapes want different strategies. Upright freezers work like a fridge, with shelves and door bins. Access is easier, but cold air spills out every time the door opens. Give each shelf one category, and use clear bins that pull out like drawers.
Chest freezers hold more per dollar and keep cold well when opened, but depth is the enemy. Everything at the bottom is invisible, and you can lose an entire rotisserie chicken in there. The cure is to turn one big hole into several accessible, labeled compartments.
The basket method
Buy or repurpose stackable bins that fit the freezer’s footprint. Wire baskets that hang on the rim are sold with most chest freezers, but hard-sided plastic bins are easier to wipe and do not catch on bags. Measure your freezer’s interior length, width, and depth before you buy.
For a 7 to 10 cubic foot chest freezer, aim for bins about 12 to 14 inches wide. That is narrow enough to lift out with one hand.
A workable setup for a mid-sized chest freezer:
- Top tray or hanging basket: the “this week” bin. Four or five dinners that are ready to go, plus a loaf of bread. You open the freezer, grab from this bin, and close it.
- Left side, stacked bins: cooked dinners and soups, labeled by zone, one bin per category.
- Right side, stacked bins: raw proteins and components.
- Bottom layer: long-term items, such as bulk meat packs, a case of frozen fruit, or holiday baking supplies.
Pull-up handles
If you have a very deep freezer, give each bin a short, fixed strap or handle so you can lift it without reaching to the bottom.
Safety firstSkip long loose cords, which are an entanglement risk for toddlers. Keep the lid locked or out of kids’ reach, and never let children play in or around a chest freezer.
The “lid map”
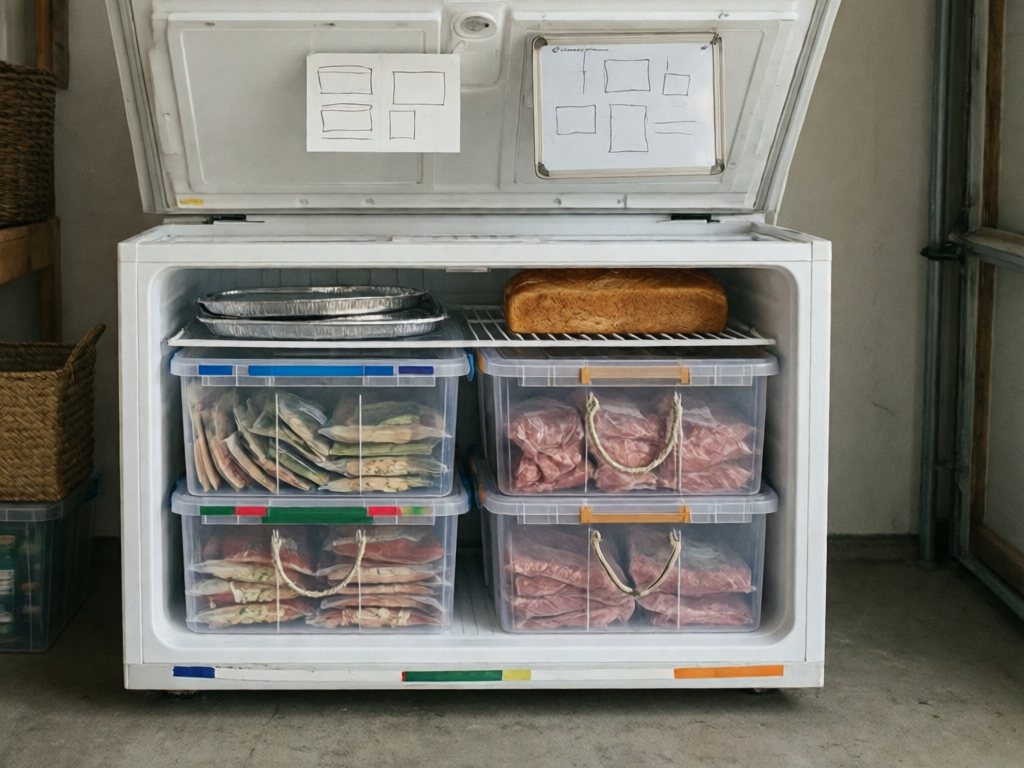
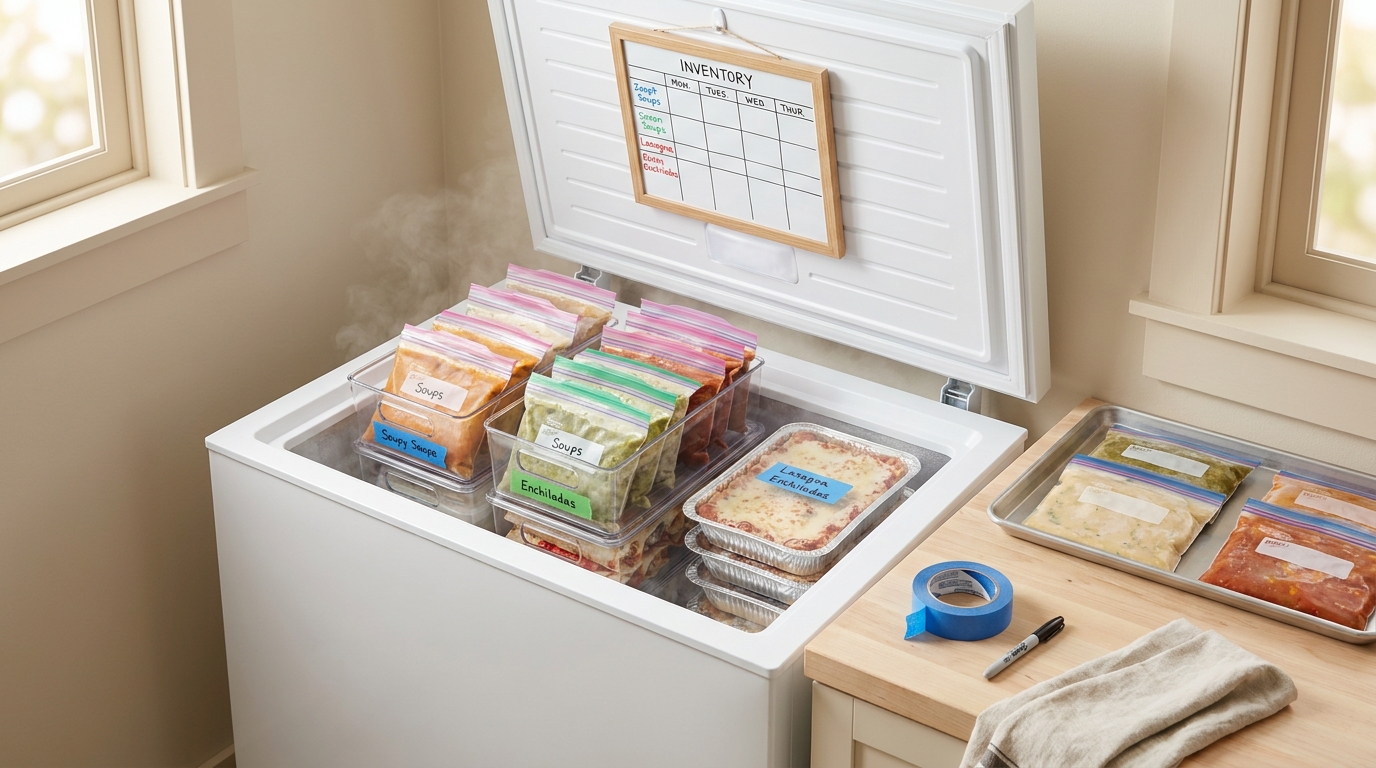
Tape an index card inside the lid, or hang a small whiteboard from it, showing where each bin lives. When another adult in the house goes digging at six in the evening, they do not need to ask you where the chili is. The map answers for you.
If the freezer is in the garage, take a photo of the map and keep it in a shared family note. Nobody wants to stand in a cold garage guessing. For the rest of that space, see our family garage organization guide.
Containers That Actually Work for Batch Cooking
The right container saves space, prevents freezer burn, and makes dinner faster. The wrong one wastes all three. Here is how common options compare.
| Container | Best for | Pros | Watch out for |
|---|---|---|---|
| Zip-top freezer bags (gallon and quart) | Soups, sauces, marinated meat, shredded chicken | Freeze flat, stack like books, cheap | Not reusable forever, must squeeze out air |
| Silicone portion trays (1 cup, 2 cup) | Broth, sauce, pesto, baby-food-size portions | Pop out blocks to bag together | Fill carefully, they spill |
| Rectangular glass or foil pans | Lasagna, casseroles, enchiladas | Go straight to oven, easy to stack | Thaw glass first, because thermal shock can crack it |
| Deli-style plastic tubs | Chili, stews, rice | Stackable, labelable, microwave-friendly | Leave headspace for expansion |
| Vacuum-sealed bags | Raw meat, fish, long-term storage | Best protection from freezer burn | Equipment cost, harder for hot or liquid foods |
| Wide-mouth jars (freezer-safe) | Broth, small soups | Reusable, zero plastic | Must leave 1 to 2 inches of headspace and use straight-sided jars |
Safety firstThaw glass dishes in the fridge first, or start them in a cold oven, unless the manufacturer says freezer-to-oven use is approved.
Flat-freezing, the single best trick
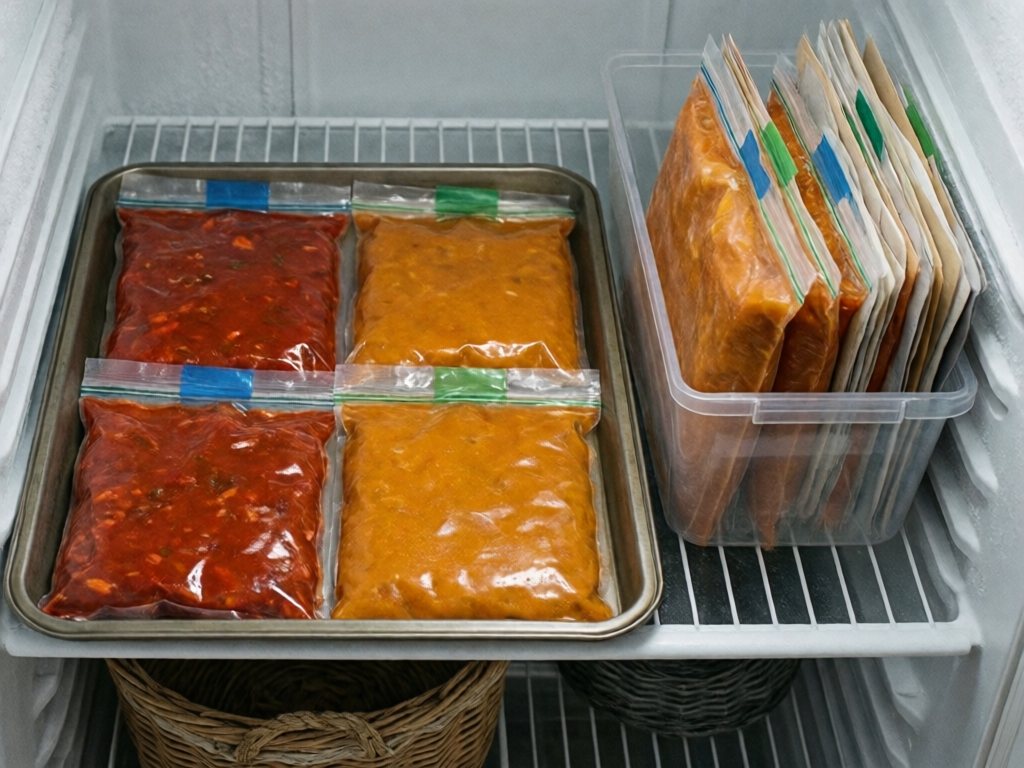
If you adopt only one technique from this guide, make it this one. Pour cooled soup, sauce, or chili into a zip-top bag, press out the air, seal it, and lay it flat on a sheet pan in the freezer. Once it is frozen solid, you can stand the bags up like files in a filing cabinet or stack them like bricks.
Flat bags pay off in three ways:
- A flat bag takes up a fraction of the space of a round tub.
- It thaws much faster, which means dinner on a bad day does not require advance planning.
- You can see the label on the edge without digging.
Portion before you freeze
Batch cooking tempts you to freeze the whole pot in one container. Do not. Portion by how your family eats:
- Family-size: one container feeds everyone for one dinner.
- Two-person: for the nights when only some of you are home.
- Single: one lunch or one toddler dinner.
I freeze a few single portions of every batch. Lunches and odd-hour meals are then covered without breaking into a family-size block.
Labeling Systems That Survive the Cold
Label every package before it goes into the freezer. I once wrote “soup” on three different bags in one afternoon, and we guessed at dinner for weeks. Make labeling effortless and it will actually happen.
What every label needs
At minimum, put four things on every package:
- What it is. Write “turkey chili”, not “chili stuff”.
- Date frozen. Month and year is enough for most items.
- Servings or size. For example, “serves 4”.
- Reheating note. For example, “350°F, 40 min, covered” or “thaw overnight, simmer 15 min”.
The reheating note matters most. At 5:45 in the evening, you do not want to look up how to cook a frozen enchilada. You want the instructions to be on the package.
Materials that do not fail in the freezer
- Freezer-proof markers or paint pens. Standard markers fade or smear in cold and condensation. Look for ones labeled for freezer use, or use a fine-point permanent marker and test it first.
- Painter’s tape. It sticks in cold, peels off cleanly, and is easy to write on. It is the budget favorite among batch cookers.
- Dissolvable or removable labels. These are great for reusable containers because they wash off without residue.
- Write directly on the bag. For zip-top bags, write on the bag itself before filling, while it is flat and dry. This is far easier than trying to write on a cold bag full of soup.
If you like a polished look, a coordinated label set makes the whole freezer feel calm. Our printable pantry label system works nicely as a starting point, and you can adapt the same style for freezer bins so the garage matches the kitchen.
A color-coding idea that costs almost nothing
Assign a tape color to each category, and the freezer becomes readable from a distance.
| Tape color | Category |
|---|---|
| Blue | Dinners, ready to heat |
| Green | Soups, stews, sauces |
| Red | Raw proteins |
| Yellow | Components |
| White | Breakfast and lunchbox |
| Orange | Treats and extras |
One glance tells you if the chili bin is low.
One honest trade-off: in dim garage light, blue and green tape can look alike. If that happens, also write the category in marker on the tape.
The “use by” date, not just the freezer date
Instead of writing only the date you froze something, write the date by which you want to eat it. For most cooked meals, count forward two to three months, with three as the upper limit for soups and casseroles. Marinated raw meat does best within about two to three months too. For other foods, use the shorter end of the storage-time table further down. A label that says “Use by Jan” is easier to act on than a freeze date.
The Freezer Inventory Tracker
An inventory is what turns a freezer from a storage space into a pantry you can plan around. It does not need to be fancy. A table in a notebook, a whiteboard on the lid, or a shared note on your phone all work. What matters is that it is updated whenever food goes in or comes out.
Below is a tracker you can copy into a notes app. If you would rather work on paper, the free Family Fridge & Freezer Organization Kit is in the sign-up box on this page.
Freezer inventory tracker (copy and use)
| Item | Zone / bin | Portions | Date frozen | Use by | Reheat notes | Status |
|---|---|---|---|---|---|---|
| Turkey chili | Soups, bin B | 4 family bags | Oct 3 | Jan 3 | Thaw in fridge 24 hours, simmer to 165°F | In stock |
| Chicken enchiladas | Dinners, bin A | 3 pans | Oct 3 | Jan 3 | Thaw in fridge 24 hours, then 375°F, 45 min covered, to 165°F | In stock |
| Meatballs (beef and pork) | Components, bin D | 5 bags of 12 | Sep 26 | Dec 26 | Bake from frozen, 20 min, to 165°F | In stock |
| Marinated chicken thighs | Proteins, bin C | 3 bags | Oct 1 | Dec 1 | Thaw in fridge, grill or bake to 165°F | In stock |
| Pancake stacks | Breakfast, top tray | 6 bags of 4 | Sep 20 | Dec 20 | Toaster or oven, 5 min | Low |
| Cooked rice | Components, bin D | 8 flat bags | Sep 28 | Dec 28 | Microwave with splash of water | In stock |
| Pasta sauce | Soups, bin B | 6 flat bags | Sep 15 | Dec 15 | Thaw, simmer 10 min | In stock |
| Banana muffins | Breakfast, top tray | 18 | Sep 22 | Dec 22 | Microwave 30 sec | Eat first |
How to keep the tracker honest
A tracker only works if it reflects reality. Three habits do most of the work:
- Update on the way in. When you add food, write it in the tracker before you walk away. Thirty seconds of effort prevents the guessing game later.
- Cross off on the way out. When you pull a dinner for tomorrow, mark it down. Keep a pen on a string next to the freezer if you use paper.
- Do a quick count monthly. On the first of the month, glance at the freezer and the tracker side by side and fix any differences. This takes five minutes and keeps the whole record trustworthy.
Paper, whiteboard, or app?
| Method | Best for | Downside |
|---|---|---|
| Paper list taped to the lid | People who like analog, freezer in the garage | Gets damp, needs a plastic sleeve |
| Dry-erase board on the freezer | Visual families, easy daily updates | Can get wiped by accident |
| Shared note or spreadsheet | Two-adult households, grocery planning | Requires remembering to open the phone |
| Magnetic inventory strips | Upright freezers with metal doors | Limited detail |
Pick the one you will still update on a busy Tuesday.
Batch-Cooking Day: Making Freezing Part of the Cook
Organization works best when it is built into the cooking, not tacked on afterward. A few small changes to how you run a batch-cook session make the freezer almost organize itself.
Cool food fast and safely
Hot food straight into the freezer raises the temperature around everything else and can partially thaw nearby items.
Safety firstGet hot food into the fridge within 2 hours (1 hour if the room is above 90°F). Bag it and freeze it flat only once it is fully chilled.
- Divide large pots into shallow containers so heat escapes quickly.
- Set containers in an ice bath in the sink for soups and sauces.
- Never stack warm containers tightly; leave room for air.
Prep your freezer landing zone
Before the cooking begins, clear a flat area in the freezer. A sheet pan on a shelf works, and so does the top of a chest freezer’s contents. Chilled bags of soup freeze flat there in an hour or two. Then move them into their bins.
With a spot ready, you are not scrambling when a dozen chilled bags need a home.
A simple batch-cook rhythm
My batch-cook sessions settle into a loose pattern like this:
- Plan the menu and check the tracker for what is already stocked.
- Shop for exactly what the plan needs.
- Cook two or three base recipes in large quantities.
- Cool, portion, and label as you go.
- Freeze flat, then file into bins.
- Update the tracker before cleaning up.
Notice that checking the tracker comes first. It is easy to batch cook whatever you feel like making and end up with eight pans of lasagna and no breakfast. The tracker is a planning tool, not just a record.
What Freezes Well (and What Does Not)
Knowing what works prevents sad, watery dinners. This list is general guidance, and your own testing and family tastes should settle the details.
Freezes beautifully
- Soups, stews, chili, and curries. Leave out dairy and add it when reheating.
- Meatballs, meatloaf, and burger patties
- Casseroles and baked pasta
- Enchiladas, burritos, and quesadilla fillings
- Cooked grains such as rice, quinoa, and barley
- Pancakes, waffles, muffins, and quick breads
- Shredded cooked chicken and pulled pork
- Cookie dough portions and unbaked scones
- Pesto, tomato sauce, and broth
Freezes with care
- Pasta (slightly undercook it, and it reheats best inside a sauce or casserole)
- Potatoes (fine in soups and mashed, grainy when frozen raw or boiled whole)
- Cooked eggs (scrambled and egg muffins work, hard-boiled whites turn rubbery)
- Dairy-heavy sauces (can separate, so whisk while reheating)
- Fresh herbs (freeze in oil in ice cube trays)
Usually skip
- Raw leafy greens and cucumbers, which go limp
- Mayonnaise-based salads
- Fried foods meant to stay crisp
- Soft cheeses with high water content
Rough storage times for best quality
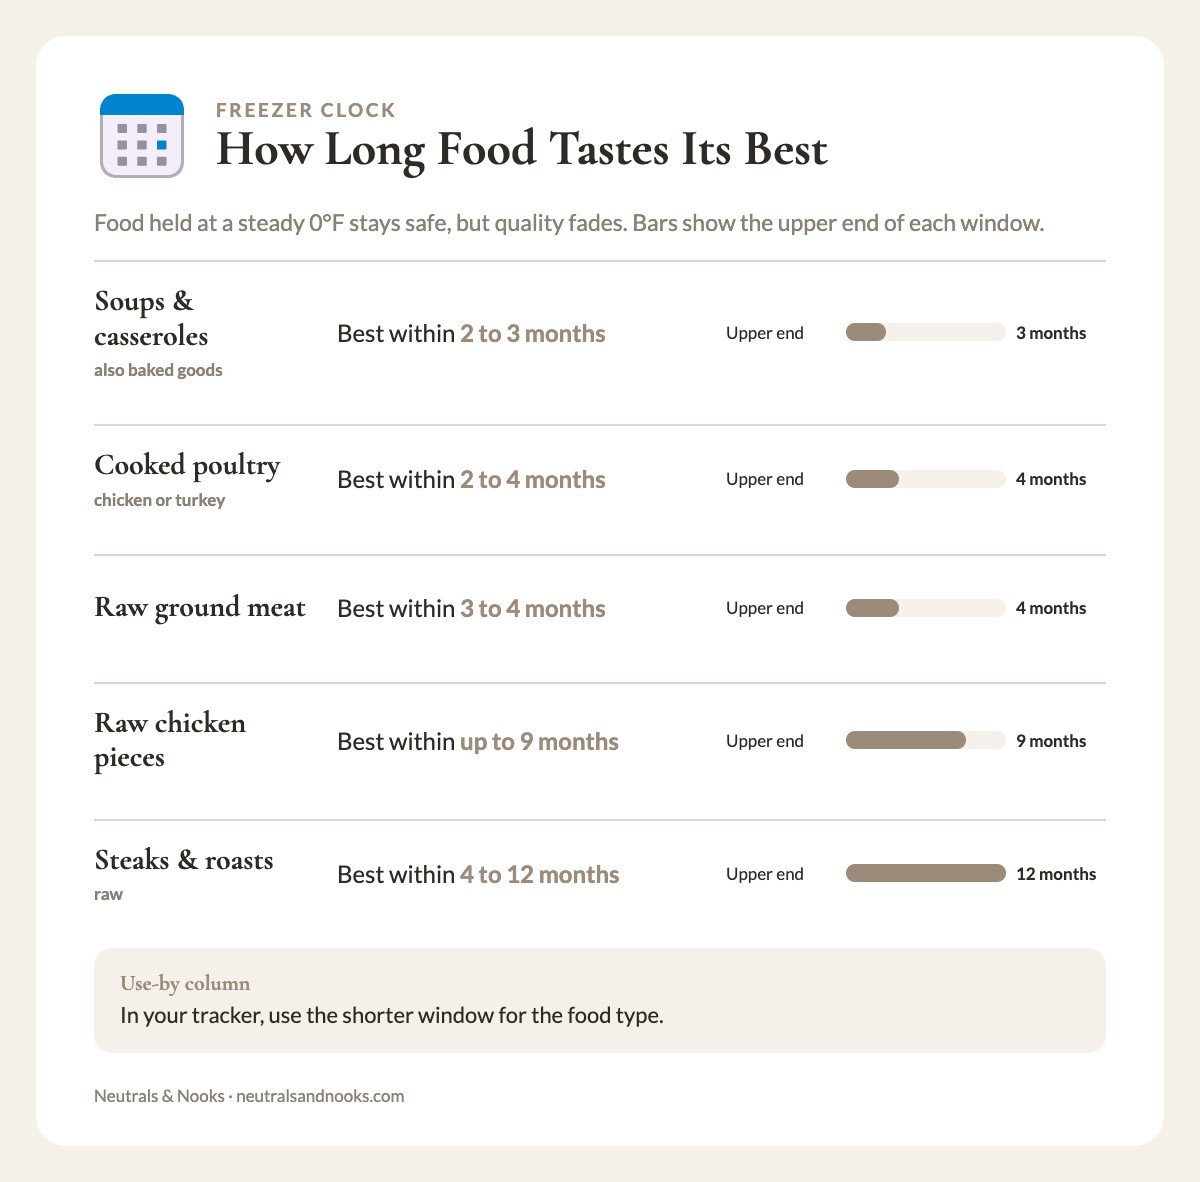
These are quality guidelines, not safety cut-offs. They are based on the USDA FoodKeeper guidance for food kept at a steady 0°F.
| Food | Best-quality window |
|---|---|
| Soups, stews, casseroles | 2 to 3 months |
| Cooked chicken or turkey | 2 to 4 months |
| Cooked ground meat dishes | 2 to 3 months |
| Raw ground meat | 3 to 4 months |
| Raw chicken pieces | Up to 9 months |
| Raw steaks and roasts | 4 to 12 months |
| Baked goods, muffins, waffles | 2 to 3 months |
| Breads | 2 to 3 months |
| Cooked grains | 2 to 3 months |
For the tracker’s use-by column, use the shorter window for the food type. Marinated raw meat does best within about 2 to 3 months.
Sources vary a little on these windows. For any food not listed, check the USDA FoodKeeper chart.
A Rotation System That Keeps Food From Aging Out
Rotation is how you make sure the old food gets eaten first. Restaurants call it FIFO, first in first out, and the same idea works at home with almost no effort.
The “newest to the back, oldest to the front” rule
In an upright freezer or a bin, place new items behind or beneath the old ones. When you pull dinner, you pull from the front. Nothing gets buried by default.
The “eat first” bin
Designate one bin or one corner as the “eat first” spot. Anything nearing its use-by date, any half-used bag, any odd portion goes there. Check this bin first when you plan the week’s menu. It is the single best defense against waste.
The monthly freezer-shop dinner
Once a month, build a week of dinners entirely from the freezer. Treat it like a challenge: no new grocery trip for mains, just fresh produce and sides to fill out the plates. This clears the oldest stock, tests the inventory against reality, and gives you a pleasant stretch where dinner is already done.
Quarterly reset
Four times a year, do a short version of the audit. Pull out the bins one at a time, check dates, wipe the shelves, and re-label anything faded. A quarterly reset takes about twenty minutes, and it is the reason your freezer will never again hide a spring lasagna until fall. If you like building small routines into the week, a short evening reset routine can include a quick freezer glance as one of its steps.
Safety Basics Every Batch Cooker Should Know
A well-organized freezer is a safer freezer, but a few rules deserve their own space.
Keep the temperature at 0°F (-18°C)
Put a freezer thermometer in the freezer and check it occasionally. Many freezers drift warmer than their dials suggest, especially if packed tightly or opened often. A steady 0°F or below keeps food safe and slows quality loss.
Thaw the right way
There are three safe ways to thaw food:
- In the refrigerator, the safest and most predictable method. Plan for about 24 hours per 4 to 5 pounds.
- In cold water, in a leakproof bag, changing the water every 30 minutes, for faster thawing.
- In the microwave, if you will cook the food immediately afterward.
Never thaw on the counter, because the outside warms into the danger zone while the center is still frozen. Here is how the three methods compare:
| Method | Time guide | Can you refreeze it raw? |
|---|---|---|
| Refrigerator (40°F or below) | About 24 hours per 4 to 5 pounds | Yes, if it stayed at 40°F or below. Use it within the normal fridge window for that food, such as 1 to 2 days for ground meat and poultry. |
| Cold water, changed every 30 minutes | Faster than the fridge | No. Cook it first. |
| Microwave | Minutes, then cook right away | No. Cook it first. |
Safety firstReheat cooked leftovers, including egg dishes, to 165°F. Cook raw poultry to 165°F. Check both with a food thermometer. Discard anything left out for over 2 hours (1 hour above 90°F) rather than refreezing it.
Prepare for a power outage
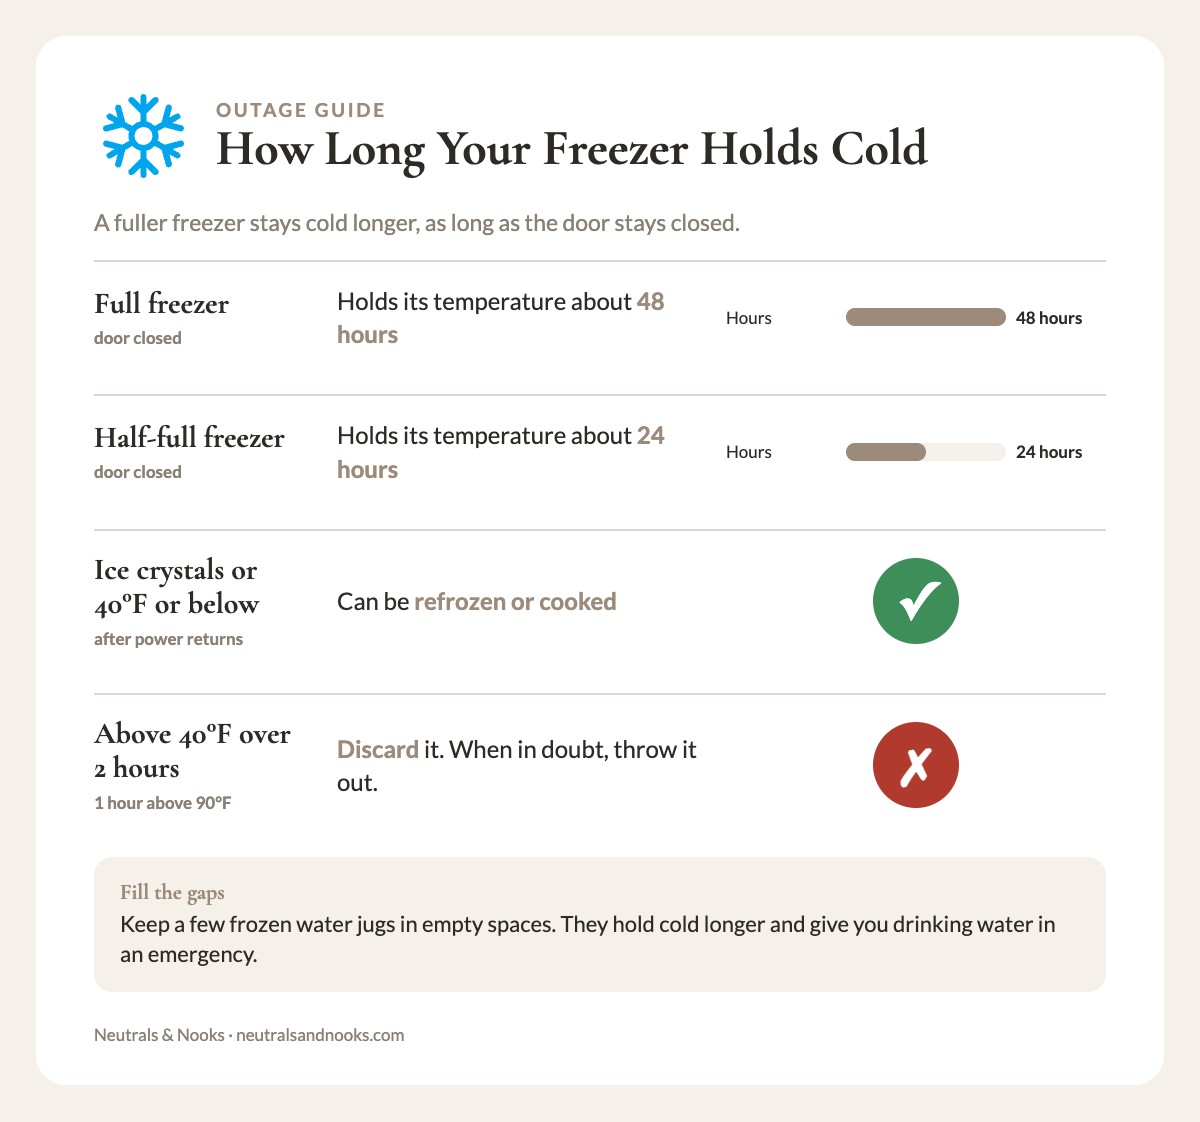
A full freezer holds its temperature for about 48 hours if the door stays closed. A half-full one holds for about 24 hours. This is one more reason to keep a freezer fairly full. A few steps help, especially with a chest freezer in the garage:
- Keep a few frozen water jugs in empty spaces. They fill gaps, hold cold longer, and give you drinking water in an emergency.
- Know where your nearest dry ice source is, in case of a longer outage. Read the safety note below before you handle it.
- Keep the thermometer inside so you can check without a guess.
Safety firstDry ice can burn bare skin, so use gloves or tongs. Never seal it in an airtight container. It gives off carbon dioxide, so use it only in a well-ventilated space. Never keep it in a closed car or small room. Keep it away from children and pets.
If the power does go out, work through these steps:
- Keep the door shut. Every opening lets the cold out.
- Check the thermometer. Read it without opening the lid if it is mounted outside.
- After power returns, inspect. Food that still contains ice crystals or measures 40°F or below can be refrozen or cooked.
- Discard what is unsafe. Discard anything above 40°F for more than 2 hours (1 hour above 90°F). When in doubt, throw it out.
Separate raw and cooked
Store raw meat, poultry, and fish in sealed containers on the bottom of the freezer or in their own bin, away from cooked and ready-to-eat items. This prevents drips and cross-contamination when thawing.
Making the Freezer Work for the Whole Family
A system only a single person understands is a fragile one. The goal of an organized freezer is that anyone in the household can use it.
Teach the zones
Walk older kids and your partner through the layout once. Show them the “this week” bin, point out the lid map, and demonstrate how to read a label.
Then agree on who reheats what. Younger kids can choose from the breakfast bin while an adult does the heating. Older kids can use the microwave once they are ready and you have supervised them a few times. Stoves, ovens, and hot pans stay with adults, or with teens you have supervised.
Safety firstLet reheated food stand a minute and check its temperature before serving little ones. Hot fillings in muffins and burritos can burn.
Make reheating instructions foolproof
If someone else will cook the dinner, the label becomes their instruction manual. Write clear temperatures and times, and note whether to thaw first. A sitter, a grandparent, or a tired partner will thank you.
Create a “no cooking tonight” shelf
Keep three or four of the easiest meals in an obvious spot at the top. A bag of meatballs with a jar of sauce works, and so does a pan of baked ziti. On a night when everything goes sideways, nobody needs to think. This single shelf can rescue a week. It pairs nicely with a calm kitchen setup. If you have small children underfoot, our guide to a toddler-friendly kitchen covers how to keep the room safe and workable at dinner time.
Share the load
Batch cooking can feel like a one-person job. If there are two adults, split it: one cooks, the other portions, labels, and files. Even older children can label bags with a marker and update the tracker. A freezer that belongs to the whole family is a freezer that stays organized.
Small-Space and Apartment Variations
Not everyone has a garage chest freezer. If you are working with the freezer on top of a fridge, a single drawer, or a compact upright, the same principles scale down.
For a fridge-top freezer
- Use thin, flat bags that stack, and rely on flat-freezing for everything.
- Cut zones down to three: dinners, components, and breakfast and treats.
- Keep the inventory on a small whiteboard magnet on the fridge door.
- Do a monthly audit, since small freezers fill and hide things fast.
For a freezer drawer
- Use shallow bins that fit the drawer’s width so each bin slides out like a tray.
- Stand flat bags upright like files in a divider-lined drawer.
- Keep the most-used items at the front and long-term items at the back.
For a freezer shared with ice-cream habits
Be honest about it. Give treats their own small bin, and the rest of the system will thank you. A defined space for popsicles keeps them from slipping into every other zone.
Troubleshooting Common Freezer Frustrations
Even a great system hits snags. Here are the usual ones, and how to fix them.
| Problem | Likely cause | Fix |
|---|---|---|
| Freezer burn on bags | Air in the bag or long storage | Press out air, double-bag, or vacuum seal; eat older items first |
| Labels falling off | Condensation or low-quality tape | Switch to painter’s tape, write on bag before filling |
| Everything frozen into one block | Bags frozen while stacked | Freeze flat on a sheet pan first, then stack |
| Bottom layer forgotten | No lifting system | Add bins with short fixed handles and the lid map |
| Overbuying meat on sale | No tracker check | Check the inventory before shopping |
| Ice crystals inside containers | Warm food frozen, or temperature swings | Cool food first, check the thermometer |
| Freezer too full to close well | Overpacking | Keep the door seal clear, and audit monthly |
| Family does not use the freezer | Cannot find or understand the food | Add the lid map and reheat notes |
Frequently Asked Questions
How should I organize a chest freezer so I can actually find things?
Divide it into zones with stackable bins or baskets, one per category, such as ready-to-heat dinners, soups, raw proteins, and breakfast items. Keep a “this week” bin at the top for the dinners you plan to eat soon, and tape a simple map inside the lid showing where each bin lives. Adding short, fixed handles to the bins lets you lift them from deep inside without digging.
What is the best way to label freezer meals?
Include four things on every package: the name of the dish, the date frozen, the number of servings, and a short reheating note. Painter’s tape and a freezer-safe marker hold up well in the cold. Writing on a bag while it is flat and empty is much easier than writing on it once it is filled. It also helps to add a “use by” date about two to three months out so the decision about what to eat first is already made.
How long can cooked batch-cooked meals stay in the freezer?
Food kept continuously at 0°F (-18°C) stays safe indefinitely, but quality declines with time. For best taste and texture, aim to eat soups, stews, and casseroles within about two to three months, and cooked poultry within two to four months. Dating every package and keeping an “eat first” bin makes this easy to manage without thinking about it.
Is it better to freeze meals in bags or containers?
Each has a place. Zip-top bags frozen flat are the most space-efficient choice for soups, sauces, and shredded meats, and they thaw quickly. Rigid containers or foil pans suit casseroles and lasagna that go straight into the oven. I use bags for most things and pans for a few oven-ready meals, and I portion each batch so I am not locked into one giant block.
How do I keep track of what is in my freezer?
Use a simple inventory tracker, which can be a table on paper, a whiteboard, or a shared note on your phone. List the item, where it lives, the number of portions, the date frozen, and a use-by date. Update it whenever food goes in or out, and do a quick five-minute check once a month to make sure the list matches reality.
Can I refreeze food after thawing it?
Food thawed in the refrigerator (at 40°F or below) can be refrozen without cooking, though quality may dip a little. Use it within the normal fridge window for that food first. Food thawed in cold water or the microwave should be cooked before it goes back into the freezer. If something was left out for more than two hours (one hour above 90°F), throw it away rather than refreeze it.
How often should I clean out and reorganize my freezer?
A quick monthly glance at the inventory and an “eat first” bin check keeps things under control, and a fuller reset every three months is plenty for most families. During the quarterly reset, check dates, wipe shelves, re-label anything faded, and defrost a chest freezer if frost has built up more than about a quarter inch.
Start With the Audit This Week
On the evening when the day has gone sideways, you can open a door, read a label, and have dinner on the table. Every bag you flatten, date, and file on a Sunday afternoon makes that evening easier.
You do not have to do it all at once. Start with the audit, name your zones, buy a roll of painter’s tape, and copy the tracker above into a note on your phone. Open the freezer a month from now, and let it feel like a pantry you trust.